QSR-1 GB Version 1
Before Use Please read IMPORTANT SAFETY INSTRUCTIONS on pages 20 - 23 before use. It is important to read and understand all instructions. For your future reference: Serial No. (found inside battery compartment) Date of purchase Name and address of dealer Included Accessories: AC Adapter (p. ?) Item Code: VCA Audio Patchcord (p. ?) Item Code: VPC Optional Accessories: (4) “C” Cell Batteries Item Code: CAL Copyright © 2001 by C. Crane Company, Inc., Fortuna, CA 95540 All rights reserved.
Table of Contents Location of Controls ---------------------------------------------------------- 4-5 Connection to Power ----------------------------------------------------------5-6 Battery Installation -------------------------------------------------------------- 6 Setting the Clock ----------------------------------------------------------------- 7 Cassette Tapes --------------------------------------------------------------------- 8 Inserting Cassette Tapes -------------------------------------------
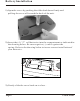
Location of Controls 24 23 6 7 8 9 6 1 2 3 21 20 18 19 4 12 10 11 22 17 14 15 16 13 1) 2) 3) 4) 5) 6) 7) 8) 9) 10) 11) 12) 13) Page 4 Control ldentification Day 1 4 ) Vo i c e A c t i v a t i o n S w i t c h Hour (See page 12) Minute 15) Record Built-In Microphone 16) Play R e c o r d o r S t a t u s L i g h t 1 7 ) Vo i c e A c t i v a t i o n S w i t c h Clearor or Recall time (ON/OFF) Clock 18) Rewind/Review Program 19) Fast Forward/Cue Timer ON/OFF 20) Stop/Eject Headphone Jack 21) Normal/Q
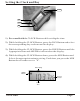
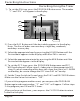
Location of Controls Control ldentification 1) LINE IN 2) Timer Activation Switch 3) LINE OUT 4) DC Power In To access the handle: Put fingers in the well undeneath the VersaCorder and pull gently. Connection to Power The VersaCorder will run on the included AC adapter . it will also run on (4) "C" size Alkaline or NiCad batteries. The batteries are necessary to keep the clock time and program memories if the power cord is removed from the recorder for more than 3 minutes.
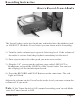
Battery lmstallation 1) Open the cover by pushing the ribbed tab down firmly and pulling the cover off toward the back of the unit. 2) lnsert the (4) "C" cell batteries into the compartment as indicated in the drawing below. Be sure negative (-) end is against the spring. Refer to the drawing below to insure correct installation of your batteries. + + + + 3) Gently slide the cover back on to close .
Setting the Clock and Day CLOCK DAY HOUR MIN 1) Press and hold the CLOCK Button while settihg the time. 2 ) W h i l e h o l d i n g t h e C L O C K B u t t o n , p r e s s t h e D AY B u t t o n a n d s e l e c t the corresponding day as shown on the display. 3) While holding the CLOCK Button, press the HOUR Button until the Appropriate hour and AM/PM is indicated on the display. 4) While holding the CLOCK Button down, press the MIN Button and Select the appropriate minute setting.
Cassette Tapes High quality 110-minute tapes are recommended for use in the VersaCorder.ln tests, these tapes provide a balance between maximum play/recording time and prolonged tape life. Audio cassette tapes are available up to 150 minutes ,however ,the tape material is thin and may stretch or break during recording or playback. With the extra long tapes, any cassette machine is more likely to "eat" the tape. Inserting Cassette Tapes 1) P ress the EJECT Button to open the lid.
Recording lnstructios How to Record From A Radio T h e Ve r s a C o r d e r c a n b e u s e d w i t h a n y r a d i o t h a t h a s a h e a d p h o n e j a c k o r L I N E O U T . W i t h t h e Ve r s a C o r d e r y o u c a n l i s t e n w h i l e r e c o r d i n g . 1) Turn the radio volume up to a gentle listening level.lf the volume of the radio is set too loud,the playback sound may be distorted. 2) Put a tape in and select the speed you want to record at .
R ec or d i n g l m s t r u c t i on s R ec or di n g U s i n g th e T i mer 1 ) T o s et t h e O N t i m e, pr es s the P R O G R A M B utton onc e. T he number " 1 " and " O N " w i l l appear i n the di s pl ay . DAY AM/PM Programmed Setting DAY HOUR MIN PROGRAM # Hour Minutes PROGRAM 2 ) P r es s the D A Y B utton unti l the des i r ed day appear s i n the di s pl ay . N ot e: T he V er s aC or der c an r ec or d any s i ngl e day , week ends , week day s or ev er y day .
Recording lnstructions Tips and Notes There are total of (6) recording times.Each one can be programmed with a separate ON/OFF Time and Day. To delete an event press the CLEAR/RECALL Button for each ON and OFF time to clear the times. Four dashes will appear to verify that the event is now inactive. The CLEAR/RECALL Button can be used to clear the event ON or OFF time or if you press it again the previous time programmed in that event will display.
Recording lnstructions Using Voice Activated Recording 1) 2) 3) 4) S e t t h e Ve r s a C o r d e r o n Q U A R T E R s p e e d f o r b e s t r e s u l t s . S w i t c h V O L C E A C T I VAT E D t o " O N " . P r e s s t h e " P L AY " a n d R E C O R D B u t t o n s a t t h e s a m e t i m e . Set SENSITIVITY so the recorder starts when someone is talking. SENSITIVITY VOICE ACTIVATION ON/OFF NORMAL OR QUARTER SPEED Sensitivity can be set on 1, 2, or 3.
R ec or d i n g l n s t r u c t i on s R ecor ding A Telephone C all Y ou c a n pur c ha s e a tel ephone pa tc hc or d a nd phone l i ne s pl i tter f r om y our C . C r a ne dea l er or C . C r a ne C ompa ny a t 8 0 0 - 5 2 2 - 8 8 6 3 ( c c r a ne. c om) . 1 ) C onnec t the dua l ti p end of y our pa tc hc or d to the pone B E E P a ne M I C i nput on the f r ont of the V er s a C or der . 2 ) C onnec t the phone l i ne s pl i tter to y our phone w a l l j a c k .
Remote Switch Operation Some radios have a special Remote Switch connection provided. This is f o r d i r e c t l y r e c o r d i n g f r o m a b u i l t i n t i m e r o n t h e r a d i o . T h e Ve r s a C o r d e r may be compatible with the remote switch supplied on these receivers. Please refer to the radio or device's manual for proper operation of this feature.
Playback lnstructions 1) Insert tape. The side you want to listen to should be facing up. Refer to page 8 for instructions. 2) Press REWIND until the tape stops. VOLUME PLAY REWIND 3) When tape is fully rewound, press the PLAY Button. lf you are checking your test recording,ensure the volume is at an adequate level and the audio does not distort. lf low or no audio is present, turn up volume or refer to trouble shooting section on pages 16-17. lf you are playing a pre-recorded cassette tape (i.
Tr o u b l e S h o o t i n g G u i d e Record speed is varying or FF and REW are slow: lf the recording is running on the batteries and they are low,you will notice that FF and REW will slow down. This is an indication that the b a t t e r i e s n e e d t o b e r e p l a c e d . l f p l u g g i n g i n t h e D C Wa l l A d a p t e r c u r e s the above symptoms ,battery replacement will be necessary.
Tr o u b l e S h o o t i h g G u i d e I have programmed the timer but it will not record. 1 ) C h e c k t o s e e t h a t t h e T I M E R s w i t c h i s o n , t h e R E C a n d P L AY buttons are pushed down,and the PROGRAM time is correctly set for AM or PM.See page 10 for Recording Instructions.
Trouble Shooting Notes Page 18 VersaCorder
Audio Sources LINE IN/OUT: LINE IN is a special connection that is compatible with any LINE OUT (or headphone jack), commonly found on portable CD players, AM/FM/shortwave receivers,computer audio output, etc. LINE LEVEL Refers to a low level audio that does not change when you increase the Volume of the receiver or other audio device. You can connect the LINE OUT of any device through the supplied audio cables into the VersaCorder's LINE IN and record the audio from that device.
Safety Instructions R E A D B E F O R E O P E R AT I N G E Q U I P M E N T S AV E T H E S E I N S T R U C T I O N S 1) Read and understand all safety and operating instructions before the VersaCorder is operated. 2) Retain Instructions: The safety and operating instructions should be retained for future reference. 3) H e e d Wa r n i n g s : A l l w a r n i n g s o n t h i s a p p l i a n c e a n d a l l o p e r a t i n g instructions should be followed.
Safety Instructions 10) If the recorder is stored for long periods of time, unplug it from the wall outlet and remove the batteries. This will prevent damage caused by lightning or power line surges and wil keep battery acid from leaking inside of the recorder. 11) N e v e r a t t e m p t t o s e r v i c e t h e Ve r s a C o r d e r y o u r s e l f . R e m o v i n g t h e cover may expose you to dangerous voltage levels and will void the warranty. Refer all servicing to authorized service personnel.
Safety Instructions READ THIS BEFORE I N S TA L L AT I O N Each device that you connect to the phone line draws power from t h e p h o n e l i n e . We r e f e r t o t h i s power draw as the device's ringer equivalence number, or REN. The REN is on the bottom of your teltphone cassette recorder. If you are using more than one device on the line, add up all the RENs. If the total is more than five, your phone might not ring and your telephone cassette recorder might not record.
Safety lnstructions Important: The law in some areas requires that all parties on the phone line be able to hear a beep indicating the conversation is being recorded. lf you connect the telephone cassette recorder to your phone using the supplied dual-prong cord and handset adapter, all parties on the phone line might not hear a beep during recording .We recommend you check the laws in your area.
Model: VERSACORDER FCC ID: THIS DEVICE COMPLIES WITH PART 15 OF THE FCC RULES. OPERATION IS SUBJECT TO THE FOLLOWING TWO CONDITIONS. 1) THIS DEVICE MAY NOT CAUSE HARMFUL INTERFERENCE, AND 2) THIS DEVICE MUST ACCEPT ANY INTERFERENCE RECEIVED, INCLUDING INTERFERENCE THAT MAY CAUSE UNDESIRED OPERATION. Notice: The changes or modifications not expressly approved by the party responsible for compliance could void the user’s authority to operate the equipment.