CC WiFi Internet Radio INSTRUCTION MANUAL PLEASE READ ALL THE INSTRUCTIONS COMPLETELY BEFORE USE AND SAVE THIS MANUAL FOR FUTURE REFERENCE v1.
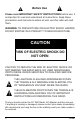
Before Use Please read IMPORTANT SAFETY INSTRUCTIONS before use. It is important to read and understand all instructions. Keep these precautions and instructions where all who use this radio will read them. WARNING: TO PREVENT FIRE OR ELECTRIC SHOCK HAZARD, DO NOT EXPOSE THIS PRODUCT TO RAIN OR MOISTURE. CAUTION CAUTION RISK OF ELECTRIC SHOCK DO NOT OPEN CAUTION: TO REDUCE THE RISK OF ELECTRIC SHOCK, DO NOT REMOVE THE RADIO BACK. NO USER SERVICEABLE PARTS INSIDE.
Table of Contents Unpacking ................................................................................ 2 Unpacking ............................................................................................................. 2 ..... Location of Controls ........................................................... 4-5 Location of Controls ............................................................................................ 4-5 Getting Started Turning the Radio On ...............................
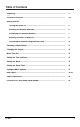
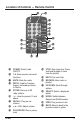
Location of Controls — Front and Back of Radio Location of Controls — Front and Back of Radio QQ WW EE RR P P OI U Y T OI U Y T Q LCD Display Q WLCD Display PLAY/PAUSE/STOP or PRESET #1 W PLAY/PAUSE/STOP or #1 or PRESET #2 EPRESET PREVIOUS NEXT or PRESET #3 #2 E RPREVIOUS or PRESET T Remote Sensor R NEXT or PRESET #3 T Remote Sensor Y Y U U I I O P O P Speaker w { DC Power Jack } Line Out Jack { Page DC4 Power Jack } Line Out Jack 4 DIAL/VOLUME/SELECT DIAL/VOLUME/SELECT REPLY REPLY BACK BACK ON/
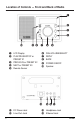
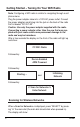
Location — Remote RemoteControl Control LocationofofControls Controls — e e rr tt yy uu i i o o p p [ [] A ] S A J J H H G G S F D F29-30Dare used only in Media Player Buttons 23-26 and mode while playing tracks from your computer. Buttons 23-26 and 29-30 are used only in Media Player mode while computer. e POWER: Switchplaying radio tracks from ] your STOP: Stop track play.
GettingStarted Started–– Turning Turning On Getting On Your YourWiFi WiFiRadio Radio Note: Configuring a WiFi radio is similar to navigating through a cell Note: Configuring a WiFi radio is similar to navigating through a cell phone menu. phone menu. Plug the power adapter cube into a 120V AC power outlet. Connect Plug power adapter cube 120V thethe power adapters small pluginto intoathe jackAC on power the backoutlet.
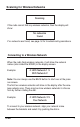
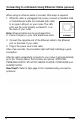
Scanning Networks Scanning for for Wireless Wireless Networks Scanning Scanning IfIfthe wireless networks, networks,then thenthe thedisplay displaywillwill theradio radiocannot cannot find find any wireless show: show: No No networks networks found found nonetworks networks are are found, found, see see page 33 IfIfno page19 33for fortroubleshooting troubleshootingassistance. assistance.
Connectingto toaa Wireless Wireless Network Connecting Network If the display If the display shows: shows: Connecting to Connecting to Network Network then continue then continue on to page 12. on to page 12. However, if the screen displays: However, if the screen displays: Enter WEP Key Enter WEP Key or or Enter WPA Key Enter WPA Key you must enter the correct WEP or WPA wireless encryption key Password) to proceed.
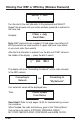
Entering Key(Wireless (WirelessPassword) Password) EnteringYour YourWEP WEP or or WPA WPA Key ABCDE FF GHIJ ABCDE GHIJ FF __ Turn the dial to the next character in the password and SELECT. Turn the dial to the next character in the password and SELECT. Repeat this process until your entire wireless password is entered on Repeat this line. process until your entire wireless password is entered on the lower the lower line.
Connecting Ethernet Cable Cable (optional) (optional) Connecting to to aa Network Network Using Using Ethernet When little setup setup is is required. required. When using using an an ethernet ethernet cable cable to to connect, connect, little 1. power, connect connect aa standard standard Cat5 Cat5 1.
Choosing Radio Station Station Choosing aa Radio 1. From the Menu, choose“Stations” “My Stuff”byby turning the dial 1. thePrimary Primary Menu, Menu,choose choose turning the until 1. From From the Primary “Stations” by turning the dialdial until brackets are positioned on both sides. Press the dial tountil select. brackets are positioned positionedon onboth bothsides. sides.Press Pressthethe dial select. brackets are dial to to select.
Changing the Changing theVolume Volume You can change the volume by turning the dial clockwise to increase You can change the volume by turning the dial clockwise to increase the volume and counterclockwise to decrease the volume. The display the volume and counterclockwise to decrease the volume. The display shows the volume bar. You cannot change the volume when you are shows the volume bar. using You cannot change the After volume whenisyou are in a menu, except when the remote control.
MenuTime-Out Time-Out Menu Whena aradio radiostation station is is playing playing — SELECT is pressed, the the When —ififBACK BACKoror SELECT is pressed, radio will go into menu selection mode. If no radio controls are used radio will go into menu selection mode. If no radio controls are used within ten seconds, the radio will “time-out” and go back to the curwithin ten seconds, the radio will “time-out” and go back to the currently playing radio station. rently playing radio station.
Settingthe the Time Time and Setting andDate Date Set SetTime Time 12:00 AM 12:00 AM 7. Turn the dial until the day of the month is correct — press the dial 7. Turn the dial untilthe thesame day method of the month is correct — press the dial to select. Follow for setting the month and year. to select. Follow the same method for setting the month and year. Set Date 01 Set Jan Date 2008 01 Jan 2008 8. When finished, the radio will show “Time and Date Set”. 8.
Settingthe theAlarm Alarm Setting 4. Turn the dial and choose one of the five alarm slots to set — press 4. Turn the dial and choose one of the five alarm slots to set — press the dial to select. the dial to select. Disable All < Disable 1 OFF All > < 1 OFF > 5. Turn the dial until the hour setting is correct — press the dial to select. 5. Turn the dial until the hour setting is correct — press the dial to 6.select. Turn the dial until the minute setting is correct — press the dial to select. 6.
Settingthe theSleep Sleep Timer Timer Setting Withthe thesleep sleeptimer timer enabled, enabled, the willwill automatically With theinternet internetradio radio automatically switch itself off after a set amount of time. switch itself off after a set amount of time. Note: At any point, you can use the BACK button to start over at the Note: At any point, you can use the BACK button to start over at the previous screen. previous screen. 1.
Configure Menu Menu Options Configure Options To access the “Configure” menu follow these steps: To access the “Configure” menu follow these steps: 1. Briefly press the dial once to access the Primary Menu. You can 1. Briefly press the thePrimary dial once to access the Primary Menu. can also access Menu by pressing and holding theYou BACK also access the Primary Menu by pressing and holding the BACK button. button.
This option puts all settings back to their default, as they were when the radio left the factory. If you perform a factory reset on your radio, you will lose all your presets, clock settings, and wireless network Configure Menu Options connection settings. To access the “Configure” menu follow these steps: option will display key that be used registerMenu. the radio 1.This Briefly press the diala once to can access the to Primary Youoncan RadioMv Stream Network.
HelpPages Pages— —Wireless Wireless Network Help NetworkHelp Help “No NetworksFound” Found” shows shows after wireless net-net“No Networks afterscanning scanningforfor wireless works: works: 1. Sometimes your wireless network will not show on the first scan. 1. Sometimes your wireless network will not show on the first scan. Try scanning for networks again on your radio. Try scanning for networks again on your radio. 2. Check the LED lights on the front of your wireless router. Be sure 2.
Help Pages — Wireless Network Help Help Pages — Wireless Network Help printed on the bottom of the router. “No Networks Found” shows after scanning for wireless net3. If all else fails, try calling the manufacturer of your wireless router works: for assistance with locating the routers wireless encryption key. 1. Sometimes your wireless network will not show on the first scan. Try scanning for networks again on your radio. 2. Check the LED lights on the front of your wireless router.
Help Pages — Error Message Troubleshooting Help Pages — Error Message Troubleshooting Timeout Getting IP Address: Timeout GettingWEP IP Address: 1. An incorrect or WPA key may have been entered into the radio. This is the most common reason forbeen this error. Check 1. An incorrect WEP or WPA key may have entered intoyour the routerThis to make your wirelessreason encryption keyerror. is correct or your see radio.
Help Pages — Error Message Troubleshooting Help Pages — Error Message Troubleshooting 2. UPNP may be disabled on your router. UPNP must be enabled for Timeout Getting IP correctly. Address:Consult your routerʼs user manual for the radio to work enabling UPNP or contact of theentered router forinto more 1. An incorrect WEP or WPAthe keymanufacturer may have been the assistance. radio. This is the most common reason for this error. Check your 3.
Help Pages Pages — Error Ethernet Network Help Help Message Troubleshooting The LEDGetting Connection Light Does Not Flash When Cable is Timeout IP Address: Inserted into Radio: 1. An incorrect WEP or WPA key may have been entered into the 1. radio. Be sure that is connected to both the error. radio and theyour This is the the power most common reason for this Check router.to make sure your wireless encryption key is correct or see router 2. page Your Ethernet damaged incompatible.
Safety Instructions " READ BEFORE OPERATING EQUIPMENT SAVE THESE INSTRUCTIONS ! To prevent damage to your radio or possible injury to you or others, read these safety precautions and instructions entirely before applying power to your radio. Keep these precautions and instructions where all who use this radio will read them. 1) COMMON CARE ! Check the radio, AC adapter and any accessories regularly. Do not use the radio if there is any sign of damage.
Location of Your CC WiFi Radio Serial Number Location of Your CC WiFi Radio Serial Number From the “Primary Menu” of the CC WiFi Radio, follow this path to find your serial number: CONFIGURE > VERSION > SERIAL NUMBER. From the “Primary Menu” of the CC WiFi Radio, follow this path to find your serial number: CONFIGURE > VERSION > SERIAL Record your serial number here for future reference: NUMBER.