
Instruction manual


Page 4 AE Wi-Fi Internet Radio Quick Start Guide
Getting Started
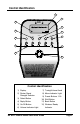
Please refer to the Control Identification Diagram on page 3.
1) Assemble the AC Adapter with the proper plug required by your wall
outlet. The plug piece slides down into the top of the adapter and
should click into place. Slide the lock switch to the LOCK position to
keep the plug from disconnecting.
2) Plug the AC Adapter into the DC jack on the back of the radio.
3) The screen will display Reciva Radio ARM Powered.
4) The screen will then display <Select Network>. Next, press the
Select Button, and the screen will display <Scan>. Press the Select
Button again.
5) The screen will display Scanning and a progress bar. If there are
any wireless networks broadcasting in your area, they will be
displayed. Turn the Tuning Knob to display the networks that were
found. To select a network, press the Select Button.
Example: <network_1>, <network_2> and <network_3> are
found. You have decided to use <network_3>.
Turn the Tuning Knob until <network_3> is displayed. Press the
Select Button to choose <network_3>.
6) If a password is required, the screen will display <Encryption Key
Required>. Enter your wireless network encryption password to
access your network. If no password is required, the screen will
display <Connecting to Network> and then the screen will display
<Stations>.
Note: If the name of your network is not being broadcast for security
reasons and it does not show up after scanning, or you are
unable to connect, skip to Advanced Network Security Setup on
page 7.
Note: Passwords must be entered as case specific. (If you originally
entered the password into your router in lower case letters, you
must enter the password into the radio using lower case letters
also. The same method applies if you used capital letters or a
combination.)