
Manual

10
Horizontal Mini-Gel Instructions 9-12-13
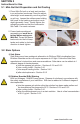
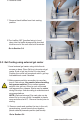
3.4 Running the Gel
1. Addenoughrunningbuffertollboth
reservoirsandoverowthesurfaceofthe
geltoadepthof2-3mm.Flushoutanyair
bubblesinthewells.Stains may be added
during this step. Use according to manufac-
turer’s recommendations.
2.Loadthesamplesintosamplewells.Donot
forgettoloadDNAsizestandardladders.
Forbestvisibilityloadsamplesoncontrast-
ingbackgroundcolorsuchasredorblack.
Safe stains may be added during this step.
Use according to manufacturer’s recom-
mendations.
3.Placethesafetycoverontheunit.Connect
powerleadstopowersupply,matchingthe
color-codedredtoredandblacktoblack.
See Section 4.1 for recommended power
conditions.Beginseparationbyelectro-
phoresis.
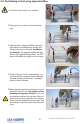
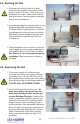
3.5 Removing the Gel
1. Turnpowersupplyoffanddisconnect
theleadsfromthepowersupply.Remove
thesafetycoverfromtheMini-Gelunitby
placingthumbsonwhitepostsandpushing
downwhilepullingupwithngersunderlid.
DO NOT PULL ON POWER CORDS!
2.Gentlyliftthegeltrayfromtheunit.Al-
ways wear gloves, eye protection and
protective clothing if buffer and /or gel
contain Ethidium Bromide.EthidiumBro-
mideisapowerfulmutatgen;gloves,eye
protectionandprotectiveclothingshould
alwaysbewornwhenhandlingthegelor
buffersolutions.Viewseparatedfragments
underUVlight,usingproperprotectionfor
eyesandskin(seemanufacturer’sinstruc-
tions).Alternatively, Safe Stains may be
used and viewed using blue light or UV
excitation.