INSTRUCTION MANUAL Dedicated Height Nucleic Acid Sequencing Systems Single Unit DH-400-20 DH-500-20 DH-600-20 DH-400-33 DH-500-33 DH-600-33 Dual Unit DDH-400-20 DDH-500-20 DDH-600-20 DDH-400-33 DDH-500-33 DDH-600-33
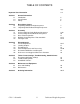
TABLE OF CONTENTS Page Important User Information 3-4 Section 1 1.1 1.2 1.3 General Information Introduction Specifications Safety 5 5 6 Section 2 2.1 2.2 Description of parts Unpacking-Dedicated Height Sequencer Unpacking-Dual Dedicated Height Sequencer 7 8 Section 3 3.1 3.2 3.3 3.4 3.
ENGLISH IMPORTANT USER INFORMATION This Instruction Manual will explain how to use this product safely and effectively. Please read and carefully follow the instruction manual in its entirety. The triangle/exclamation mark symbol alerts the user of the product to important operational, maintenance, and/or warranty requirements. The triangle/lighting bolt symbol alerts the user of the product to potentially hazardous electrical exposure.
FRANÇAIS INFORMATION IMPORTANTE À L'USAGE DES UTILISATEURS ESPAÑOL Le présent manuel d'utilisation explique la manière de se servir efficacement du produit en conditions de sécurité. Il est recommandé de soigneusement lire la totalité du manuel, avec ses consignes et ses instructions. El presente instructivo explica la manera de usar este producto en forma segura y efectiva. Sírvase leerlo en su totalidad y seguir detenidamente las indicaciones que contiene.
General Information 1.1 Introduction The C.B.S. Scientific Dedicated Height Nucleic Acid Sequencers feature safety covers with attached power leads, removable upper and lower reservoirs, epoxy-coated anodized aluminum heat dispersion plates, buffer drainage ports and a clear acrylic bar clamp. The Dual Dedicated Height Nucleic Acid Sequencers include the same features, with the convenience of divided upper reservoirs, if independent runs are required.
1.3 Safety Power to the Sequencing unit must be supplied by an external DC voltage power supply that must be ground isolated so that the DC voltage output floats with respect to ground. Current to the unit, provided from the external power supply, must enter the unit through the lid assembly, providing a safety interlock to the user. Current to the unit is broken when the lid is removed.
Section 2 Description of Parts 2.1 Unpacking- Dedicated Height Sequencer Please verify that your sequencing unit comes complete with the following components: • Buffer reservoirs, upper & lower with safety covers with attached power leads • Drain plugs installed in upper reservoir • 4 white spring clamps (Cat.
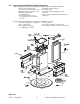
2.2 Unpacking- Dual Dedicated Height Sequencer Please verify that your sequencing unit comes complete with the following components: • Buffer reservoirs, divided upper & lower with safety covers/power leads • Drain plugs installed in upper reservoir • Eight white spring clamps (Cat.
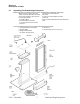
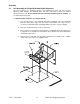
Assembly 3.1 Unit Assembly for Single Dedicated Height Sequencer Place the Sequencer in a laboratory workspace for authorized personnel only. For protection against possible damage, the aluminum plate and upper and lower reservoirs are shipped detached from the unit. Do not attach reservoirs until after aluminum plate is installed. To assemble follow steps below: A. Aluminum plate installation (see diagram below). 1. The top-front portion of the aluminum plate will be identified.
3.1 Unit Assembly for Single Dedicated Height Sequencer-continued B. Installation of reservoirs. 1. Attach lower reservoir (with red power lead) by loosening black thumb screws on base of unit and sliding receptacle slots on reservoir around screw stem. Hand tighten. 2. Install upper reservoir (with black lead) by detaching upper black thumb-screws and positioning oval slot on upper reservoir so that they line up with screw holes on the base. White O-ring should be facing forward.
3.3 Glass Plate Preparation 1. Select a pair of glass plates (if using a notched set, one notched and one unnotched back plate) for the appropriate gel height. Be sure the edges of the plates are nick or chip free. 2. It is vital that these plates are absolutely CLEAN ! Wearing gloves (and rinsing off any residual powder), clean the glass plates thoroughly with a non abrasive detergent and a plastic scouring pad. The cleaning solution should not leave a soap residue when rinsed thoroughly. 3.
3.4 Methods for sealing glass plate sandwich (A) Gel Slider™, ( B) Capillary Gel Casting or (C) Yellow tape (A) C.B.S. Scientific's Gel Slider™, Sequencing Gel Caster. This adjustable width unit simplifies the pouring of problem-free sequencing gels for the novice or experienced sequencer. Unit sold separately, see instructions for Gel Slider™ and skip section 3.5. (B) Capillary Gel Casting.
3.4 Methods for sealing glass plate sandwich - continued (A) Gel Slider™, ( B) Capillary Gel Casting or (C) Gel Sealing Tape (C) Gel Sealing Tape. Seal the sides and bottom of the assembled glass plate sandwich with gel sealing tape, as shown. Tape the sides first and then the bottom. Extend the tape around the bottom corners in both directions to ensure an adequate seal. Apply the tape as smoothly as possible to avoid forming air channels or bubbles along the edges of the glass plates.
3.5 Pouring the Gel 1. Always wear gloves, eye protection and protective clothing. 2. Prepare acrylamide gel solution using freshly made stock solutions or commercially available pre-mix solutions. See section 4.5 Buffers. Most gel formulations allow approximately 10 minutes before polymerization, so proceed quickly. Spacer thickness (mm) 0.2 0.4 0.5 0.75-1.0 Minimum volume required (ml) 50 65 90 120-180 3. Mix by gently swirling, using a magnetic spin bar on a stirring plate. Do not mix vigorously.
6. Before the acrylamide polymerizes, insert a comb into the top of the gel. The available types of combs are: rectangular tooth combs, a casting comb the same thickness as a sharktooth comb or the back side of a sharktooth comb as a casting comb. If you are using a rectangular tooth comb, insert to edge of backing. If you are using a separate, one well casting comb with a sharktooth comb, insert casting comb to edge of backing.
Section 4 Electrophoresis 4.1 Pre-electrophoresis 1. Remove the gel sealing tape from the bottom of the gel sandwich, if tape was used. Rest the bottom edge of the sandwich on the footing in the lower reservoir, notched plate inward. Using mounting clamps (cat. # GPC-0001) attach the lower section of the glass plate assembly to the upright of the sequencer. Do not clamp glass plate assembly to the upper reservoir until the sharktooth comb is inserted. 2.
4. Verify that the upper buffer reservoir drain is secure. For the single 20cm wide sequencer, fill the upper buffer reservoir with approximately 350ml of electrophoresis buffer. Make sure no buffer is leaking from the upper buffer reservoir. Fill the lower reservoir with approximately 350ml of electrophoresis buffer. For the dual 20cm wide sequencer, fill the upper reservoir 375ml and the lower with 350ml.
4.3 Electrophoresis 1. After loading the samples, close the reservoir safety cover. Connect the DC power leads to the unit then to the power supply with the proper polarity. Make sure the black leads are connected to the black cathodes (-) and the red leads are connected to the red anode (+). 2. Turn on the power supply and set the voltage or wattage to the proper setting for the gel. Be sure to follow manufacturer's instructions. (See Table 5.1 for recommended DC power settings).
4.4 Post-Electrophoresis – Gel Processing A. Removal of sequencing plate from gel unit. 1. Ensure power supply is OFF disconnect power cords from reservoirs. 2. Reduce buffer level in upper reservoir below level of notch (or drain entirely). If buffer is not reused, drain buffer from lower reservoir. Be careful with lower reservoir buffer, it will be radioactive if you have used 32P, 33P or 35S. Dispose of buffer according to your institutions radioactive safety policies.
B. Transfer of gel onto blotting paper-continued 2. Place a sheet of pre-cut (slightly larger than gel) blot/chromatography paper to fit on top of the gel and press down firmly and evenly over the entire gel surface. The gel will come off the glass and stick to the paper as you lift the paper/gel sandwich slowly and carefully away from the glass plate. NOTE: At this step, if you were using 35S you could follow the alternative fixing procedure given if greater band resolution is desired. 3.
4.5 Recommended Buffers and Reagents Pre-mixed acrylamide stock solutions are the method of choice. Use according to manufacturer’s instructions. EDTA solution (0.5 M EDTA, pH 8.0, 100ml) Na2EDTA•2H2O (FW 372.2) Deionized H2O Dissolve 10M NaOH. Adjust to pH 8.0. Deionized H2O Store at room temperature 0.5M 18.6g 70.0ml ∼5.0ml to 100.0ml Tris-borate-EDTA buffer, 5X (5X TBE, pH ∼8.3, 1 liter) Tris (FW 121.1) 0.45M 54.5g Boric acid (FW 61.83) 0.45M 27.8g EDTA solution (0.5 M, pH 8.0) 0.001M 20.0ml to 100.
4.6 References and Suggested Reference Literature DNA SEQUENCING PROTOCOLS in Methods in Molecular Biology, Volume 23, ed. by H.G. & A.M. Griffin, Humana Press, N.J., 1993 MOLECULAR CLONING A Laboratory Manual, 2nd edition, ed. by J. Sambrook, E.F. Fritsch and T. Maniatis, Cold Spring Harbor Laboratory Press, 1989. CURRENT PROTOCOLS IN MOLECULAR BIOLOGY ed. by F.M. Ausubel, R. Brent, R.E. Kingston, D.D. Moore, J.G. Seidman, J.A. Smith and K.
Section 5 Tables: Power Settings, Troubleshooting Guide, Comb Volumes 5.1 Recommended Power Settings For 20cm wide unit Gel Height Gel thickness Recommended wattage Recommended voltage 42 52 62 82 102 42 52 62 82 102 42 52 62 82 102 0.2mm 0.2mm 0.2mm 0.2mm 0.2mm 0.4mm 0.4mm 0.4mm 0.4mm 0.4mm 0.5mm 0.5mm 0.5mm 0.5mm 0.
5.
5.3 Comb/Well Volumes Sequencing Combs for 20cm wide units Note: To calculate sample well volume expressed in millimeters (mm) divide maximum volume by tooth depth. -Volume per tooth (microliters-μl) # of wells Tooth 0.2mm thickness 0.4mm thickness 0.5mm thickness width/mm 8 17.7mm 33.6μl 67μl 84μl 12 11mm 21μl 41μl 52μl 14 9mm 17.3μl 34μl 43μl 16 7.6mm 14.4μl 28μl 36μl 17* 6.6mm 12.5μl 25μl 31.3μl 20 5.6mm 10.6μl 21μl 26.5μl 28 4mm 7.8μl 15μl 19.5μl 32 3.4mm 6.4μl 12μl 16.5μl 35* 2.92mm 5.5μl 11.12μl 13.
46 well=5.92mm 62 well=4.50mm 68 well=4.02mm 94 well=3.00mm 5.3 Comb/Well Maximum Loading Volumes-continued SharktoothCombs for 20cm wide units Note: To calculate sample well volume expressed in millimeters (mm) divide maximum volume by tooth depth. -Volume per tooth (microliters-μl) # of wells Tooth 0.2mm thickness 0.4mm thickness 0.5mm thickness width/mm 1 158.7mm 317.4μl 634.8μl 793.5μl 24 5.92mm 4.5μl 9.0μl 11.3μl 34* 4.5mm 3.3μl 6.6μl 8.4μl 38 4.02mm 2.8μl 5.6μl 7.0μl 52* 3.0mm 2.0μl 4.0μl 5.
5.3 Comb/Well Maximum Loading Volumes-continued Preparative Combs for 20cm wide units Note: To calculate sample well volume expressed in millimeters (mm) divide maximum volume by tooth depth. -Volume per tooth (microliters-μl) # of wells Tooth 0.75mm 1.0mm 1.5mm 2.0mm 3.0mm width thickness thickness thickness thickness thickness 1 158mm 1125μl 1501μl 2251μl 3002μl 4503μl 2 77.5mm 552μl 736μl 1104μl 1472μl 2208μl 3 50mm 356μl 475μl 712μl 950μl 1425μl 4 37.9mm 270μl 360μl 540μl 720μl 1080μl 8 17.
Section 6 Maintenance of Equipment 6.1 Care and Handling The components of the Sequencer are fabricated from FR ABS, acrylic, Delrin®, Polycarbonate, glass and anodized aluminum. As with any laboratory instrument, adequate care ensures consistent and reliable performance. After each use, rinse buffer reservoirs, combs, spacers, clamps and glass plates with de-ionized water. Wipe dry with a soft cloth or paper towel, or allow to air dry.
Section 7 Equipment and Accessories Dedicated Height Sequencers Cat.# Item Single units: DU-400-20 DH-400-20 DU-500-20 DH-500-20 DU-600-20 DH-600-20 DU-400-33 DH-400-33 DU-500-33 DH-500-33 DU-600-33 DH-600-33 Nucleic Acid Sequencer, 20cm width, 42cm capability. Unit only. Nucleic Acid Sequencing kit, 20cm width, 42cm capability. Nucleic Acid Sequencer, 20cm width, 52cm capability. Unit only. Nucleic Acid Sequencing kit, 20cm width, 52cm capability. Nucleic Acid Sequencer, 20cm width, 62cm capability.
SEQUENCING ACCESSORIES RECTANGULAR COMBS (POLYCARBONATE) 20CM WIDE UNITS 33CM WIDE UNITS Cat.# Cat.# Comb Dimensions SG33-0208 SG33-0216 SG33-0224 SG33-0231* SG33-0234 SG33-0250 SG33-0260 SG33-0263* 0.2mm x 8 well 0.2mm x 16 well 0.2mm x 24 well 0.2mm x 31 well 0.2mm x 34 well 0.2mm x 50 well 0.2mm x 60 well 0.2mm x 63 well SG33-0408 SG33-0416 SG33-0424 SG33-0431* SG33-0434 SG33-0450 SG33-0460 SG33-0463* 0.4mm x 8 well 0.4mm x 16 well 0.4mm x 24 well 0.4mm x 31 well 0.4mm x 34 well 0.
PREPARATIVE RECTANGULAR COMBS (TEFLON) 20CM WIDE UNITS Cat.# Comb Dimensions Cat.# SG20-0701 SG20-0702 SG20-0703 SG20-0704 SG20-0708 SG20-0712 SG20-0714 SG20-0716 SG20-0717* SG20-0720 SG20-0728 SG20-0732 SG20-0735* SG20-1001 SG20-1002 SG20-1003 SG20-1004 SG20-1008 SG20-1012 SG20-1014 SG20-1016 SG20-1017* SG20-1020 SG20-1028 SG20-1032 SG20-1035* SG20-1501 SG20-1502 SG20-1503 SG20-1504 SG20-1508 SG20-1512 SG20-1514 0.75mm x 1 well 0.75mm x 2 well 0.75mm x 3 well 0.75mm x 4 well 0.75mm x 8 well 0.
LOW FLUORESCENCE GLASS PLATE SETS 20CM WIDE UNITS 33CM WIDE UNITS Cat.# Plate Dimensions (w x h) Cat.# Plate Dimensions (w x h) LFP20-020 LFP20-030 LFP20-040A LFP20-050 LFP20-060 LFP20-080A LFP20-100 20cm x 22cm 20cm x 32cm 20cm x 42cm 20cm x 52cm 20cm x 62cm 20cm x 82cm 20cm x 102cm LFP33-020 LFP33-030 LFP33-040A LFP33-050 LFP33-060 LFP33-080A LFP33-100 33cm x 22cm 33cm x 32cm 33cm x 42cm 33cm x 52cm 33cm x 62cm 33cm x 82cm 33cm x 102cm GLASS PLATE SETS 20CM WIDE UNITS 33CM WIDE UNITS Cat.
MICROTROUGH CASTING COMBS 20CM WIDE UNITS Cat.# Thickness x # troughs MCC20-0224 MCC20-0234* MCC20-0238 MCC20-0252* MCC20-0270* MCC20-0424 MCC20-0434* MCC20-0438 MCC20-0452* MCC20-0470* MCC20-0524 MCC20-0534* MCC20-0538 MCC20-0552* MCC20-0570* 0.2mm x 24 troughs 0.2mm x 34 troughs 0.2mm x 38 troughs 0.2mm x 52 troughs 0.2mm x 70 troughs 0.4mm x 24 troughs 0.4mm x 34 troughs 0.4mm x 38 troughs 0.4mm x 52 troughs 0.4mm x 70 troughs 0.5mm x 24 troughs 0.5mm x 34 troughs 0.5mm x 38 troughs 0.
MYLARSPACER PAIRS FOR 20CM & 33CM WIDE UNITS Cat.# Spacer Dimensions Cat.# Spacer Dimensions MKS-2020 MKS-2030 MKS-2040 MKS-2050 MKS-2060 MKS-2080 MKS-2100 MKS-3020 MKS-3030 MKS-3040 0.2mm x 22cm 0.2mm x 32cm 0.2mm x 42cm 0.2mm x 52cm 0.2mm x 62cm 0.2mm x 82cm 0.2mm x 102cm 0.3mm x 22cm 0.3mm x 32cm 0.3mm x 42cm MKS-3050 MKS-3060 MKS-3080 MKS-3100 MKS-4020 MKS-4030 MKS-4040 MKS-4050 MKS-4060 MKS-4080 MKS-4100 0.3mm x 52cm 0.3mm x 62cm 0.3mm x 82cm 0.3mm x 102cm 0.4mm x 22cm 0.4mm x 32cm 0.
WEDGE SPACER SETS FOR 20CM AND 33CM WIDE UNITS EXPONENTIAL 1:3 RATIO EXPONENTIAL 1:5 RATIO Top thickness 0.2mm Bottom thickness 0.6mm Cat.# Spacer Dimensions Top thickness 0.2mm Bottom thickness 1.0mm Cat.# Spacer Dimensions SGS-2040-EW3 SGS-2040-EW5 SGS-2050-EW3 SGS-2060-EW3 SGS-2080-EW3 SGS-20-EW3-0.6 SGS-33-EW3-0.6 42cm (1pr. 20cm exponential & 1pr. 22cm flat) 52cm (1pr. 30cm exponential & 1pr. 22cm flat) 62cm (1pr. 30cm exponential & 1pr. 32cm flat) 82cm (1pr. 60cm exponential & 1pr.
ULTRATHIN MYLAR ACCESSORIES FOR 20CM & 33CM WIDE UNITS 20CM WIDE UNITS SHARKTOOTH COMBS 33CM WIDE UNITS Cat.# Comb Dimensions Cat.# Comb Dimensions MK20-07501 MK20-07524 MK20-07534* MK20-07538 MK20-07552* 75µ (0.075mm) x 1 well 75µ (0.075mm) x 24 well 75µ (0.075mm) x 34 well 75µ (0.075mm) x 38 well 75µ (0.075mm) x 52 well MK33-07501 MK33-07546 MK33-07562* MK33-07568 MK33-07594* 75µ (0.075mm) x 1 well 75µ (0.075mm) x 46 well 75µ (0.075mm) x 62 well 75µ (0.075mm) x 68 well 75µ (0.
SLIDING GEL CASTERS Cat.# Item GSL-1001 GSL-2001 DT-20 DT-33 Casts glass plates 20cm-38cm (w) x 22cm-42cm (l) Casts glass plates 20cm-38cm (w) x 22cm-62cm (l) Drip Tray for 20cm wide glass plates Drip Tray for 33cm wide glass plates POWER SUPPLIES Cat.
NOTES
NOTES
CONTACT US Telephone: Local or International 858-755-4959 Toll Free: 858-755-0733 Fax: 858-755-0733 Check out our new and improved online ordering! www.cbsscientific.com E-mail address: sales@cbssci.com Mailing address: C.B.S. Scientific Company P.O. Box 856 Del Mar, CA 92014 Shipping address: C.B.S.