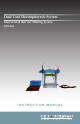
Dual Cool Electrophoresis System Mini-Vertical Slab Gel /Blotting System DCX-700 INSTRUCTION MANUAL
T A B L E O F C O N T E N T S Important User Information. . . . . . . . . . . . . . . . . . . . . . . . 3-4 Section 1: General Information 1.1 Introduction and Features . . . . . . . 1.2 Specifications. . . . . . . . . . . . 1.3. Comb Specifications for Hand Cast Gels . 1.4 Safety. . . . . . . . . . . . . . . . . . . . . . . . . . . . . . . . . . . . . . . . . . . . . . . . . . . . . .
ENGLISH IMPORTANT USER INFORMATION This Instruction Manual will explain how to use this product safely and effectively. Please read and carefully follow the instruction manual in its entirety. The triangle/exclamation mark symbol alerts the user of the product to important operational, maintenance, and/or warranty requirements. The triangle/lighting bolt symbol alerts the user of the product to potentially hazardous electrical exposure.
FRANÇAIS INFORMATION IMPORTANTE À L’USAGE DES UTILISATEURS ESPAÑOL Le présent manuel d’utilisation explique la manière de se servir efficacement du produit en conditions de sécurité. Il est recommandé de soigneusement lire la totalité du manuel, avec ses consignes et ses instructions. El presente instructivo explica la manera de usar este producto en forma segura y efectiva. Sírvase leerlo en su totalidad y seguir detenidamente las indicaciones que contiene.
SECTION 1 General Information 1.1 Introduction and Features C.B.S. Scientific offers the Dual Cool Electrophoresis System for performing SDS-Page, acrylamide-nucleic acid separations and electro-blotting. The dual unit provides the capability of running or blotting two gels simultaneously under identical temperature controlled buffer conditions. Units include 2 freezer blocks, 2 blotting cassettes, 2 foam pads, and a white plastic reservoir conversion plate to allow for single runs.
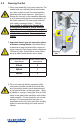
1.3 Comb Specifications for Hand Cast Gels COMB OPTIONS, material: PTFE, tooth depth: 9.5mm, overall length: 7.9cm Cat. # MVX-0701 MVX-0710 MVX-0714 MVX-0716 MVX-1001 MVX-1010 MVX-1014 MVX-1016 MVX-1501 MVX-1510 MVX-1514 MVX-1516 # of Thickness of Teeth Teeth (mm) 1 0.75 10 0.75 14 0.75 16 0.75 1 1.0 10 1.0 14 1.0 16 1.0 1 1.5 10 1.5 14 1.5 16 1.5 Width of Teeth (mm) 66.6 5.23 3.3 2.92 66.6 5.23 3.3 2.92 66.6 5.23 3.3 2.92 Recommended Max. Sample Vol.
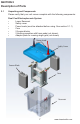
SECTION 2 Description of Parts 2.1 Unpacking and Components Please verify that your unit comes complete with the following components: Dual Cool Electrophoresis System: • Lower Reservoir • Safety cover • Power leads (must be attached before using. See section 3.1.1) • Core • 2 freezer blocks • 2 blotting cassettes with foam pads (not shown) • Adaptor plate for running single gels (not shown) Power leads Safety Cover Freezer Block Core Reservoir 7 www.cbsscientific.
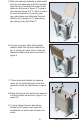
SECTION 3 Instructions for Slab Gel Electrophoresis Using Pre-Cast Gels 3.1 Preparing the Electrophoresis Unit 1. Power leads are shipped separately and must be attached before using your Dual Cool. Thread the power lead ends into the lid receptacles and rotate in clockwise direction to hand tighten. 2. Place unit in authorized work area. Remove safety cover from the assembled unit by simultaneously pressing down on white push pins while lifting up on blue safety cover as shown in figure 1.
5. Slide pre-cast gel cassette or plate set(s) into the core assembly with the notched plate facing in towards the upper buffer reservoir as shown in figure 4. If using a pre-cast gel stored at 4°C, allow to warm to room temperature. If pouring your own gels please see Alternate Protocol (Section 4) on pages 12-14 describing gel casting using Gel Wrap™. 4 6. If running one gel, slide white plastic adaptor plate into the side without the gel.
3.2 Running the Gel 1. Place core assembly into lower reservoir. The anode (red) and cathode (black) electrodes are color-coded on both the core/cassette assembly and lower reservoir. See figure 7. Ensure the red dot on the cassette assembly is on the same side as the red receptacle on the lower reservoir. Fill core upper reservoir with freshly prepared buffer (~ 190mls).
4. Attach safety cover and turn on magnetic stirrer. The closed unit ready for power is shown in figure 8. 5. Connect the leads to the power supply, matching the color-coded red to red and black to black. See Section 6.1 for recommended power conditions. Begin separation by electrophoresis. 8 3.3 Removing the Gel 1. Turn the power supply off and disconnect the leads from the power supply.
4.1 Alternate Protocol: Using Gel Wrap™ Gasket Casting Method (Not using Pre-cast gels) 1. Place all components in an authorized work area. You will need: glass plate set, Gel Wrap™ Gasket, spacer set, comb, 3 GPC-0002 clamps, and polyacrylamide solution. Prepare and clean glass plates by hand washing both plates with a high quality lab detergent followed by a complete rinsing with dH2O. Air-dry or use a lint-free tissue.
6. Lift the assembly and stand it on the base of the clamp. For leveling, push glass plate assembly down until it stops against clamp body. Clamp the sides of the assembly with additional casting clamps on either side. As each clamp is attached, be sure the gasket is aligned between the plates forming a seal. 7. Apply PAGE solution to gel plate sandwich using a syringe or pipette. If using a stacking gel, pour desired height of running gel, then overlay a small amount of dH2O or 0.
SECTION 4 Alternate Protocol for Slab Gel Electrophoresis. (Not using Pre-cast gels) 4.2 Preparing the Electrophoresis Unit when Using Gel Wrap™ Gasket Casting Method 1. Place unit in authorized work area. Remove safety cover from the assembled unit by simultaneously pressing down on white push pins while lifting up on blue safety cover as shown in figure 1. Do not remove safety cover by pulling up on leads! 1 2.
SECTION 5 Instructions for Western Blotting 5.1 Preparing the Unit for Blotting 1. Remove safety cover from the assembled unit by simultaneously pressing down on white push pins while lifting up on blue safety cover. Do not remove safety cover by pulling up on leads! Remove white core from lower reservoir by grasping core with one hand and lifting directly up. Open doors on the core assembly by pulling up on the white latches, as shown in figure 1. 1 2.
4. Insert blotting casettes into core making sure that red side faces outward. See diagram 5. black sides 5. Close doors and re-latch by pressing down on the white latches so that assembly looks like that shown in figure 6. If running one blot, slide white reservoir conversion plate into the side without the blotting cassette. 5.2 red side Electro- Blotting Procedure 1. Place stirring bar in bottom corral of lower reservoir. Place frozen freezer blocks in side receptacles.
SECTION 6 Running Conditions 6.1 Recommended Power for Slab Gels: Precise electrophoresis conditions will vary according to the number and type of gels used, buffer conditions employed, power input, and the general goal of the experiment. Refer to reference section 6.3 for in depth discussions on practical and theoretical approaches to protein gel electrophoresis. 6.1.1 ClearPAGE Gels Run Voltage Starting Current Ending Current Approx. Run TIme 180VDC 90mA/gel 40mA/gel 30-75 minutes 6.1.
6.2 Electro-Blotting As a general recommendation, equilibrate gels (after running) with the diluted transfer buffer for 5 to 10 minutes before transfer. Blotting Buffer ClearPAGE™ Transfer Buffer 10X/20X cat. # FB82500 (see Section 6.4) 100ml (1:10 dilution) Methanol 200ml Ultrapure Water 720ml Typical Blotting Conditions for DCX-700 Power Supply Setting Blot Time Expected Current 6.3 200V constant 1.5 - 2.0 hours with stirring, cooling blocks 180mA / 1 gel 220mA / 2 gels References 1. 2. 3.
6.4 Recommended ClearPAGE™ Buffer Formulations As an alternative to the ClearPAGE buffers available for purchase, these formulations may be used to prepare buffers yourself. Use high-quality, low-conductance ingredients. Do NOT use acid or base to adjust the pH! Standard SDS Running Buffer, 20X for Reduced Samples (Cat. # FB60500) * pH should be between 8.4 and 8.5 at 25° C. Ingredient MW Molarity Qty/Liter Tricine (free acid) 179.17 0.8M 143.4 g Tris (free base) 121.14 1.2M 145.
6.4 Recommended ClearPAGE™ Buffer Formulations, con’t. LDS Sample Buffer, 4x, (Cat. # FB31010) *pH should be between 7.7 and 7.8 at 25° C. MW Molarity Qty/Liter Glycerol (40%) Ingredient - - 400 g Ficoll-400 (4%) - - 40 g Triethanol amine, pH7.6 149.2 0.8M 120.0 6 N HCL Lithium Dodecyl Sulfate (4%) EDTA Di-Sodium Brilliant Blue G250 (0.025%) Phenol Red Ultrapure water (fill to) 36.46 372.2 - 2mM - 93.0 g 40 g 7.44 g 0.25g 0.25 g 1000 ml Standard DNA/Native Running Buffer, 20X, (Cat.
SECTION 7 Maintenance of Equipment 7.1 Care and Handling The plastic components of the Dual Cool Electrophoresis Systems are fabricated from acrylic and polycarbonate. Electrodes and connectors are made from pure platinum, stainless steel, and chrome plated brass. As with any laboratory instrument, adequate care ensures consistent and reliable performance. After each use, rinse buffer chamber, gel tray and combs with de-ionized water. Wipe dry with a soft cloth or paper towel, or allow to air dry.
SECTION 8 Ordering Information Dual Cool Ordering Information COMBS: See page 6. CAT. # DESCRIPTION DUAL COOL MINI-VERTICALS - 10CM(W) X 10CM(H) DCX-700 Dual Cool Mini-Vertical, CE, 2-place, Complete System Accessories and Related Products for DCX-700 EBX-BC-700 Accessory Blotting Cassette, includes sponge pad EBX-SP-700 Accessory Sponge Pads, set of 4 DCX-SP-108 Accessory shim plate for 8cm(w) Bio-Rad gels DCX-P1010R Gel Wrap@ Glass Plate Set DCX-E0710 Gel Wrap® Gasket, 0.
Precast Gel Selection Chart & Ordering information ClearPAGE SDS gels, packages of 10 - Cat. #’s Acrylamide % Gel Size (cm) WxH 1 well Cat. # 2D well trough + 1 marker lane Cat. # 12 well Cat. # 17 well Cat.
CONTACT INFORMATION Online Ordering www.cbsscientific.com Telephone Local and International: 858-755-4959 Toll Free: 800-243-4959 Sales E-mail Address sales@cbssci.com Technical Service E-mail Address technicalservice@cbssci.com Mailing Address P.O.