
Installation Manual


STEP 4: Rear Panel Installation
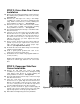
A) Remove the spare tire using a ¾” Socket. Retain the
factory hardware (3 lug nuts). See Figure #3.
B) Using a T30 Torx Bit, remove the screw holding the
lower rubber tire stop in place, retaining both the screw
and the rubber tire stop. See Figure #4.
C) Peel red vinyl backing from the tape on the Rear Panel.
D) Using the hole in the center of the Rear Panel as a
guide, align with the hole located in the vehicle. Take
care not to exert pressure on the adhesive tape before
you have aligned the Rear Panel properly.
E) Once you have checked for proper location apply 30
pounds of pressure per square inch to areas of the parts
opposite tape pads to ensure proper tape adhesion.
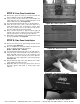
F) Reinstall the lower rubber tire stop and Spare Tire using
the factory hardware. See Figure #5.
STEP 5: Side Panel Installation
A) Remove the factory stone guard using an 8mm Socket
and ratchet. See Figure #6.
B) Prior to Installation, look at part numbers inscribed in the
plastic to identify right and left side panel.
(Right – 14002 R; Left – 14002 L)
C) Peel red vinyl backing from the tape on the Side Panels.
D) Using the holes on the underside of the Side Panel as a
guide, align with 3 factory holes on the underside of the
vehicle. Take care not to exert pressure on the adhesive
tape before you have aligned the side Panel properly.
See Figure #7.
E) Attach underside edge of the Side Panel to the vehicle
using supplied Tuf-Lok fasteners.
F) Apply 30 pounds of pressure per square inch to areas of
the parts opposite tape pads to ensure proper tape
adhesion.
Figure #3 – Remove Spare Tire
Figure #4 – Remove Tire Stop
Figure #5 – Reinstall Tire Stop & Tire
Figure #6 –
Remove Stone Guard
6710 N. CATLIN AVE. • PORTLAND, OR 97203 • 503-283-4335 • 1-800-234-8920 (USA AND CANADA) • FAX 503-283-3007