User Manual & Operating Instructions User Manual and Product Specifications DC DC-X 85X &Fridges DC 130X 12/24V Fridge/Freezer CARAVAN – MARINE – RV - OFFGRID Read user manual before operating your fridge/freezer
Congratulations on your purchase of a Bushman DC-X fridge. Please read these instructions carefully before installation and use. Please be safe and use common sense and caution when installing, operating and cleaning this appliance. If you are unsure about any of these instructions, contact your local dealer before proceeding. IMPORTANT INFORMATION Do not lay your fridge on its back, top or sides or at any angle exceeding 30º.
POWER SUPPLY Your fridge must be connected to a stable and regulated 12 V or 24 V DC power supply only. The compressor will automatically detect which voltage is present adjust accordingly. If you are using a generator or other power supply, the output must be a pure sine wave. Any fluctuations in generator current may damage the compressor. WIRING For optimum results, you will need the correct sized wire depending on the distance from your power supply to the fridge.
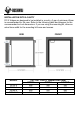
INSTALLATION INTO A CAVITY DC-X fridges are designed to be installed in a cavity. A gap of minimum 45mm is recommended for the rear. Refer to the following table and diagram for the recommended cut-out dimensions. If you are using the mounting kit, allow an extra 5mm width for the mounting kit frame and screws.
EFFICIENT OPERATION VENTILATION Two vents need to be provided from the rear of the fridge cavity to the outside environment, or to the general area where the fridge is located. The vents should be located at the bottom and top of the fridge cavity and have a free cross section of minimum 100cm2 each. This allows for natural thermal air flows across the condenser. The more ventilation you have, the better.
CLEANING Wash the inside of your fridge with luke warm water and a mild soap. Never use abrasive or corrosive cleaning agents, steel wool or scouring sponges. A soft sponge, towel, or soft brush is recommended. Always keep the inside of the fridge clean and dry. Remove any condensate water or ice which gathers in or near the tray under the freezer compartment. Be careful when opening or closing the freezer door if ice has been allowed to accumulate in this area.
REVERSING THE FRONT DOOR HINGES To change the hinge side, simply unscrew the door hinges from the fridge cabinet, move to the other side and re-affix using the same screws. MOVING THE DOOR HANDLE You can replace the front door panel, without having to remove the door completely. 1. Remove the 2 screws which hold the door handle in place, access is provided under the logo sticker. You can more easily remove the sticker by applying moderate heat from a hair dryer. 2.
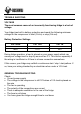
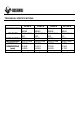
TROUBLE SHOOTING VOLTAGE The most common cause of an incorrectly functioning fridge is a lack of voltage. Your fridge has built in battery protection and needs the following minimum voltage for the compressor to start (Cut-in) or stop (Cut-out). Battery Protection Settings VOLTAGE 12 V 24 V CUT OUT 9.5 V 21 V CUT IN 11 V 23V During fridge operation, a load is placed on your power supply which can cause your voltage level to drop by as much as 2 V.
TECHNICAL SPECIFICATIONS COMPRESSOR VOLTAGE WATT RATING REFRIGERANT EXTERNAL DIMENSIONS (mm) NETT WEIGHT DC50-X Secop BD35 12 V / 24 V DC 60 W 45g R134a W 380 D 495 H 525 16.4 kg DC65-X Secop BD35 12 V / 24 V DC 60 W 45g R134a W 450 D 515 H 525 18 kg DC85-X Secop BD35 12 V / 24 V DC 60 W 60g R134a W 475 D 550 H 625 22.5 kg DC130-X Secop BD35 12 V / 24 V DC 60 W 60g R134a W 525 D 550 H 750 27.
WARRANTY DP Refrigeration Pty Ltd trading as Bushman Offgrid ABN 94 615 295 255 (Bushman) warrants, to the original owner, that this product is free from defects in workmanship and material for a period of three (3) years from the purchase date. This warranty shall be limited to repairing or replacing, at Bushman’s option and without charge to the purchaser, defective components. All warranty work shall be performed at a Bushman approved facility.