
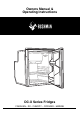
BushmanDC-X Owners Manual


3
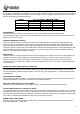
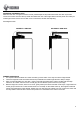
INSTALLATION INTO A CAVITY
DC-X fridges are designed to be installed in a cavity. A gap of minimum 50mm is recommended for the rear. Refer to
the following table for the recommended cut-out dimensions. If you are using the mounting kit, allow an extra 5mm
width for the mounting kit frame and screws.
MODEL
CUT-OUT CAVITY DIMENSIONS (MM)
WIDTH
DEPTH
HEIGHT
DC50-X
385
495
530
DC65-X
455
515
530
DC85-X
480
550
630
DC130-X
530
550
755
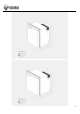
MOUNTING KIT
The mounting kit is first affixed to the side and top of the fridge cabinet using the screws provided.
Once the fridge has been connected to the power supply and moved into its final position, the mounting kit can be
affixed to the front of the cavity.
INTERNAL MOUNTING SLEEVES
There are 4 internal mounting sleeves on the inside of the fridge cabinet, and 2 internal mounting sleeves in the
inside of the freezer compartment. Access is provided by gently levering off the plastic caps. M5 screws or bolts
need to be used. Drill 4mm pilot holes through the plastic sleeve and right through the fridge cabinet sides. Put a
small nylon washer onto the screw / bolt heads before inserting. Ensure that the exterior of the fridge cabinet is flush
with your cabinetwork before affixing the screws / bolts. If there is a gap, pack it out with a suitable hard material.
Check for screw / bolt tightness after your first trip.
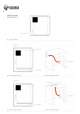
VENTILATION
Ventilation will have a significant impact on the efficient operation of your fridge. A minimum of 2 vents needs to be
provided from the rear of the fridge cavity to the outside environment, or to the main room where the fridge is
located. The vents should be located at the bottom and top of the fridge cavity and have a free cross section of
minimum 400cm
2
each. Note that a 400mm x 200mm vent will have only a free cross section of approximately 400
cm
2
(not 800 cm
2)
.
IMPORTANT STEPS FOR EFFECTIVE OPERATION
THERMOSTAT
The thermostat should be set on the lowest number to keep your fridge cold. Do not use setting 7 as this causes
very quick ice build-up. Start the fridge at setting 3 and see how it goes after 24 hours. 7 is the coldest setting and 1
is the warmest.
EQUALISING THE FRIDGE
During the first 24 hours of operation, your compressor will operate for longer than usual. This process allows the
internal air temperature, food, drinks, condenser, and insulation to equalise.
KEEP HOT / WET ITEMS OUT OF THE FRIDGE
Try and keep hot or wet items out of the fridge as they are a prime source of moisture and ice build-up.
SPACE ITEMS, ESPECIALLY ON THE TOP SHELF
It’s important to keep some space between your items in the fridge so that the cold air can circulate. This is critically
important on the top shelf so the cold air from the freezer can fall into the fridge cabinet. Round items like cans and
jars are good for the top shelf as they allow space around them. Packets of meat etc are probably the worst items as
they create an insulated barrier between the top shelf and the rest of the fridge.
RUBBER SEALS ARE CLEAN
Keep your rubber seals clean and free from stickiness. You can clean the rubber seals and the front edge of the
fridge cabinet with warm, soapy water.