
DC-X Owners Manual

4
HAVE GOODS INSIDE THE FRIDGE
The fridge will not operate properly if it is empty, as air does not hold temperature well. If you are using a wireless
thermometer the temperature readout will fluctuate significantly with the changes in air temperature, whilst your
drinks inside the fridge will not vary much at all.
DEFROSTING
Defrosting needs to be carried out when the ice layer reaches a thickness of 5mm.
Turn off the power to the fridge and move your food and beverages to another cool place. Do not use any objects to
remove the ice or frost, it must be allowed to melt naturally. Once the ice has melted, thoroughly dry the inside of the
fridge and freezer compartment. Re-start the fridge on setting 4 and monitor after 24 hours.
CLEANING
Always keep the inside of the fridge clean and dry. Wash the inside of your fridge with lukewarm water and a mild
soap. Never use abrasive or corrosive cleaning agents, steel wool or scouring sponges. A soft sponge, towel, or soft
brush is recommended.
STORAGE
Keep the door of the fridge ajar when the fridge is not in use, to allow fresh air to circulate inside the fridge
compartment.
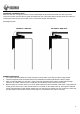
REMOVING THE FRIDGE DOOR - MOVING THE HINGES TO THE OPPOSITE SIDE
REMOVE THE DOOR
To remove the fridge door, position the fridge on a bench with the front edge overhanging so you can access the
bottom hinge screws.
1. Take the top hinge off first
2. Gently lift off the main door
3. Unscrew the bottom hinge. There is a small washer on the bottom hinge, make sure this doesn’t stick to the
bottom of the fridge door!
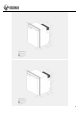
4. Reposition the bottom hinge and screw into place
5. Sit the main door onto the bottom hinge (and washer)
6. Affix the top hinge screws finger tight only.
7. Align the door so it is square to the cabinet and closes freely without rubbing.
8. Tighten the top hinge screws fully.
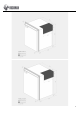
MOVING THE DOOR HANDLE
1. Remove the 2 screws which hold the door handle in place. Access is provided under the logo sticker. You can
more easily remove the sticker by applying moderate heat from a hair dryer.
2. Gently lift the door handle off.
3. Reposition the door handle on the preferred side.
4. Drill 2 small (2mm) pilot holes through the door handle for the original screws.
5. Reaffix the door handle using the original screws.
6. Reapply the logo sticker onto the door handle by applying moderate heat to the sticker.
7. Use the supplied DC-X Series sticker to cover the old screw holes.
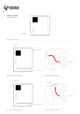
REPLACING THE FRONT DOOR PANEL
1. Follow steps 1 to 2 under “Moving the door handle” above.
2. Gently remove the bottom door profile which supports the door panel. Using a screwdriver gently lever the
bottom door profile outwards only. Do not lever it down.
3. Gently slide the original door panel down and out of the door.
4. Slide the new door panel upwards and into place.
5. Reposition the bottom door profile to be flush.
6. Continue from steps 3 to 7 under “Moving the door handle” above.