LCD32F1080P C O LO U R T V INSTRUCTION MANUAL Helpline no: 0845 604 0105 BUSH KAPAK-50138695.p65 1 17.11.
Contents Features ............................................................... 3 Accessories ......................................................... 3 Introduction ........................................................... 4 Preparation ........................................................... 4 Safety Precautions ............................................... 4 Power Source .................................................. 4 Power Cord ......................................................
Child Lock ................................................... 33 Language .................................................... 33 EXT-2 Out .................................................... 33 Default Zoom ............................................... 34 Blue Background ......................................... 34 Menu Background ....................................... 34 Menu Timeout .............................................. 34 Teletext Language .......................................
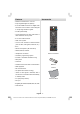
Features Accessories • Remote controlled colour LCD TV. • Fully integrated digital TV (DVB-T). • It has two HDMI connectors for digital video and audio. This connection is also designed to accept high definition signals. M • Full HD (1920x1080). • 100 programmes from VHF, UHF bands or cable channels can be preset. P
Power Cord Introduction Thank you for choosing this product. This manual will guide you for the proper operation of your TV. Before operating the TV, please read this manual thoroughly. Please do keep this manual in a safe place for future references. Do not place the set, a piece of furniture, etc. on the power cord (mains lead) or pinch the cord. Handle the power cord by the plug.
Ventilation Waste Disposal The slots and openings on the TV set are intended for ventilation and to ensure reliable Instructions for waste disposal: • Packaging and packaging aids are recyclable operation. To prevent overheating, these openings must not be blocked or covered in and should principally be recycled. Packaging materials, such as foil bag, must anyway. be kept away from children.
Disconnecting the Device The mains plug is used to disconnect TV set from the mains and therefore it must remain readily operable. Headphone Volume Excessive sound pressure from earphones and headphones can cause hearing loss. Installation To prevent injury, this device must be securely attached to the wall in accordance with the installation instructions when mounted to the wall (if the option is available).
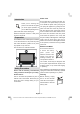
Overview of the Remote Control Standby Yellow / Feature Blue / Install 1 Previous programme 2 Cursor up 17 Cursor right 3 Cursor down 18 TV / DTV 4 Mono-Stereo / Dual I-II 19 Programme up/down Numeric buttons Hold (in TXT mode) / PIP position 21 Update (in TXT mode) / PAP position 22 Reveal (in TXT mode) / PC 23 Green / Picture menu 24 25 4 26 27 Info 28 Personal preference 29 2 3 DEF GHI 5 JKL AV / Source Mute + P - 1 Cursor left Volume up/down + V - 6 MNO 7 8 S
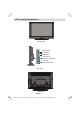
LCD TV and Operating Buttons FRONT VIEW Standby button TV/AV button TV/AV MENU button MENU TV/AV TV/AV MENU + P/CH + P/CH + + P/CH Programme Up/ Programme Down buttons Volume Up/ Volume Down buttons SIDE VIEW REAR VIEW English - 8 ENG-32761-1205UK-32 INCH 17MB26 UK IDTV-(WO 8 SVHS-ECO PIP)(3D PANORAMA)-50138695.p65 19.11.
Viewing the Connections F B C D REAR VIEW G E H I J K P L M N O A RS-232 IN This connector is for service use only.. Video Input is used for connecting video signals of external devices. Connect the video cable between the VIDEO IN socket on the TV and the VIDEO OUT jack on your device. Audio Inputs are used for connecting audio signals of external devices. Connect the audio cable between the AUDIO INPUTS on the TV and the AUDIO OUTPUT jacks on your device.
Connect the PC cable between the PC INPUT on the TV and the PC output on your PC. PC Audio Inputs connects to audio jacks of your PC to enable PC audio. Connect the PC audio cable between the PC AUDIO INPUTS on the TV and audio output of your PC. Audio Line Outs output audio signals to an external device such as an optional sound system. To connect the external speakers to your TV, use AUDIO LINE OUTS of the TV with an audio cable. Component Audio Inputs are used for connecting component audio.
Power Connection IMPORTANT: The TV set is designed to operate on 220-240V AC, 50 Hz. • After unpacking, allow the TV set to reach the ambient room temperature before you connect the set to the mains. • Plug the power cable to the mains socket outlet. Aerial Connection • Connect the aerial or cable TV plug to the AERIAL INPUT socket located at the rear of the TV. Aerial Input REAR VIEW English - 11 ENG-32761-1205UK-32 INCH 17MB26 UK IDTV-(WO 11 SVHS-ECO PIP)(3D PANORAMA)-50138695.p65 19.11.
Connecting the LCD TV to a PC For displaying your computer’s screen image on your LCD TV, you can connect your computer to the TV set. • Power off both computer and display before making any connections. • Use 15-pin D-sub display cable to connect a PC to the LCD TV. • When done, switch to PC source. See, “Input selection” section. • Set the resolution that suits your viewing requirements.
Connecting to a DVD Player If you want to connect a DVD player to your LCD TV, you can use connectors of the TV set. DVD players may have different connectors. Please refer to your DVD player’s instruction book for additional information. Power off both the TV and the device before making any connections. Note: Cables shown in the illustration are not supplied. • If your DVD player has an HDMI socket, you can connect via HDMI. When you connect to DVD player as illustrated below, switch to HDMI source.
Using Side Connectors You can connect a range of optional equipment to your LCD TV. Possible connections are shown below. Note that cables shown in the illustration are not supplied. • For connecting a camcorder, connect to the VIDEO IN socket and the AUDIO SOCKETS. Do not connect the camcoder to VIDEO IN socket at the sime time since it can cause noise in the picture. For selecting the related source, see the section “Input selection” in the following parts.
Connecting Other Equipment via Scart Most devices support SCART connection. You can connect a; DVD recorder, a VCR or a decoder to your LCD TV by using the SCART sockets. Note that cables shown in the illustration are not supplied. Power off both the TV and the devices before making any connections. For more information, refer to your device’s own instruction book.
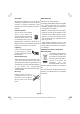
Inserting Batteries in the Remote Control Handset Operating Range for the Remote Control • Remove the battery cover located on the back of the handset by gently pulling backwards from the indicated part. • Point the top of the remote control toward the LCD TV's remote sensor LED while pressing a button. • Insert two AAA/R03 or equivalent type batteries inside. Place the batteries in the right directions and replace the battery cover.
Switching the TV On/Off Navigating the Menu System To Switch the TV On • Connect the power cord to the 220-240V AC , For displaying menu options For navigation To confirm choices 50 Hz. • Press STANDBY button. Then the standby LED lights up. • To switch on the TV from standby mode either: • Press the button, P+ / P- or a numeric button on the remote control. • Press the -P/CH or P/CH+ button on the TV. The TV will then switch on.
Initial Settings Do you want to search for analogue channels? When the TV set is operated for the first time, the IDTV turns on first. Yes Because this is the first time the TV is used, there are no channels stored in the memory and the following message appears on the screen: To seach for analogue channels, select “Yes”. TV switches to the analogue TV mode. The menu below is displayed to search for analogue channels: Please ensure aerial is plugged in.
Basic Operations You can operate your TV using both the remote control and onset buttons. Operation with the Buttons on the TV Volume Setting • Press - button to decrease volume or + button to increase volume, so a volume level scale (slider) will be displayed on the screen. Programme Selection • Press P/CH + button to select the next programme or P/CH - button to select the previous programme.
Everyday Operation Pressing the TV DTV button at any time while watching television programmes will switch the TV set between the digital terrestrial television broadcasting and its normal analogue broadcasting. Information Banner Enter Lock Key Electronic Programme Guide (EPG) • Some, but not all, channels send information about the current and next events.
• Press or button to navigate through the ELECTRONIC PROGRAMME GUIDE(7 Day) channel and programme list. Saturday 21/8 13:51 Newsround ELECTRONIC PROGRAMME GUIDE(7 Day) Saturday 21/8 13:49 Chuckle Vision 13:00-14:00 Channels Triple bill. In the Ring/Romany Days/On the Radio: Paul and Barry grapple with the world of wrestling; hunt for a mysterious Emperor's underpants; and record their first pop song.
The operation method may differ depending When Auto is selected, the format being on the contents of the digital teletext. displayed is determined by the picture being broadcast. Follow the instructions displayed on digital teletext screen. PLEASE NOTE: Menu size changes • When “Press SELECT” button or similar message appears on the screen, press the depending on the chosen image size. IDTV Menu System OK button. • When the (Text) button is pressed, the TV returns to television broadcasting.
CHANNEL LIST 1 BBC ONE 1. BBC ONE 2. BBC TWO 3. ITV 8 4. Channel 4 5. BBC THREE 6. Teletext 7. BBC FOUR 8. Sky Travel 9. UKHistory 10. RTL Select 1 BBC ONE 1. BBC ONE 2. BBC TWO 3. ITV 8 4. Channel 4 5. BBC THREE 6. Teletext 7. BBC FOUR 8. Sky Travel 9. UKHistory 10. RTL Delete Function CHANNEL LIST Edit Name SELECT Select Channel Lock SELECT Watch Favourites Select i More Navigating the Entire Channel List Press or button for selecting the previous or next channel.
Pressing the numeric buttons ‘0...9’ replaces Use the the highlighted character with the characters printed above the button one by one as the “Favourites” item at the bottom of the screen and then, in turn, highlight each channel you or button to highlight the button is pressed. Press the M button to cancel the editing or OK want to add to the favourites list, using the and buttons (or red/green buttons), and button to save the new name. press the OK button.
and network name are shown at the bottom Main Menu of the screen. Channel List In both manual and auto search, any existing channel in the database is not re-stored to Installation avoid redundant duplicates of that channel. Configuration First Time Installation Timers The user can use this item to load default Language settings, which were loaded to the receiver at the factory. TV Setup To install factory settings, highlight “First Time Installation” menu and press the OK button.
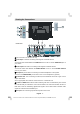
Main Menu AUTO PROGRAM Channel List Installation Country UK Text language Configuration West Timers Language TV Setup Common Interface The various configuration functions are Select your Language, Country and Text language by using or and / buttons. Press OK button to continue. To cancel, press BLUE button. The following menu will be displayed during the APS process: displayed in a list, along with a quarter-screen image of the currently selected channel.
Subtitle Digital terrestrial television channels can broadcast subtitles displayed on the screen for hard-of-hearing people. This function selects the desired subtitle language and enables the automatic display of subtitles whenever subtitle information is broadcast. Highlight the Subtitle line in the Configuration menu and use the or button to cycle through “Off” and language options. Favourite Mode This function enables or disables the favourite channel list mode.
Parental Settings Installation: Installation menu is locked, so Some channels broadcast material which you do not want younger members of the family to watch. Any channel can be ‘locked’ so that it cannot be selected for viewing unless a four-digit PIN code is entered. In this way, any channel not suitable for younger viewers can be prohibited. This function enables or disables the menu protection system and allows the PIN code to be changed. the user cannot add channels.
• To set an event, highlight its mode button • Press the M button to display the main menu or button and press the OK using the button to display the timer entry window. or button to highlight the and use Language line and press the OK button: Name: Start: End: Date: Mode: Main Menu 3. ITV 1 00:00 00:00 03/06/2005 Once Channel List Installation Configuration • Here the five settings consisting of the channel name, start time, end time, date and Timers frequency mode can be set.
You can find detailed information for all menu • Some CAMs may require the following set items in “Analogue TV Menu System” section. Common Interface up. Please set the CAM by entering the IDTV menu, Common Interface then pressing the • Press the M button to display the main menu and use the or button to highlight the OK button. (CAM set up menu is not displayed when it is not required.
Noise Reduction Menu System If the broadcast signal is weak and the picture is noisy, use Noise Reduction setting to Picture Menu PICTURE Mode reduce the noise amount. Dynamic Contrast 63 Brightness 63 Sharpness 31 Colour 99 Colour Temp Normal Noise Reduction Film Mode Low Off Store Reset Press or button to select Noise Reduction. Press / to choose from one of these options: Low, Medium, High or Off.
Sound Menu Headphone SOUND Volume 15 Equalizer Balance 0 Headphone Sound Mode Mono AVL On Effect Off Dynamic Bass Off 3D Panorama Off Subwoofer Off Store Press or button to select Headphone. Press button to view the hedphone menu. Headphone sub-menu options are described below: Volume Press or button to select Volume. Press button to increase headphone volume level. Press button to decrease headphone volume level. Headphone volume level can be adjusted between 0 and 63.
Press button to select Effect. Press or Feature Menu / button to set Effect as On or Off. FEAUTURE Dynamic Bass Sleep Timer Dynamic Bass is used to increase bass effect of the TV set. Press or Off Child Lock Off Language English Ext-2 Out button to select Dynamic Bass. Default Zoom Use / button set Dynamic bass to Low, High or Off. It is not recommended to select Blue Background Menu Background Menu Timeout High while listening at high volume levels.
Press or button to select Ext-2 Out. Use / button to set Ext-2 Out to TV/DTV, EXT1, EXT3, EXT4, EXT5, EXT6 or PC. Note: • Only audio output is available for EXT-3, EXT5, EXT-6.The other options have both Menu Timeout To set a specific display timeout for menu screens, set a value for this option. Press or button to select Menu Timeout. Use / button to change menu timeout to 15 sec, 30 sec or 60 sec. Teletext Language audio and video outputs.
Install Menu Fine Tune Press or button to select Fine Tune. Press / button to adjust the tuning. INSTALL Program 1 Band S Channel 36 Colour System AUTO Sound System BG Fine Tune 0 Search 423.25 VCR Off Store Program Search Press or button to select Search. Use / button to start program searching. You can also enter the desired frequency using the numeric buttons while Search item is highlighted. VCR This item can be seen in all modes except for PC, YPbPr and HDMI.
Program Menu erases the selected programme from the programme list, and the programmes shift one line up.
Install Menu in AV Modes SOURCE : TV The following screen appears in the install menu when the TV is in AV modes. Note that TV TUNER limited options will be available. Switch to TV mode for viewing complete version of the EXT - 1 SCART EXT - 2 SCART EXT - 3 YPbPr Install menu. EXT - 4 FAV EXT - 5 HDMI EXT - 6 PC HDMI INSTALL DTV Colour System AUTO VCR Off Store Program In source menu, highlight a source by pressing or button and switch to that or OK button.
Autoposition PC Mode Menu System for connecting a PC to the TV set. If you shift the picture horizontally or vertically to an unwanted position, use this item to put For switching to PC source, press AV button on your remote control and select PC input. You can the picture into correct place automatically. This setting therefore automatically optimizes See “Connecting the LCD TV to a PC” section also use “Source” menu to switch to PC mode. the display.
Displaying TV Information When you switch to PAP Mode, Main window Programme Number, Programme Name, Sound Indicator and Zoom Mode information is displayed on the screen when a new programme is entered or button is pressed. changed by pressing / button. Press the button again to exit the PAP mode. Source restrictions of PAP Mode are same as Mute Function Press in PIP Mode is displayed on the right side of the screen. The active window can be button to disable sound.
• When the AUTO mode does not function correctly due to poor WSS signal quality or when you want to change the ZOOM mode, change to another ZOOM mode manually. Full Cinema This zooms up the wide picture (16:9 aspect This uniformly stretches the left and right sides of a normal picture (4:3 aspect ratio) to fill the ratio) to the full screen. wide TV screen.
Teletext Press to select a page. Teletext system transmits information such as news, sports and weather on your TV. Note Note: Most TV stations use code 100 for their that if the signal becomes insufficient, some text errors may occur or the teletext mode may Coloured Buttons be quitted. Teletext function buttons are listed below: Teletext On/Off / PAT mode index pages. (RED/GREEN/YELLOW/BLUE) Your TV supports both FASTEXT and TOP text systems.
No Picture Tips Care of the Screen Clean the screen with a slightly damp, soft cloth. Do not use abrasive solvents as they may damage the coating layer of the TV screen. For your safety, unplug the mains plug when cleaning the set. When moving the TV, hold it properly from the bottom part. Image Persistence Please note that ghosting may occur while displaying a persistent image. LCD TVs’ image persistence may disappear after a short time. Try turning off the TV for a while.
Appendix A: PC Input Typical Display Modes The display has a maximum PC resolution of 1360 x 768, frequency range of 56-85 Hz. The following table is an illustration of some of the typical video display modes. Your TV may not support different resolutions. Supported resolution modes are listed below. If you switch your PC to an unsupported mode, a warning OSD will appear on the screen. M ode Resolution Frequency Horizontal Vertical Hor.(kHz) Ver.
Appendix B: Main and PIP-PAP Picture Combinations Main and PIP, PAP picture combinations MAIN TUNER EXT-1 EXT-1 EXT-2 EXT-2 EXT-3 EXT-4 EXT-5 EXT-6 CVBS RGB CVBS RGB YPBPR CVBS HDM I HDM I O O O O O O N N O O P P PC PIP,PAP TUNER / DTV * EXT-1 CVBS EXT-1 RGB EXT-2 CVBS EXT-2 RGB EXT-3 YPBPR EXT-4 CVBS EXT-5 HDMI EXT-6 HDMI PC O O O O O X O X X X O X O O X O X X X X O O O X O X X X O O O X X O X X X O O X O X O X X X O O O O X O X X X O O O O X O X X X O I I P P &
Appendix C: AV and HDMI Signal Compatibility Source Supported Signals Available PAL 50/60 O EXT-1 NTSC 60 O (SCART 1) RGB 50 O RGB 60 O PAL 50/60 O EXT-2 NTSC 60 O (SCART-2) S-VHS 50 X S-VHS 60 X 480I 60Hz O 480P 60Hz O 576I 50Hz O EXT-3 576P 50Hz O (YPbPr) 720P 50Hz O 720P 60Hz O 1080I 50Hz O 1080I 60Hz O PAL 50/60 O EXT-4 NTSC 60 O (FAV) 480I 60Hz O 480P 60Hz O 576I 50Hz O 576P 50Hz O HDMI1 720P 60Hz O HDMI2 720P 50Hz O 1080I 60Hz O 1080I 60Hz O 1080P 50Hz O 1080P 60Hz O (X: Not Available, O: Available)
Appendix D: Pin Specifications Signal Input PC RGB Terminal (D-sub 15-pin connector) Pin 1 2 3 4 5 6 7 8 9 10 11 12 13 14 15 Input signal R G or sync on green B No connection No connection R.GND G.GND B.GND No connection GND No connection [SDA] H.sync or H/V composite sync V.sync. [V.
Appendix E: Important Instruction For your own safety read following instruction carefully before attempting to connect this unit to the mains supply.
Specifications TV BROADCASTING PAL/SECAM B/G D/K K' I/I' L/L' RECEIVING CHANNELS VHF (BAND I/III) UHF (BAND U) HYPERBAND CABLE TV (S1-S20/ S21-S41) NUMBER OF PRESET CHANNELS 100 CHANNEL INDICATOR On Screen Display RF AERIAL INPUT 75 Ohm (unbalanced) OPERATING VOLTAGE 220-240V AC , 50 Hz. AUDIO 3D Panorama AUDIO OUTPUT POWER (WRMS.
ARGOS Product Guarantee This product is guaranteed against manufacturing defects for a period of 1 Year This does not cover the product where the fault is due to misuse, abuse, use in contravention of the instructions, or where the product has been the subject of unauthorised modifications or alterations, or has been the subject of commercial use In the event of a problem with the product within the guarantee period please return it to your nearest Argos store If the item is shown to have had an inherent d
BUSH KAPAK-50138695.p65 2 17.11.