
Operation Manual


5
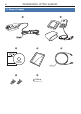
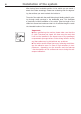
Description of the components:
1) Connector box with power supply cable
2) CL 1010 Time, case and holder
3) Installation and Operating manual, software on DVD
4) Cleaning cloth
5) USB data cable
6) Fuses
7) Label
Please note:
If certain components are added or omitted you will receive the corresponding informa- X
tion on a separate enclosure.
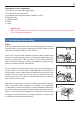
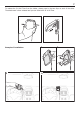
4. Positioning and mounting
Step 1:
First of all, please choose the most convenient position for the monitor
and the holder in your vehicle by attaching the CL 1010 Time to the pad
and checking different positions in the vehicle.
The CL 1010 Time should be installed so that the holder, together with
the cable, is positioned away from you, because the system has a push-
button on its top section. With this button you are able to switch be-
tween private and business journeys. An alternative mounting is pos-
sible but it makes operation more difficult.
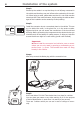
If you would like to use the device during your journey, positioning it in
the front area on the driver’s side is advisable. Sit in the vehicle and
check whether you can reach the device without difficulty. It this is not
possible then you should refrain from using the device during your
journey and ensure you make the required settings prior to starting
each journey that you make.
Also make sure that the CL 1010 Time is able to receive GPS data opti-
mally. The holder should therefore be attached to the dashboard
in a way which is as level as possible. In certain vehicles the GPS recep-
tion may be hampered because of windows with evaporated metal sur-
faces. In some vehicles, the installation in the glove box won’t provide
an optimum result either. Ask your garage about this or contact us via
our hotline if you have further questions.