Installation Guide/Operating Instructions
Manuals
Brands
Burnham Manuals
Cooling & Air Quality
IN5, 86,000 BTU Output Independence Steam Boiler w/ EZ-Connect Package, Standing Pilot (Nat Gas)
1
2
3
4
5
6
7
8
9
10
4
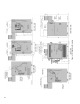
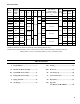
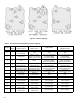
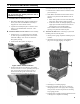
Figure 1: Dimensional Drawing
1
...
2
3
4
5
6
...
...
92