Install Instructions
Manuals
Brands
Burnham Manuals
Aspen Firetube Boilers
Aspen Firetube 126,000 BTU Combi High Efficiency Wall Hung Condensing Gas Fired Boiler
1
2
3
4
5
6
7
4
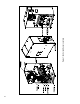
Figure 1: Control and Sensor Locations
1
...
2
3
4
5
6
...
7