IMIX®-3S+ IMIX®-3S+A IMIX®-5S+ IMIX®-5S+A INSTALLATION & OPERATING GUIDE BUNN-O-MATIC CORPORATION POST OFFICE BOX 3227 SPRINGFIELD, ILLINOIS 62708-3227 PHONE: (217) 529-6601 FAX: (217) 529-6644 To ensure you have the latest revision of the Operating Manual, or to view the Illustrated Parts Catalog, Programming Manual, or Service Manual, please visit the Bunn-O-Matic website, at www.bunn.com. This is absolutely FREE, and the quickest way to obtain the latest catalog and manual updates.
BUNN-O-MATIC COMMERCIAL PRODUCT WARRANTY Bunn-O-Matic Corp. (“BUNN”) warrants equipment manufactured by it as follows: 1) Airpots, thermal carafes, decanters, GPR servers, iced tea/coffee dispensers, MCP/MCA pod brewers thermal servers and Thermofresh servers (mechanical and digital)- 1 year parts and 1 year labor. 2) All other equipment - 2 years parts and 1 year labor plus added warranties as specified below: a) Electronic circuit and/or control boards - parts and labor for 3 years.
USER NOTICES The notices on this dispenser should be kept in good condition. Replace unreadable or damaged labels. ! WARNING As directed in the International Plumbing Code of the International Code Council and the Food Code Manual of the Food and Drug Administration (FDA), this equipment must be installed with adequate backflow prevention to comply with federal, state and local codes. For models installed outside the U.S.A., you must comply with the applicable Plumbing /Sanitation Code for your area.
INITIAL SET-UP 1. Apply the four non-skid pads from the parts box to the bottom of the legs. 2. Remove the drip tray assembly, drip tray bracket, and splash panel assembly from the parts box. 3. Place a set of key holes in the drip tray bracket over the lower two screws in the panel below the hopper access door; push down gently and tighten screws. 4. Place the set of key holes in the splash panel over the upper two screws and position so the screws are between the holes.
PLUMBING REQUIREMENTS This dispenser must be connected to a cold water system with operating pressure between 20 and 90 psi (138 - 620 kPa) from a 1⁄2” or larger supply line. A shut-off valve should be installed in the line before the dispenser. Install a regulator in the line when pressure is greater than 90 psi (620 kPa) to reduce it to 50 psi (345 kPa). The water inlet fitting is 1⁄4” flare.
RUNNING A RINSE SEQUENCE 1. Place the Normal/Program/Rinse switch (page 9) in the “rinse” position. 2. Sequentially at each position, press all of the dispense switches. The dispenser will run for 10 seconds with the hopper(s) disabled. 3. As each position is rinsed, the LCD display will show which position is being rinsed and count down from 10 seconds. 4. After all positions have been rinsed, return the Normal/Program/Rinse switch to the “Normal” position. DISPENSER USE - Self Serve 1.
CLEANING The use of a damp cloth rinsed in any mild, non-abrasive, liquid detergent is recommended for cleaning all surfaces on Bunn-O-Matic equipment. Do NOT clean this equipment with a water jet device. 1 x 24h 1. Rinse out Whipper Chambers by placing RINSE/RUN switch in the "RINSE" position and activating DISPENSE switches. 2. Turn elbow up, remove Hoppers, refill with product and replace hoppers into dispenser. 3. Empty Drip Tray and wash in a solution of dish detergent. 7 1.
GLOSSARY TANK TEMP XXX° (-) EXIT (+) Adjust tank temperature (190° F maximum) SET PASSWORD ? (-) XXXX (+) READY TEMP XXX° (-) EXIT (+) Adjust minimum tank ready temperature for lockout (185° maximum) ENABLE ADS ? NO EXIT YES Enables “ADS” to be displayed on LCD door display PORTION CONTROL ? NO EXIT YES Select Portion Control Dispensing ENTER ASSET # ? EXIT YES Enter asset number of machine SET CUP SIZE EXMPL TIME Select setting cup size by Time (seconds) or by Example (Portion Control mode
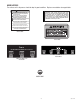
PROGRAMMING THE DISPENSER The following function screens are in order of appearance. Each screen will have instructions on how to access, and the procedures to program the various functions of the dispenser. To enable programming, place the “NORMAL/PROGRAM/RINSE” switch in the “PROGRAM” position. IMPORTANT PROGRAMMING NOTES - READ CAREFULLY To exit the programming mode at any time, press and release the exit (center) pad located on the front switch panel. The display will return to the PROGRAM HOME SCREEN.
PROGRAMMING THE DISPENSER (cont.) NORMAL/PROGRAM/RINSE switch: NORMAL: Allows all dispenser functions. Must be in this position for dispensing. PROGRAM: Allows access to program menus using touch pad and LCD screen. RINSE: Disables hopper motors. Pressing dispense button on front door will dispense dilution water and power whipper motor for ten seconds. P3060 PROGRAMMING LOCKOUT SWITCH This switch can be set to prevent access to the programming mode of the dispenser.
PROGRAMMING THE DISPENSER (cont.) Press and release right switch (advance to next menu), “TANK TEMP XXX°” appears on screen. TANK TEMP XXX° (-) EXIT (+) Adjust tank temperature READY TEMP XXX° (-) EXIT (+) Adjust minimum tank ready temperature for lockout PORTION CONTROL ? NO EXIT YES (K) STRENGTH ADJ.
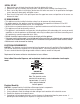
PROGRAMMING THE DISPENSER (cont.) Adjust hopper motor speed for station selected (D) SELECT UNITS ENG EXIT METRIC (B) DRINK STRENGTH 1 (-) XX (+) XX° CAL XX° (-) Tank Temp (+) PRESS DISPENSE TO CHECK TASTE TASTE 1 OK ? NO YES 235 (-) Goes to next station. Returns to (A) (page 11) after last station. (-) REFILL EXIT 155 (+) Auger Delay .
PROGRAMMING THE DISPENSER (cont.) (F) (H) (J) RINSE ALARM ? NO EXIT YES TEST SWITCHES ? Use Switch To Test SET CUP SIZES BY EXAMPLE TIME HEAD 1 DISABLE ? NO EXIT YES RINSE ALARM TIME (-) XX hours (+) TEST HEATER ? EXIT YES DISPENSE UNTIL CUP IS 3/4 FULL Goes to next station. Continues after last station. RINSE LOCKOUT ? NO EXIT YES TEST REFILL ? EXIT YES Press and release any dispense button to set cup size.