
Instruction Manual


17
PMT INSTALLATION
Introduction Parts Description Operating Instructions Internet Updates Appendix
TO MOUNT THE DASH ASSEMBLY: CONTINUED
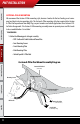
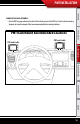
2. Once a mounting location is chosen, determine the position of the PMT and direction the PMT will
face by moving the ball and socket joints of the dash mount assembly. Once you nd the right position
tighten down the two Flat-Head screws to secure that position, the screws must be tightened suf-
ciently to hold the PMT in position.
3. Make sure that the mounting location on the dash is cleaned, preferably with isopropyl alcohol. Peal
the backing o of the double stick foam tape on the bottom of the dash mounting base and stick the
dash mount assembly along with the cradle to the dash. Press down rmly to ensure that the adhesive
reaches full contact with the dash.
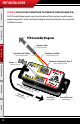
4. Run the end of the Cradle Cable down through the driver’s side of the vehicle dash and pull all of the
extra slack in the cable down also. The Cradle Cable Plug will need to be connected to the OBDII Adapter
Plug and the Power Wire will need to be hooked to a fuse in the vehicle fuse box.
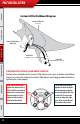
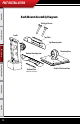
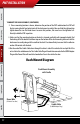
Dash Mount Diagram
Dash Mount Assembly
with Cradle
Cradle Cable
(To OBDll Adapter Plug)
(To Vehicle Fuse Box)
Power Wire
PMT Installation