
Instruction Manual


14
PMT INSTALLATION
Introduction Parts Description Operating Instructions Internet Updates Appendix
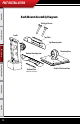
DASH MOUNTING
Dash mounting is a quick and easy way to mount the PMT. The dash mounting pieces do require some as-
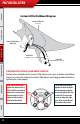
sembly. Dash mounting requires all parts in the dash mount assembly diagram (pg. 15).
TO ASSEMBLE:
1. Gather the Dash Mounting assembly pieces:
• Top Mounting Arm
• Bottom Mounting Arm
• The Cradle with Cradle Cable
• Dash Mounting Base with Foam Tape
• Top Plate
• Bottom plate (with threads)
• (2) Flat-Head Screws
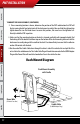
2. Insert the metal top plate into the recessed area on top of the top mounting arm and hold it in place
while inserting the bottom plate into the bottom mounting arm (note: the bottom plate has threaded
screw holes).
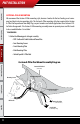
3. Bring the arms together with the ends of the arms covering the ball on the cradle back and the ball on
the mounting base. When together they will form two ball joints connected by a single arm.
4. Insert the two Flat-Head screws in the two holes in the top plate and then thread them into the bottom
plate through both arm pieces. Hand tighten the screws just enough so that the assembly stays in one
piece. You will fully tighten the screws once a mounting location on the dash has been located and a
desired angle for mounting is chosen.
PMT Installation