
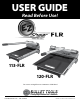
Use and Care Guide


3
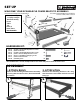
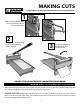
SEt Up
WELCOME! YOUR EZ SHEAR FLR COMES READY TO ASSEMBLE.
*
*You will need #2 & #3 Phillips head screwdrivers
and a 1/2” (13mm) socket or wrench.
Please Review and Verify Parts Included in Box:
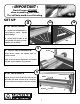
A S S E m b ly
1. ATTACH RAILS
Attach rails and mounting bracket to Power Assembly
base using Item A machine screws, fitted with Item B
star washers.
2. ATTACH TAIL
Attach tail and mounting bracket to rails using
Item C machine screws. Make sure holes in tail are
facing up.
21
F.
6.
1.
1a.
A.
B.
D.
E.
C.
G.
C.
2.
3.
4.
7.
5.
Item A. (4) 6mm x 65mm PH Phillips Machine Screws
Item B. (4) M6 Star Washers
Item C. (6) 6mm x 25mm PH Phillips Machine Screws
Item D. (5) M6 x 16mm FH Phillips Machine Screws
Item E. (4) #10 x 1 FH Phillips Self Tapping Screws
Item F. (2) M8 x 50mm Hex Bolts
Item G. (2) M6 Wing Nuts
HARDWARE KIT:
A.
C.
D.
E.
F.
B.
G.
1. Power Assembly
1a. Safety Lock pin
2. Handle Assembly
3. Fence
4. Table
5. Tail
6. Rails (2)
7. Hone Stone
8. Hardware Kit
*The Hardware Kit is used in multiple models. Your Shear may not use all of the items listed.