
Programming instructions

16
LOCALISATION ET RÉALISATION
DES BRANCHEMENTS
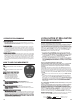
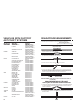
FIL(S) DALLUMAGE (BLANC et BLANC À FILET ROUGE) (+12 V aux positions
de marche, de démarrage et parfois daccessoires)
Faites tous les branchements le plus près possible du commutateur dallumage.
Le ou les fils dallumage se trouvent aussi dans le faisceau principal qui sort du
commutateur dallumage. Vérifiez votre schéma pour les couleurs probables et sondez
chaque fil à laide de la sonde de mesure fournie. Le ou les fils dallumage appropriés
indiquent +12 V et le voyant ROUGE sallume intensément quand la clé de contact
est à la position RUN ou CRANK et parfois à la position ACCESSORY (véhicules
GM plus récents). Les fils appropriés nindiquent pas +12 V à la position OFF ou
ACCESSORY (autres que certains véhicules GM).
1. Si le véhicule a un seul fil dallumage, comme cest le cas de la plupart des
véhicules nord-américains et importés jusquen 1993, reliez le gros fil BLANC au
fil dallumage n° 1, dans le faisceau de commutateur dallumage.
2. Si le véhicule a deux fils dallumage, reliez le fil BLANC comme indiqué à létape
1, au fil dallumage n° 1, puis le gros fil BLANC AVEC FILET ROUGE au fil
dallumage n° 2, dans le faisceau de commutateur dallumage.
3. Si le véhicule a trois fils dallumage, comme cest le cas de certains véhicules
GM, Ford et Chrysler plus récents, reliez le gros fil BLANC au fil dallumage n°
1 et au fil dallumage n° 3, dans le faisceau de commutateur dallumage. Veillez
à relier le FIL BLANC AVEC FILET ROUGE au fil dallumage n° 2, comme indiqué
à létape 2.
FIL(S) DACCESSOIRE ALIMENTANT LE MOTEUR DE
CHAUFFAGE/VENTILATEUR (BLANC À FILET NOIR) (+12 V à la position RUN
ou ON) Ce fil se trouve aussi dans le faisceau principal de commutateur
dallumage. Faites ce branchement le plus près possible du commutateur
dallumage.
La plupart des véhicules ont un fil daccessoire, mais certains véhicules Ford, les
véhicules GM plus récents et les véhicules Chrysler à partir de 1994 ont au moins
deux fils daccessoire. Consultez le tableau des couleurs de fil et vérifiez ce(s) fil(s).
Le ou les fils appropriés indiquent +12 V et le voyant ROUGE sallume intensément
quand la clé de contact est à la position ACC ou RUN, mais jamais à la position OFF
ou CRANK.
1. Si le véhicule na quun seul fil daccessoire, reliez-y le gros fil BLANC À FILET
NOIR.
2. Si le véhicule a deux fils daccessoire (certains véhicules GM et la plupart des
véhicules Ford), reliez le fil BLANC À FILET NOIR aux deux fils daccessoire.
Dans certains cas, si vous navez pas utilisé le gros fil BLANC À FILET ROUGE
pour lallumage n° 2 (votre véhicule na pas de fil dallumage n
o
2), vous pouvez
relier ce fil au fil daccessoire n° 2; vous naurez pas ainsi à relier ensemble le
fil daccessoire n° 1 et le fil daccessoire n° 2 au fil BLANC À FILET NOIR du
module principal.
FIL DE DÉMARREUR/LANCEMENT (JAUNE À FILET NOIR) (+12 V à la position
« Start » seulement)
Faites tous les branchements le plus près possible du commutateur dallumage.
Le fil de démarreur/lancement se trouve aussi dans le faisceau principal.
Consultez votre tableau pour les couleurs probables et vérifiez le fil. Le ou les
fils appropriés indiquent +12 V et le voyant ROUGE sallume intensément
uniquement à la position « Crank ». Ce fil nindique +12 V à aucune autre position.
Reliez-y le fil JAUNE À FILET NOIR. REMARQUE : Le plupart des Nissan et des
Audi ont deux fils de démarreur/lancement. Dans ce cas, reliez les deux fils du
faisceau de commutateur dallumage au fil JAUNE À FILET NOIR du module principal.
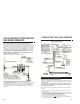
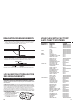
MASSE DU CHÂSSIS (NOIR)
Localisez un boulon ou une vis accessible sous la planche de bord, côté conducteur,
et reliez-y le fil de masse NOIR
du faisceau à 9 broches (voir illustration).
REMARQUE: Enlevez la
peinture sous la cosse.
Boulon du
véhicule
Cosse
Fil de masse noir
29
OPERATOR PROGRAMMING
RUNTIME CONFIRMARUNTIME CONFIRMATION:TION:
With the vehicle not running press and release Button #2, the parking
lights will flash (1) one time for each 5 minutes of programmed run time.
Example: (2) two flashes = 10 minutes
TTO SETO SET THE RUNTIMETHE RUNTIME
:
Press and hold Button #2 on the remote control for approx. 10 seconds
or until the parking lights begin to flash (one flash for each 5 minutes of
runtime) and when Button #2 is released the new runtime is programmed.
To check this programmed runtime for example, press and release Button
#2 if the parking lights flash (3) three times, the unit is programmed to run
for 15 minutes.
CCLEARING LEARING THE UNITS MEMORTHE UNITS MEMORYY::
Press and hold the brake, with the brake held, cycle the key in the ignition
switch from OFF to RUN, (5) five times within 4 seconds, the parking lights
will flash (3) three times. Unplug the unit from ALL wires and harnesses,
wait 30 seconds, plug the unit back into all harnesses, the units memory
is now cleared, set back to factory settings and ready to learn a remote.
You must follow the initialization procedure on page 13 to reprogram the
transmitter.
HOW TO USE YOUR NEW REMOTE
SSttartart
Press and release Button #1 the vehicle will remote
start.
SStoptop
Press and release Button #2 the vehicle will shut
down.
Pit S
Pit Stop: Exiting the Vtop: Exiting the Vehicle with the Engineehicle with the Engine
RunningRunning
Make sure the transmission is in park
and the brake is not pressed then
press and release Button #1 (start)
before turning the ignition switch off.
(The engine will remain running for
15 minutes or until the brake is pressed).
SSttartart
Using the remote included in this kit:Using the remote included in this kit: Press and release Button #1.
Using your factory keyless entry remote:Using your factory keyless entry remote: Press the Lock button (3) times.
Using Using AfAftermarket termarket Alarm:Alarm: Press the second channel button on your remote transmitter.
SStoptop
Using the remote included in this kit: Using the remote included in this kit: Press Button #2.
Using your factory keyless entry remote:Using your factory keyless entry remote: Press the Lock button (3) times again.
Using Using AfAftermarket termarket Alarm:Alarm: Press and release the second channel button on your remote
transmitter.
Pit SPit Stop (Exiting the Vtop (Exiting the Vehicle with the Engine Running)ehicle with the Engine Running)
With your factory keyless remote:With your factory keyless remote:
If the vehicle is running with the ignition key, pressing the Lock button on the factory keyless
will cause the parking lights to flash once (if connected). You can now turn off your ignition
key, remove the key and exit the vehicle. The vehicle will remain running for 15 minutes.
NOTE: Some vehicleNOTE: Some vehicles factory keyless wont work if the engine is running. If your vs factory keyless wont work if the engine is running. If your vehicleehicle
operates in this fashion, pit stop will not function.operates in this fashion, pit stop will not function.