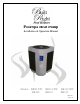
Pool/Spa Heat Pump Installation & Operation Manual Models BR80 XW BR100 BR115 XW BR110 BR135 XW BR135 BR-40101 Version 1.
HEAT PUMP LIMITED FACTORY WARRANTY This warranty applies to all models installed within the State of Florida after September 1, 2010 (all versions, brands and voltages). Built Right Pool Heaters, LLC warrants this Swimming Pool Heat Pump, to the original owner and installation site, to be free of material or workmanship defects for a limited term. Specific warranty terms, by model, are listed below.
Page | 1 Table of Contents Important Information Log 2 Introduction 3 Installation Location Recommendations Clearances Equipment Pad Water Piping 4-5 4 4 4 5 Electrical Hook Up Bonding Using an External Controller Wiring Diagram 6-7 6 7 7 Heat Pump Operation / Digital Control Operation Control On/Off Pool/Spa Mode Displaying the Temp.
Page | 2 Please Read Carefully For your records, please complete the information requested below. Should warranty service be required, the following information will be requested to initiate service.
Page | 3 INTRODUCTION Thank you for your purchase of a Built Right pool and spa heat pump, proudly made in Punta Gorda, Florida. To ensure a long worry-free life, your heat pump has been manufactured with the highest quality parts available today. A pool heat pump is a cost effective method of heating your pool or spa. Your Built Right heat pump will provide you with years of pool enjoyment. Your new heat pump takes heat from the surrounding air and transfers it into the water.
Page | 4 INSTALLATION Location Recommendations Make sure the heat pump is not located where large amounts of water may enter the heater. This includes roof run-off and sprinklers. Re-direct any suspect sprinkler heads away from the heater. Use a deflector if necessary. (Corrosive sprinkler water damage will void the warranty!) In cases where roof run-off is unavoidable, use of a down spout and/or gutters will protect the heater.
Page | 5 Water Piping For your convenience the heater’s inlet and outlet are labeled. 2” PVC Unions are provided with the heater. The piping sequence is as follows: Pool Circulation Pump → Filter → Heater → Chlorinator → Pool To minimize harm to the pool equipment, any inline chlorination device must be located as the last item returning to the pool. Use only rigid PVC piping and all joints should be cleaned then secured with PVC glue.
Page | 6 ELECTRICAL HOOK UP The wiring of your heater should be performed by a qualified electrician in accordance with local code requirements. CAUTION! The main power disconnect must be off before opening the access panel. IMPORTANT! The electrical conduit must be run up through the base of the unit and connected at the control box with a conduit connector. Check the heat pump data label for required breaker size. Copper wire and a properly sized breaker must be used.
Page | 7 Using an External Controller Push the remote wires from the external controller through the rubber plug on the bottom left side of the control box. Connect the two remote wires to the two wires from the heater control with the grey wire nuts. For POOL/SPA Remote – Adjust both pool and spa temperature’s to your desired setting. For Remote Thermostat – Adjust pool temperature down to “OFF” and turn spa temperature up to 104° F.
Page | 8 HEAT PUMP OPERATION / DIGITAL CONTROL OPERATION Control On/Off When the unit is powered up, but in the OFF mode, the display will show “OFF” when you press the SET button. To turn the unit on, press the Up arrow button until desired temperature is reached. To turn the unit off press and hold the Down arrow button until the display shows off. This point will be one level below 51 degrees F. This is convenient for shutting the unit down for short periods of time.
Page | 9 Pool/Spa Modes The control is equipped with two independent thermostats, one for pool temperature and one for spa temperature. This is to allow the user to preset a temperature of their choice and switch between the two settings.
Page | 10 GENERAL MAINTENANCE CAUTION! Make sure all power is disconnected to the heater prior to washing. Cleaning Your heater requires only minimal maintenance, Make sure the heater has good airflow through the evaporator. To ensure good airflow, remove any leaves, paper or other debris. Also, be sure to keep all shrubs trimmed back from the heater for allowance of sufficient airflow. Make sure the drain holes in the base are free of debris to ensure proper drainage of condensate water.
Page | 11 TROUBLESHOOTING To verify that your heater is heating your pool, place your hand above the unit. Cool air will blow out of the top of the heater, this occurs when the heating indicator is on. The water returning to the pool will be between 3° to 5° warmer* than the overall pool water temperature. There will also be water draining out of the base of the unit after 10 minutes of run time. *depending on model, ambient conditions, and water flow rate.
Page | 12 SERVICE INFORMATION All service must be handled by an Authorized Service Center. Warranty may be void if a nonauthorized service representative does service. Do not return the heater to your dealer, as they do not provide service. Before calling for assistance or service, please check the Troubleshooting section of this manual. This may save you the cost of a service call. If you still need help, follow the instructions below.
NOTES ________________________________________________________________________________ ________________________________________________________________________________ ________________________________________________________________________________ ________________________________________________________________________________ ________________________________________________________________________________ ________________________________________________________________________________ ____________________
Built Right Pool Heaters, LLC.