
Installation Guide

Step 3:
Step 4:
After the Shutter-Clips are in position and fastened to the
mounting surface, attach the shutter. Place the shutter
over the Shutter-Clips and press the ribs of the shutter on
to each Shutter-Clip. Press the shutter firmly against the
mounting surface being sure all six clips engage.
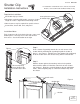
With it's front facing the mounting surface, align the
shutter next to where it will be mounted. On the lines
drawn in the previous step, sketch marks
corresponding to the mounting areas of the shutter.
Figure 3
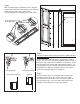
Step 5:
Read all of Step 4 and view Figure 4 before installing Shutter-
Clips to mounting surface. Fasten the shutter clips centered
on the vertical line and between the sketch marks drawn in
Step 3. Use one screw next to the window and two screws in
the shutter clips away from the window. See Figure 4. These
clips should be free to move with temperature changes. The
mounting bracket on the Shutter-Clip should be placed in the
upright position. Different mounting surfaces may require
special mounting procedures or techniques.
correct placement areas
for Shutter-Clips
fasten with bracket up optional
next to window away from window
sketch marks
Figure 4