
Installation Guide

3. Start with a whole plank in the le hand ner of the room with the tongue side and end toward the wall.
Lay the
st row of planks along a halk line and trim to to the wall allowing a 3/8 in (6.35mm)
expansion spa
e. If star ng the rst row with a whole width plank it will be ne essary to trim the tongues
next to the wall, then p
e the ut ends next to the wall using sp rs. To trim the planks, a table saw
works best for both end and length
uts.
4. Align and a
h the end joints
of the planks in the
rst row using the fold down method, tap the e
using a b
k to lo the joints se urely. For length joints insert the tongue into the groove while holding
the plank at a 20° to 30° angle to the
or. Apply pressure inward and down un the planks together,
you may use add
onal tapping if ne essary. Use spa ers between the long edge and end of the planks
next to the wall to maintain the expansion spa
e.
5. Start the se
nd row using 1/3rd of a plank. he ut
end against the wall. Insert the tongue on the
long side of the plank into the groove of the plank in the
rst row. Hold the plank in a 20° to 30° angle
while applying pressure inward and down un
they lo together. To omplete the se ond and all
su
essive rows, it will be ne essary to align the short end onto the previous plank
st before lo ng the
long side of the plank. Angle the plank and push the tongue into the groove and adjust it un
the tongue
ks into p e
. It may be ne
essary to tap the planks inward to lo the joint together. Complete the
se
nd row allowing 3/8 in expansion spa e at the start and end of e row.
6. Start the third row using a 2/3rd length of a plank with the
ut end against the wall. Comple h row
there
using a random layout with end joints o -set by at least 8”. Plan the layout to avoid using small
planks (less than 6”) at the walls and stagger the end joints 6 to 8 in
hes. The ut pie e at the end of the
row
an o n be used to start the next row provided it a hieves a random layout. Always p e the ut
end against the wall and allow for the expansion sp
There should never be a ut pie e in the eld of
the installed area, a
uts are along the perimeter.
7.
HDPC Planks are unique in that they
an also be installed using a tapping b k and rubber
mallet or hammer and pull bar in dif
t areas su h as the last row and when ng under door trim.
Always use a pull bar on the
ut edge of the plank, f
tory edges an be damaged if the pull bar is used
dire
tly against them.
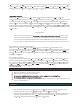
8. When
ng around door trim it will be ne essary to slide the plank under the trim. This n be
omplished easily by star ng the row on the side of the room with the door trim and then sliding the
plank into p
e on e it is a hed. The row n be ompleted by inse ng the tongue onto the groove or
the groove under the tongue depending on the dire
n. A tapping b k and pull bar (Diagrams 2a & 2b)
n also
be used to lo
the joints together while the planks are in a t pos on. Use a series of light taps
un
the joint is gradually lo ked together.
Diagram 2a Diagram 2b
Bathrooms: HDPC planks and be installed in full and half bathrooms.
When HDPC®
Planks are installed in a bathroom, remember that wood and water do not get along and to avoid
standing water if possible. The
oring should be installed around the toilet leaving a 1/8 in h (3.175mm)
expansion spa
e. Use 100% sil ne ulking to ll the expansion spa e at the toilet, tub, shower, and all
wet areas to help prevent surf
e water seepage from going under the or.
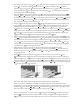
Pipes: In rows where there is a pipe or other ve
al obje t through the sub or, make sure the obje t
lines up
tly where two boards will meet on the short ends. Take are to measure arefully before
u ng, so the two boards end at the middle of the obje t. Use a drill or hole bit th at is the diameter of