
Use and Care Manual


7
Through the exterior wall using 45° elbows.
*** IMPORTANT ***
Pipe will need to pass through the wall at a 45 degree angle.
AT NO TIME CAN THE PIPE RUN AT MORE THAN 45 DEGREES OFF VERTICAL!
1.
Remove top of unit by lifting straight up
2.
Remove bins from inside of unit
3.
Separate bin by gently pulling up on bin lid
handle while holding bottom bin firmly.
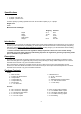
4.
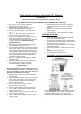
Insert fan housing in back of unit as shown in
Fig. 1
5.
Use 2 – ¾” #8 – 32 screws and 2 #8 nuts to
secure the fan housing to the base.
6.
Slide 2” x 2” shielded rubber coupler over vent
fan housing nipple with screws facing
downward. Tighten clamp using 5/16” nut driver
or socket until snug. (CAUTION: DO NOT
OVER TIGHTEN)
7.
Mark position on wall behind toilet where pipe
will penetrate through interior wall
8.
Ensure position marked is not directly in line with
studs, wires, pipes or other obstructions that will
prevent the vent pipe from running through the
wall. Remember the pipe will be running through
the wall at an upward 45 degree angle. Ensure
there are no obstruction on the outside of the
wall where the pipe will exit.
9.
Drill a 2 ½” hole through the wall at an upward
45 degree angle
10.
Determine how and where you are going to run
the drainage tube using the “Drainage
Recommendations” section as a guide.
***IMPORTANT***
Ensure placement of the drain tube allows for a
constant downward slope to promote proper
flow of the liquids. Ensure drain tube does not
kink wherever bends are necessary.
11.
Mark position on wall or floor where drain tube
will penetrate.
12.
Ensure position marked is not directly in line with
joists, studs, wires, pipes or other obstructions
that will prevent the drain tube from running
through the wall or floor.
13.
Drill a 1 1/4” hole in the floor or wall to
accommodate the drain tube.
14.
Pass a 2” white pipe through the wall and into
the 2” rubber coupler. Ensure the pipe is fully
insulated in the wall.
15.
Tighten clamp on rubber coupler using 5/16” nut
driver or socket until snug.
16.
Cut 2” white pipe extending through the wall to
desired length.
17.
Glue 45 degree elbow to end of 2” white pipe
extending through wall with open end facing
upward.
18.
Glue next 2” white pipe into open end of 45
degree elbow.
19.
Follow steps 18 – 39 in instructions on page 6
Starting the toilet
1.
Insert the composting bin inside the toilet with
the curved end facing forward.
2.
Open the included 8-gallon bag of starter mulch
and add about 1 quart of water to it. (just enough
to keep the mulch from dusting)
3.
Mix the water with the mulch to evenly distribute
it throughout the bag.
4.
Place approximately 2” of starter mulch into the
bin.
5.
Replace the top on the toilet.
6.
Your BTS 33 is now ready to use
Drainage recommendations
The drainage system to be chosen depends entirely
on the soil condition, ground water level and local
regulations. Always consult your local health
authorities before installing your drainage system.