
Use and Care Manual


5
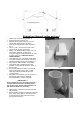
Straight run through ceiling and roof
1.
Remove top of unit by lifting straight up
2.
Remove bins from inside of unit
3.
Separate bin by gently pulling up on bin lid
handle while holding bottom bin firmly.
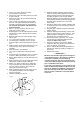
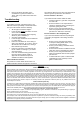
4.
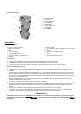
Insert fan housing in back of unit as shown in
Fig. 1
5.
Use 2 – ¾” #8 – 32 screws and 2 #8 nuts to
secure the fan housing to the base.
6.
Slide 2” x 2” shielded rubber coupler over vent
fan housing nipple with screws facing
downward. Tighten clamp using 5/16” nut driver
or socket until snug. (CAUTION: DO NOT
OVER TIGHTEN)
7.
Insert male end of 2” x 45 degree street elbow
into rubber coupler with the female end facing
upward. Assembly should now look like fig. 2.
8.
Place toilet in desired location and position
9.
Using plumb bob or weighted string mark
position on ceiling directly above the center of
the vent pipe.
10.
Ensure point marked on ceiling is not directly
below a ceiling joist, wiring, pipe, or other
obstruction that will prevent the pipe from
running upward.
11.
Determine how and where you are going to run
the drainage tube using the “Drainage
Recommendations” section as a guide.
***IMPORTANT***
Ensure placement of the drain tube allows for a
constant downward slope to promote proper
flow of the liquids. Ensure drain tube does not
kink wherever bends are necessary.
12.
Mark position on wall or floor where drain tube
will penetrate.
13.
Ensure position marked is not directly in line with
joists, studs, wires, pipes or other obstructions
that will prevent the drain tube from running
through the wall or floor.
Fig 1
Fig 2