
Use and Care Manual

6
14.
Drill a 1 1/4” hole in the floor or wall to
accommodate the drain tube.
15.
Drill a 2 1/2” hole in the ceiling where you made
a mark in Step 8.
16.
Drill a 2 1/2” hole in the roof directly above the
hole in the ceiling.
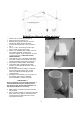
17.
Glue 1 length of 2” white pipe into the female
end of 2” x 45 degree street elbow attached to
the back of the toilet using PVC glue (ensure
you follow all precautions and directions on
glue and cleaner)
18.
Glue 2” x 2” PVC coupler to other end of 2”
white pipe on back of toilet.
19.
Repeat steps 17 and 18 until white pipe extends
through the roof and at least 6” above anything
within 10’ of it.
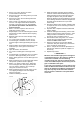
20.
Seal the hole in the roof around the pipe using
silicon caulk.
21.
Cut 1 end of foam insulation to angle of roof
22.
Cut total length of insulation so it’s 2” shorter
than the length of white pipe sticking through the
roof
23.
Wrap insulation around white pipe above roof so
all but the top 2” of the pipe is covered with
insulation.
24.
Tape all seams in the insulation.
25.
Cut 1 end of 4” black pipe to the angle of the
roof.
26.
Cut total length of 4” black pipe so it is 2” shorter
than the 2” white pipe sticking out of the roof.
27.
Slide 4” black pipe down over the white pipe and
insulation
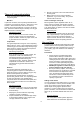
28.
Slide roof flashing over 4” black pipe with domed
side upward. (note this will be a tight fit!)
29.
Slide 2” x 4” rubber coupler over 4” black pipe
and 2” white pipe till 2” white pipe is flush with
top of 2” opening. Tighten 2” and 4” clamps
using 5/16” nut driver or socket.
30.
Slide roof flashing down so it lies evenly on the
roof, slipping its flanges under the shingles
along the top edge.
31.
Outline the flashing on the roof.
32.
Raise the flashing and apply silicone sealant
inside the outline. Slide the flashing back down,
sliding the flange under the shingles along the
top edge and press it firmly into the sealant.
When the flashing is properly placed the top part
of the flashing should be under the shingles and
the lower portion should be on top so water
sheds easily.
33.
Secure the flashing with corrosion resistant nails
or staples at each corner and along the sides at
4” – 6” intervals.
34.
Exposed nails or staples should be sealed with
silicone sealant.
35.
Install the drainage tube attaching it to the drain
nipple on the back of the toilet using the 1” hose
clamp provided in Hardware Kit “A” and run it
through the hole you drilled in step 13
36.
Attach toilet to floor using 4 #10 1 ½” machine
screws with 4 #10 stainless/rubber bonded
washers RUBBER SIDE DOWN.
37.
Remove compost bin tray from box labeled
“Parts Box” and place the bin tray in the bottom
of the unit with the ridge side up.
38.
Place 1 compost bin in toilet so depressions on
bottom of bin matches up with the “nipples” on
the bin tray.
39.
Replace top of toilet
*** IMPORTANT ***
Wherever the ventilation pipe passes through an
unconditioned area (i.e. attic space) or outside it
needs to be insulated. Use the remaining
insulation from your vent kit to insulate the pipe
in the unconditioned space. Ensure every inch of
pipe is insulated in this space
A rain cap is not necessary. If one is desired, use
ONLY the BioLet authorized wind directional cap
that can be obtained from BioLet Toilet Systems.
Any other cap may hinder the airflow from the
toilet and cause a reduction in the performance
of the unit.