
Installation manual


CS-Xpress PC Software / UCM01 Interface Installation
Windows 95/98/2k Installation
1 - Insert CD ROM into Drive
A screen with icons will appear.
2 - Click on Setup, click next, next,
when prompted.
3 - Then check the tickbox:
Yes, Launch the program file, then ok.
CS-Xpress 3 is installed within
‘Program Files’ folder.
The program will be installed on
your hard disc with an icon in the
program manager of your choice.
The program will run from the CS-Xpress.exe icon. Ensure that you
close down any resident fax software that may be present on your
computer. A customers system configuration is stored as a .csx file
type. The system configuration is stored within U4 I.C. on the main
CPU. Never remove or replace this I.C. without first powering the
system down. A default configuration may be found in the CS-Xpress
Folder using file / open default.csx.
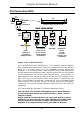
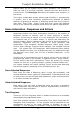
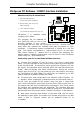
Connecting your PC to the Model UCM01 Interface
1. Connect the interface to your PC comm. port using a serial data
cable. Link the interface to the Comfort control panel by connecting KA
to KA and KB to KB. A connection is also required to Comfort’s 12 volt
DC supply. The Interface Green and Red LED’s D10 and D9 should now
'flicker. Start CS-Xpress and select Configuration. Select the correct
comms port for your PC. You can make-up your own lead for this using
the Termination kit UCM-TERM. The UCM may be installed up to 200
metres away using Belden twisted pair cable.
2. To upload your new configuration into Comfort, select Transfer, PC
- > System, select a catergory to download from the left hand menu or
'Do All' from the middle of the screen, enter the User 1 Login-Code
(def: 1234) followed by send, then click the Green CSX Console icon on
the bottom bar and view the data being exchanged. This is also useful
for showing any problems with the download. The interface Red and
Green LED’s D11 and D12 will flash as data is being sent. The download
has finished when the screen shows ‘Transfer Complete’ on the bottom.
3. Now press Comforts reset button on the main PCB, this will cause
the settings to take effect, the system will re-start and jump to the last
mode it was in. Engineer access will be disabled (Press F0 to
re-enable).
Comfort Installation Manual
60
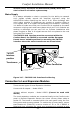
U1
UCM 4.XX
U6
STATUS LEDS UCM
+
KB KA COM 12V
1
2
3
SW7
RDY BUSY BUSY2 ERR
SW6
SW4
SW5
SW6
UPLOAD
TEST
COPY
COMPARE
SW3
MASTER
D11
D12
SW1
U2
U3
U5
D10
D9
COPY
JP2
JP2A
P1
J2
+
KB KA COM 12V
RS485
RS232
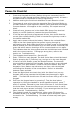
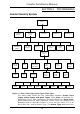
Comfort
CPU
UCM4
UCM5
UCM6
UCM7
UCM8
UCM3
UCM2