
Installation manual

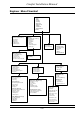

Engineer Menu Flowchart
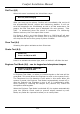
Entry/Exit Time (4,2)
0 - Entry Time
1 - Exit Time
2 - Entry Warning Time
3 - Night Exit Time
Security Options (4,3)
1 - Force Arm
3 - Siren Reverse
Control Station (4,4)
Enter Control Key 0-*
Enter Response 0-127
Code On or Off
Control Menu (3,1)
Enter Control Key (0-9)
1 - Description
2 - Action Key
Time Program (3,3)
Enter Time Program No and #
1 - Day Of Week
2 - Change Time
3 - Response
Vacation Program (3,4)
Enter Vacation Program No and #
1 - Start Time (hour)
2 - Duration (hours)
3 - ON Response
4 - OFF Response
Security Mode Response (3,5)
0 - Security Off Mode
1 - Away Mode
2 - Night Mode
3 - Day Mode
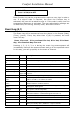
1 - Zone
2 - Alarm
3 - Control
4 - Security
5 - Event Log
6 - Sign-in Code
7 - System
8 - Test Mode
9 - Program Menu
# to End
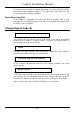
Zone (1)
Enter Zone number and # key
1 - Description
2 - Zone Type
3 - Entry Path
5 - ON Response
6 - OFF Response
Alarm (2)
Enter Alarm Type and # key
1 - Dial Settings
2 - Response
3 - Description
4 - Strobe
5 - Siren Type
7 - Trouble Arm Option
8 - Alarm State
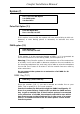
Control (3)
1 - Control Menu
2 - Holiday Settings
3 -Time Program
4 - Vacation Program
5 - Security Mode Response
6 - Response
Security (4)
1 - Phone Settings
2 - Entry/Exit Time
3 - Security Options
4 - Control Station
Event Log (5)
1 - Event Log
0 - Erase Event log
Change Phone Numbers (4,1)
Select Phone (1 to 8)
0 - No Phone
1 - Voice Phone
2 - Pager
3 - Alarm Message
4 - Monitoring Station
Monitoring Station (4,1,4)
1 - CMS Code (Account Code)
2 - CMS Type (format)
3 - Phone Number
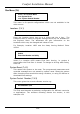
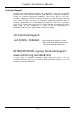
Test (8)
1 - Battery Check
2 - Security Check
3 - Dial Test
4 - Siren
5 - Strobe
6 - Eng Test Mode
System (7)
1 - Pulse Dial Option
2 - PABX Option
4 - Star Menu
PABX Option (7,2)
1 for ON
0 for OFF
if ON, select PABX Key
Star Menu (7,4)
1 - Locations
2 - System Reset
3 - System Control No
Dial Settings (2,1)
1 - Dial Settings (1-8)
2 - Dial Delay
3 - Report Code
4 - Restore Code
6 - Class Code (Contact ID)
Siren Type (2,5)
Siren Delay
Comfort Installation Manual
132