Diverse Deskphone For use with Diverse 1010, 1015, 2010, 2015, 2-Line and ISDN base stations User Guide This equipment is not designed for making emergency telephone calls when the power fails. Alternative arrangements should be made for access to emergency services.
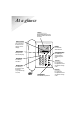
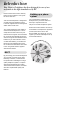
At a glance Display Illuminated display shows dialled numbers and menu structure. Option buttons Lets you select from the menu options on the display. Diverse 2000 Deskphone Recall For use with switchboards. Menu button Phonebook For storing numbers. Quickdial button © Brings menu onto the display 1 GHI [■■■ ] RCL ABC DEF 2 3 JKL MNO 4 5 6 PQRS TUV WXYZ 7 8 9 ✱ For dialling a stored number specified by the user.
For your records Date of purchase: Place of purchase: Serial number (on the underside of the telephone base station): Purchase price: For warranty purposes, proof of purchase is required, so please keep your receipt. Personal Emergency Numbers 1 2 3 4 Please use this space to record your selected Diverse Deskphone PIN code. See page 29 for the default PIN code and for full instructions on how to change that code for added security.
In this guide At a glance 1 Introduction 4 Installation 6 Registering your Diverse Deskphone with a base station 8 Your Diverse Deskphone menu display 11 Using the Diverse Deskphone 13 Using the Diverse Deskphone with a switchboard 27 Additional Features 29 Operating with additional base stations 33 How to use the shortcut function 36 Maintenance 40 Help 41 Technical Information 42 Index 43 3
Introduction Your Diverse Deskphone has been designed for ease of use and made to the high standards set by BT. CON F IGURATI ON W ITH DI VE SD N By purchasing your Diverse Deskphone you now own a product which offers flexibility of location, combined with the performance advantages of a high quality telephone system. It complies with the Digital Enhanced Cordless Telecommunications (DECT) standard and offers unparalleled quality and features.
Important information 1. Do not use any power supply other than the one provided with your telephone unit (supplied BT unit C39280-Z4-C66). Use of other power supply units may cause irreparable damage to your telephone; it will invalidate your warranty and the approval given to the apparatus. 2. Research has shown that in certain cases medical equipment can be affected by cordless telephones. A distance of at least one metre should therefore be observed between the telephone and medical equipment.
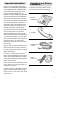
Installation Follow these steps to set up your Diverse Deskphone ready for use. Plan the location of your Diverse Deskphone Make sure your Diverse Deskphone is within 2 metres of the phone and mains sockets. 1 Connect the handset to 2 Connect the Deskphone to the mains power supply Insert the telephone power supply lead into the socket marked on the underside of the telephone. Put the other end of the plug-in power unit into a 220/230V electricity socket.
In order to ensure that you achieve the maximum range possible with your Diverse system please note the following advice: Install the base station on a central location in your home or office. Avoid placing the base station or Deskphone: • • • • • Behind metal doors. Under the stairs. Behind heavy furniture or cabinets. In rooms with thick or metal walls. Near other electrical equipment, as it may generate electrical interference. • In the bathroom or other damp rooms.
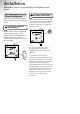
Registering your Diverse Deskphone with a base station Registering with Diverse 1010,1015, 2010 and 2015 base stations If your Diverse Deskphone has not been registered previously to other base stations, the display will show: REGISTER? If REGISTER? is not displayed, firstly select the REGISTER option from the SETTINGS menu, then select the base station number you wish to register it with, then follow the instructions below: At the Deskphone Press keypad buttons in order shown OK CODE Press OK.
Registering with Diverse 2-Line and ISDN base stations If your Diverse Deskphone has not been registered previously to other base stations, the display will show: REGISTER? If REGISTER? is not displayed, firstly select the REGISTER option from the SETTINGS menu, then select the base station number you wish to register it with, then follow the instructions below: At the Deskphone OK Enter the base station code (default 0000). OK KEYPAD Press OK.
To de-register a base from the handset Press keypad buttons in order shown This de-registers the Deskphone from a selected base station. © ▼ Press the MENU button and use DOWN to highlight SETTINGS. OK Press OK. Display shows a list of menu options. ▼ Press DOWN to highlight BASE SETTINGS. OK Press OK. Display lists the base stations to which you have registered your Deskphone. ▲ Press UP or DOWN to select the base station from which you want to de-register your Deskphone. ▼ + Press ACTIVATE.
Your Diverse Deskphone Menu Display Your Deskphone offers a menu-driven display. You enter the menu lists by using the MENU button. The option buttons below the display allow you to select the options within each menu and make adjustments to their settings. To Exit from the menu You can leave a menu without saving any changes or settings by simply lifting (or replacing) the handset. Alternatively, press the LOUDSPEAKER button twice. ▼ ➔ Soft key options Use the Option button below to select.
Menu Buttons Phone Lock Handset Volume Base 1 Baby Alarm Ringer Options Base 2 ISDN config Select Base Register Base 3 De-register base Settings Base Settings Service Local Settings Menu depending on base station Change base name Beeps Key beeps Autom.
Using the Diverse Deskphone Making and receiving external calls To use the loudspeaker This allows you to talk without holding the handset. To make an external call Press LOUDSPEAKER before or after dialling the number. Press keypad buttons in order shown Or during a call Lift the handset and dial the number. Or, ➔ KEYPAD Enter the number on the keypad, check that it is correct and then lift the handset to dial. If you make a mistake entering numbers, use DELETE to delete them.
To accept an incoming call To store a redial number in the director y With the Deskphone in idle state it is possible to store any redial number into its phonebook. Press keypad buttons in order shown Lift the handset. Or Press the LOUDSPEAKER button. To redial numbers You can redial the last five numbers dialled from your Deskphone. ➔➔ Press REDIAL. Use the UP or ▲ DOWN option to highlight the ▼ required number. + ▼ Press DOWN to select COPY NUMBER. OK Press OK.
Making internal calls To make an internal call Your handset must be in the cradle. INT Press INT. Dial the internal extension you want. Transferring external calls You can easily transfer calls between handsets. On most Diverse handsets this is done by pressing INT followed by the extension number you wish to call. Generally, you can replace your receiver either before or after the transferred call has been picked up. For more information please see your base station guide.
To put an internal or external call on hold using the Diverse 2-Line To put an internal call on hold using the Diverse ISDN While in a call: Press keypad buttons in order shown © While in a call: Press the MENU button. © ▼ OK RESUME Press DOWN to highlight INTERNAL CALL. Press OK. The call is put on hold. External callers will hear music whilst internal callers will hear silence. Press RESUME to return to the call. Note.
To transfer an external call with the Diverse 2-Line © NEXT OK 0-9 ✱ END CALL To transfer an external call with the Diverse ISDN Press the MENU button. INT Press NEXT to highlight INTERNAL CALL and press OK. 0-9 Either enter the internal number (0-9) of the handset or telephone to which you want to transfer the call or press the ✱ button to ring all handsets. When the call is answered, you can talk to the other handset without the outside caller hearing.
To add a number and name to the Phonebook To dial a number stored in the Phonebook Press PHONEBOOK. The display shows a list of stored numbers. Press keypad buttons in order shown Press PHONEBOOK. + ▼ OK ➞ GHI 0 Press ACTIVATE. ▲ ▼ Use the DOWN option to highlight NEW ENTRY. Press OK. The display shows NAME and TEL.NUMBER and the cursor flashes for you to input the name first.
To change an entr y in the Phonebook To delete individual entries Press PHONEBOOK. ▲ ▼ Press UP or DOWN to select the entry you wish to change. Press PHONEBOOK. ▲ ▼ + + Press ACTIVATE. ▲ ▲ ▼ Press UP or DOWN to highlight EDIT ENTRY. ▼ OK OK Press OK and the display takes you to the name/number you want to change. Use the LEFT, RIGHT and DELETE options and use the keypad to make your changes. Press ACTIVATE when you have finished editing.
When COPY ENTRIES TO INTERNAL UNIT is displayed, enter the internal extension number of the telephone you wish to copy to. To find out how much free space is in the Phonebook memor y Press keypad buttons in order shown + ▲ ▼ OK Press PHONEBOOK and then press ACTIVATE. Press UP or DOWN to highlight AVAILABLE MEMORY. Press OK. The amount of free space will be displayed briefly. For example, the display will show: MEMORY: 74% AVAILABLE.
If you wish to escape a MENU press the LOUDSPEAKER button twice or lift and replace the handset on the cradle. To change the settings on your Diverse Deskphone © ➔ To display the SETTINGS menu options To adjust the handset volume Press the MENU button. ▼ Use DOWN to highlight SETTINGS. OK Press OK. You can set the handset volume to three different levels. The standard setting is 1. © Press the MENU button. OK Highlight SETTINGS and press OK. ▼ Highlight HANDSET VOLUME. OK Press OK.
To adjust the ringer volume To adjust the ringer tone There are 10 different ringer tones from which to choose. Press keypad buttons in order shown The ringer volume can be set to six different levels. © Press the MENU button. OK Highlight SETTINGS and press OK. ▼ Highlight RINGER OPTIONS. OK Press OK. ▼ Press DOWN to highlight RINGER VOLUME. OK © OK Highlight SETTINGS and press OK. ▼ Highlight RINGER OPTIONS. OK Press OK. ▼ Press DOWN to highlight RINGER TONE. OK Press OK.
Range warning beep To display the LOCAL SETTINGS menu options © Tells you when the telephone is too far from the base station during a call. Default setting is OFF. Press the MENU button. Confirmation beep ▼ Use DOWN to highlight SETTINGS. Confirms that you have followed procedures successfully. Default setting is ON. OK Press OK. Error beep ▼ Highlight LOCAL SETTINGS. OK Press OK. Display shows the following menu options. Lets you know that you have made a mistake when following a procedure.
Press DOWN to highlight the beep you want to modify. OK To change the language on the display Press OK. The display will show the current setting and an ON or OFF button to change the setting. You can have the display in ENGLISH, GERMAN, FRENCH, ITALIAN, SPANISH, PORTUGUESE or DUTCH. The standard setting is English. Either – To change the setting. ON OFF OK Press ON (if current state is off) or OFF (if current sate is on). Press the MENU button. © Or – To keep the current setting.
▼ Press UP or DOWN until one of these words appear: – – – – – – OK ▲ ▼ © Press UP or DOWN until one of these words appear: Highlight SETTINGS. Press OK. OK Highlight LOCAL SETTINGS. Press OK. OK Highlight BABYALARM LEVEL. Press OK. Use LEFT and RIGHT to select the level you want (1 = least sensitive, 3 = most sensitive). OK Press OK. The sensitivity is set. (See page 31 for a description of the baby alarm feature.
To reset the Deskphone back to original standard settings Press keypad buttons in order shown This will not affect the PIN, Phonebook or base system code. The following settings will be restored: Ringer volume 3 Ringer tone 1 Handset volume 1 Loudspeaker volume 3 Range warning OFF In-range Beep OFF Key Beep ON Confirm Beep ON Error Beep ON Automatic Backlight ON Language Setting English Redial number list Deleted ISDN Configuration ON Press the MENU button. © ▲ ▼ Press UP or DOWN to select SETTINGS.
Using the Diverse Deskphone with a switchboard Your Diverse Deskphone can be connected to all compatible switchboards (PBXs). For a list of compatible switchboards call the Diverse Helpline on 0845 7908070. See your Diverse base station user guide for more information on using your phone with a switchboard. When connected to some switchboards it may be necessary to inset a pause in the number string. The following procedures show how it can be done.
To insert a pause in a number stored in the phonebook Press keypad buttons in order shown Refer to the phonebook procedures on how to create, edit and save phonebook entries. Either – when creating a new entry. Enter the name and part of the number up to where the pause should go. + Press ACTIVATE. ▼ Press DOWN to highlight INSERT FUNCTION. OK Press OK. Display will show PAUSE highlighted. OK Press OK. Display will now show a P at the end of the number you are entering.
Additional Features If you enter an incorrect PIN number whilst changing your PIN, the display branches back to Handset Settings and you have to work through the process again. Security Using and changing the Deskphone PIN code Highlight SETTINGS and then press OK. OK Highlight LOCAL SETTINGS and press OK. OK Highlight CHANGE PIN and press OK. CODE OK To change the system code, please refer to your base station user guide.
Phone Lock To block the telephone from making outgoing calls Press keypad buttons in order shown The Diverse Deskphone offers call barring to prevent unauthorised use. Incoming calls can still be answered. © OK CODE Quickdial Number A Quickdial number can be stored in your Diverse Deskphone so that when you lift the handset, the Quickdial number is automatically dialled.
To edit or cancel a stored Quickdial number Press the MENU button. © OK CODE OK ▲ Select PHONE LOCK and press OK. Enter PIN (default 0000) and press OK. OK Use UP or DOWN to select DSS NUMBER from the menu and press OK. ➞ Use the RIGHT/LEFT and DELETE buttons to change the number (or just use the DELETE ▼ + OK Press ACTIVATE once you have finished your alterations. Press OK to save entry.
On the phone in the baby room Press keypad buttons in order shown Press the MENU button. © ▼ Using the DOWN option on the menu highlight BABY ALARM. OK Press OK. 0-9 + OK Enter the extension number of the telephone you wish to ring as the alarm. Press ACTIVATE. STORE will be highlighted on the display. Press OK. Display will show BABY ALARM ACTIVATED INTERNAL, plus the extension number of the telephone to be called. To switch the baby alarm OFF OFF 2 Press OFF.
Operating with additional base stations You can register your Diverse Deskphone with up to three base stations. Or – At a Diverse 2-Line or ISDN base station If you are registering phones to more than one base we recommend that you: 1. Ensure each base station has been assigned a different number. 2. Ensure that each handset is given the same extension number at each base with which you register it. Then – At the Deskphone Press the MENU button.
KEYPAD OK KEYPAD OK Enter the system code for the base to which you are attempting to register. To set the Diverse Deskphone to search for a specific base signal Press OK. After a few seconds the Deskphone will display all available internal numbers. If you are using your phone in an area where two base signals overlap, we recommend that you specify a preferred base signal for your telephone to search for first.
To change base station name/ numbers on your Diverse Deskphone You may decide to reassign base names/numbers when building up your telephone system. The procedure opposite removes the registration information from the Diverse Deskphone only. On completing these steps you will need to remove the information from the base station as well. See your base station user guide for instructions. Press the MENU button. © Select SETTINGS and press OK. OK Select BASE SETTINGS and press OK.
How to use the shortcut function Shortcut function Your Diverse 2000 Deskphone has a shortcut button which gives you access to a shortcut menu. In the shortcut menu you can store frequently used functions as shortcuts which can be accessed when the phone is in idle state or on-line. Each shortcut corresponds to a button sequence which is saved under a shortcut name and can then be retrieved from the list of shortcut names, just like a directory entry. Overview of shortcut functions.
How to insert functions whilst creating a new shortcut See list below of available functions. + How to use a shortcut [■■■ ] Press the ACTIVATE button. ▲ ▲ ▼ Press UP or DOWN to highlight INSERT FUNCTION. ▼ + OK ▲ ▼ OK Press the SHORTCUT button. A list of stored shortcuts will be displayed. Press OK. A list of functions will be displayed. OK Press UP or DOWN to highlight the desired function. Repeat the last 5 steps to add more functions.
Editing How to delete all shortcuts Highlight EDIT ENTRY. OK + + OK OK © 8 Press OK. The shortcut name and content will be displayed. The shortcut name will be flashing with the edit cursor at the end of the line. Use LEFT and RIGHT to move the cursor, LEFT to delete the character to the left of the cursor, the keypad buttons to insert digits and ACTIVATE button to go to another menu to allow inserting a function. Press ACTIVATE.
To load the default shortcut list for Diverse 1010/1015/ 2010 and 2015 To check how much memor y is free [■■■ ] [■■■ ] + ▲ ▼ OK Press the SHORTCUT button. Press ACTIVATE. Highlight DEFAULTSHORTCUTS by using the UP or DOWN button. Press OK. The screen will display CAUTION: USE ONLY WITH SPECIFIC BASES!. This is a reminder that the shortcut functions were written for use with the 1010, 1015, 2010 or 2015 base stations. + ▲ ▼ OK © Press the SHORTCUT button. Press ACTIVATE.
Maintenance General Simply clean the telephone with a damp (not wet) cloth or antistatic wipe. Never use a dry cloth as this may cause static shock. Service Within the warranty period If you experience a problem with your Diverse Deskphone you should contact the Diverse Helpline on 0845 7908070. Calls are charged at local call rates. If the problem is not remedied, you will be advised to contact your original point of purchase.
Help Emergency Calls The emergency services can be contacted in the UK by dialling 999, or by dialling 112, which is valid in any country that is a member of the European Community. If your Diverse base station is connected to a switchboard, you can still dial the emergency services direct on 999. This number will connect you even if call barring has been set, but YOU MUST DIAL 999 BEFORE LIFTING YOUR HANDSET FROM THE TELEPHONE UNIT.
Technical Information Environment Your Diverse Deskphone should be kept free of dust, moisture, high temperature and vibration. It should not be exposed to direct sunlight. Do not stand it on carpets or other surfaces which generate fibres, or place it in locations which prevent the free flow of air over its surfaces. Approval This additional piece of equipment for Diverse base stations has been approved in accordance with the European directive 91/263/EEC Telecommunications Terminals.
Index 25, 23, 31, 8, 9, 15, 14 31 24 35 34 33 41 41 4 14 11 41 13 35 6 41 6 15 24 30 13 6 40 13 11 16 30 27 17 20 19 20 19 29 Quickdial Quick search Range Redial Registering with base stations Removing registration Reset Ringer tone Ringer volume Security Settings Shortcut Store numbers Switchboards Technical information Transferring calls Volume Warnings 30 18 6 14 8 10 26 22 21 29 21 36 14 27, 42 42 15, 17 21, 22 42 INDEX Answer call Baby alarm Backlight Base name Base selection Base stations Beep
Offices in Europe, North America, Japan and Asia Pacific. The telecommunications services described in this publication are subject to availability and may be modified from time to time. Services and equipment are provided subject to British Telecommunications plc’s respective standard conditions of contract. Nothing in this publication forms any part of any contract. Touchtone™ is a registered trade mark of British Telecommunications plc in the UK. © British Telecommunications plc 1998.