
Parts List
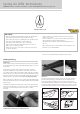

1
2
3
Care and Maintenance
After use, check that your rie is unloaded and wipe the metal and
woodwork surfaces with a lightly oiled cloth. Pay special attention to the
metal nishes as these are not fully rustproof and are vulnerable to damp
and particularly perspiration. If your rife has become damp, make sure it is
completely dry before you put it away.
The only other lubrication that your rie will occasionally need after use
is a very small smear of light grease on the sides of action where the
barrel pivots. Never use oils containing silicone as they can cause damage
to metal surfaces. Application of oil and grease except as directed by the
manufacturer can often do more harm than good.
Your rie has been designed and manufactured for optimum performance.
Tampering with the components, or unauthorised modications and
alterations may make the rie unsafe to use and will invalidate the
warranty. It is important that the screws that hold the action in the stock
are kept tight, so regularly check the forend xing screws and the action
retaining screw behind the trigger, and tighten as required. All air ries
require periodic maintenance and inspection, so even if everything seems
to be in good working order, have your air rie checked periodically by a
competent gunsmith. You should always have the power of your air rie
re-checked following any maintenance or repair work as any repairs or
adjustments could affect the power. It is your legal responsibility to
make sure the air rie remains below the legal limit of 12 ft-lb.
Diagrams and parts lists are available on our website at www.bsaguns.co.uk
2 Year Warranty All new BSA ries carry a 2 year warranty against faulty
parts and labour, this applies to new ries only and is not transferable;
proof of purchase is required. Excluded from this warranty are: failure due
to misuse or abuse, the tting of non-standard parts, and fair ware and tear
including damage to the stock. All warranty work must be done by BSA or
an authorised agent of the company, and should the rie be collected or
returned under warranty, BSA or their authorised agent reserve the right to
charge for postage and / or inspection.
Fitting Telescopic Sights
The Meteor, Comet and Supersport have machined dovetail grooves, the
Polaris and Lightning range have a raised scope rail, all accept scope mounts
with an 11mm clamp. Refer to the scope manufacturer’s instructions on t-
ting and adjusting.
We recommend the use of one piece scope mounts on spring ries, if two
piece mounts are used they should be of the two screw type. On models
with dovetail grooves it is strongly advised that you t a BSA scope stop kit
(part # 18-1178) which has a shock absorbing pad to help protect the scope
from recoil action. All lightning family models have the Maxigrip scope rail
which incorporates a raised scope stop pin at the rear of the rail which the
rear mount should be positioned against to prevent any possible movement.
Trigger Adjustment
Always ensure that your gun is not cocked or loaded before adjusting the
trigger. In the interests of safety, take care not to over-lighten the
trigger weight.
Meteor, Comet and Polaris
These models have a 2-stage trigger, the second stage can be adjusted using
a at head screw driver. The adjustment screw is located behind the trigger
blade. Turn the adjustment screw anti-clockwise to increase the trigger
engagement or clockwise to reduce it.
Supersport & Lightning Models
These models have a 2-stage trigger,
the second stage can be adjusted
using the Allen key provided, turn
the adjustment screw clockwise to
increase the trigger weight or anti-
clockwise to lighten it.
Open Sights
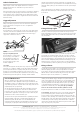
To zero your rie sights for elevation, rst set up a target at a xed distance
and test re 4 or 5 pellets to establish a group. If the pellets strike below the
point of aim, slacken the two rear sight aperture plate screws (1) to enable
the plate to be raised slightly, re-tighten the screws and retest. Once an
approximate zero has been found, ner adjustments can be made by rotating
the knurled nut (2) under the sight base. Turning it clockwise will raise
Fitting a Silencer
On some ries it is not possible to use open sights with a silencer, so an
alternative sighting system like a telescopic sight will have to be tted.
To t a silencer, remove the front sight, and follow the instructions supplied
with the silencer. On the Polaris unscrew the barrel end cap and screw in
BSA silencer adapter 16-6627, which has a
1
/
2
” UNF thread.
Technical Information
All BSA airguns are made to the highest standards at our factory in
Birmingham. BSA barrels are cold hammer forged and crowned for
optimum accuracy.
Before leaving the factory every airgun is tested on special purpose machinery
to verify velocity and pellet grouping. UK law dictates that air ries should
not be capable of above 12 ft-lb of muzzle energy; all BSA models conform
to this requirement. Export models are supplied to conform to the laws in the
destination country.
the ring point of impact. The gures alongside the rear sight slide are for
guidance only and do not represent distances. Lateral adjustment is made by
turning the windage knob (3). Turn it clockwise to move the point of impact
to the left.
The fore sight element can be adjusted for height after rst slackening its
xing screw. The element may be removed and inverted to give a choice of
bead or blade.
BSA GUNS (UK) Ltd. Armoury Road, Birmingham B11 2PP, England
BSA Guns (UK) Ltd, reserve the right to alter the designs or any constructional details of any product at any time without prior notice.
For the most up to date information on BSA products view our website at www.bsaguns.co.uk
Issue 4, September 10
© BSA Guns (UK) Ltd. Unauthorised sale, distribution, copying or reproduction of part or all of this material is not permitted without prior arrangement.