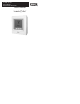
T2--PHP, T2--PAC Legacyt Series Programmable Thermostat Owner’s Manual
YOU WILL LOVE THIS THERMOSTAT. You have the Legacyt Programmable thermostat. This unique device’s state-- of-- the-- art technology makes it easier than ever for you to keep your home comfortable. Designed to be as smart – and smart-- looking – as any of the other electronics in your home, your new thermostat offers programming options to fit your lifestyle – not anybody else’s. Let this manual show you how easy it is to enjoy the newest experience in home comfort. Designed and Assembled in the U.S.A.
TABLE OF CONTENTS BUTTON IDENTIFICATION . . . . . . . . . . . . . . . . . . . . . . . . . . . . . . . . . 4 ON--SCREEN INDICATORS . . . . . . . . . . . . . . . . . . . . . . . . . . . . . . . . . 6 QUICK START Setting the time and day . . . . . . . . . . . . . . . . . . . . . . . . . . . . . . . . . . . . . . . . . . . 8 Setting the temperatures for heating and cooling . . . . . . . . . . . . . . . . . . . . . . . . 9 Changing the temperature . . . . . . . . . . . . . . . . . . . . . . . . . . . . . . . . .
TABLE OF CONTENTS Turning off the continuous backlighting . . . . . . . . . . . . . . . . . . . . . . . . . . . . . . Keypad lockout . . . . . . . . . . . . . . . . . . . . . . . . . . . . . . . . . . . . . . . . . . . . . . . . Unlocking the keypad . . . . . . . . . . . . . . . . . . . . . . . . . . . . . . . . . . . . . . . . . . Changing from programmable to nonprogrammable . . . . . . . . . . . . . . . . . . . . Changing the number of programming periods . . . . . . . . . . . . . . . . . . . . . . . . .
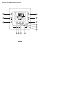
BUTTON IDENTIFICATION off Em heat c mode F C aux actual temp heat on temporory hold fan AM auto start PM at fan on b run hold d cool on2 e all days weekdays weekends f a home fan away done sleep g push and hold to set set schedule days period start time d/h/m set clock h i m k l 4 j
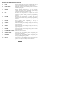
BUTTON IDENTIFICATION a. b. c. d. e. f. g. h. i. j. k. l. m.
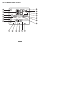
ON--SCREEN INDICATORS off Em heat 6 5 aux actual temp heat on temporory hold fan AM auto start PM at fan on 4 3 2 1 19 18 7 F C 17 16 6 15 8 9 cool on2 all days weekdays weekends 10 11 12 13 14
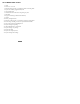
ON--SCREEN INDICATORS 1. 2. 3. 4. 5. 6. 7. 8. 9. 10. 11. 12. 13. 14. 15. 16. 17. 18. 19.
QUICK START Setting the time and day You must set the time and day before you can use any of the thermostat’s programming features. 1. Open the door. 2. Press the d/h/m button. It’s on the lower right, under the display screen. The day of the week will flash on the display. 3. Press the up or down button, located to the right of the display, to change the day. Stop on the correct day. 4. Press the d/h/m button again and the hour will flash on the display. 5. Press the up or down button to change the hour.
QUICK START Setting the temperatures for heating and cooling Your thermostat is installed with pre-- set heating and cooling temperature settings. You can use these or change them so your home is as warm or as cool as you’d like it to be. These steps will hold the temperature where you set it. For the temperature to change automatically according to your lifestyle needs – whether you’re home, away or asleep – you’ll need to follow the Touch ‘N’ Go instructions on pages 13 – 19. 1. Open the door. 2.
QUICK START 5. Press the mode button located on the left side of the display once. You will see the preset temperature setting for cooling appear on the right side of the display. 6. Press the up or down button. The word cool will flash. 7. Continue pressing the up or down button to change the cool setting. Stop at the desired cooling setting. 8. Press the hold/run button located on the left side of the display. This holds the thermostat at that setting. 9. Press the done button. 10. Close the door.
QUICK START Changing the temperature There are times when you want to change the temperature. Here’s how. 1. Open the door. 2. Press the up or down buttons on the right side until you reach the desired temperature setting. This creates a “temporary hold” until the next pre-- set time period. You will see temporary hold on the display. (To switch from the cooling temperature to the heating temperature – or vice versa – press the mode button on the left until the word heat or cool is flashing.) 3.
QUICK START Understanding Touch ‘N’ Go feature The unique Touch ‘N’ Go feature on your thermostat is a revolutionary tool that lets you use a simpler programming option – literally, touch and go – to help you get the maximum comfort control from the entire comfort system. With the touch of one Touch ‘N’ Go button – home, away or sleep – you can tell your thermostat where you’ll be. To keep the home at that comfort level indefinitely, you add one more button – hold/run – and you’re set.
PROGRAMMING THE THERMOSTAT Programming the Touch ‘N’ Go feature The Touch ‘N’ Go feature on your thermostat involves the home, away and sleep buttons immediately under the display. They are used for two programming options. One is more sophisticated than the other. The simpler programming option requires you to either accept the preset temperature settings for when you are home, away or asleep, or to set your own Touch ‘N’ Go heating and cooling temperature settings.
PROGRAMMING THE THERMOSTAT The more sophisticated programming option works well with people who tend to follow a more predictable routine and who also want to get the most from this thermostat’s potential. For both programming options, you must set-- up your Touch ‘N’ Go heating and cooling temperatures in order to use the thermostat’s expanded programming options. Here are the temperature settings that are pre-- programmed for your home, away and sleep periods.
PROGRAMMING THE THERMOSTAT Use this blank grid to determine how warm or cool you want your home to be when you’re home, away or asleep. You’ll assign time periods to those temperatures later.
PROGRAMMING THE THERMOSTAT Setting the home temperature 1. Open the door. 2. Press the home button located under the display on the left. You will see a triangle icon (B) above the home button. This icon will always tell you whether you’re in the home, away or sleep setting. 3. You will see the heating and cooling temperatures that were set at the factory. To use these, just close the door. 4. To change the factory settings press the home button. You will see the word heat flashing on the screen. 5.
PROGRAMMING THE THERMOSTAT Setting the away temperature 1. Press the away button located under the display in the center. You will see a triangle icon (B ) above the away button. 2. You will see the heating and cooling temperatures that were set at the factory. To use these, just close the door. 3. To change the factory settings, press the away button. You will see the word heat flashing on the screen. 4.
PROGRAMMING THE THERMOSTAT Setting the sleep temperature 1. Press the sleep button located under the display in the center. You will see a triangle icon (B ) above the sleep button. 2. You will see the heating and cooling temperatures that were set at the factory. To use these, just close the door. 3. To change the factory settings, press the sleep button. You will see the word heat flashing on the screen. 4.
PROGRAMMING THE THERMOSTAT 7. Press the up or down button until you reach the desired temperature setting. 8. Press and hold the sleep button for about three seconds. The set temperature will flash, indicating that it saved your settings. 9. Close the door. Changing the temperature time periods After you have set your three Touch ‘N’ Go buttons with temperature settings for when you’re away, home and asleep, you can program the time of day you want to use for those temperature settings.
PROGRAMMING THE THERMOSTAT The thermostat has preset periods (see below), but you can change these to fit your lifestyle. Period Preset Hours P1 6:00 AM to 8:00 AM P2 8:00 AM to 5:00 PM P3 5:00 PM to 10:00 PM P4 10:00 PM to 6:00 AM What time blocks work for you? Write them in here and refer to this as you make the changes on the thermostat.
PROGRAMMING THE THERMOSTAT Here’s how to change the factory-- set time periods. 1. Open the door. 2. Press the days button at the bottom of the thermostat. You will see all days, weekdays and weekends flashing on the display. You will be changing the time periods according to the days of the week. All days is used when the household’s weekday and weekend schedules are the same. 3.
PROGRAMMING THE THERMOSTAT 6. You will see the hours in 6:00 AM flashing on the screen. Press the up or down button and stop on the desired time. 7. To change the minutes, press the start time button on the bottom of the screen again. You will see the minutes in 6:00 AM flashing on the screen. Press the up or down button and stop on the desired time. The “stop time” for period 1 (P1) is also the “start time” for period 2 (P2).
PROGRAMMING THE THERMOSTAT 10. To change the minutes, press the start time button on the bottom of the screen again. You will see the minutes in 8:00 AM flashing on the screen. Press the up or down button and stop on the desired time. 11. To change the start time for period 3 (P3), press the period button at the bottom of the screen three times. This displays the information for period 3, with P3 flashing on the display. 12. You will see the hours in 5:00 PM flashing on the screen.
PROGRAMMING THE THERMOSTAT 17. If you did not select all days when you started this process, repeat all the steps for your remaining timeframe choice – weekdays or weekends. 18. To confirm that the thermostat has accepted your changes, cycle through the four time periods by pressing days, selecting your time frame – all days, weekdays, or weekends – and then pressing the period button to see the hours assigned for each start time. Each time you press period, you will advance to the next start time. 19.
PROGRAMMING THE THERMOSTAT Assigning time periods to temperatures To get the most from your thermostat’s programming features, you will want to take the remaining steps that will link your four schedule time periods (P1, P2, P3 and P4) to the heating and cooling temperatures you set with the Touch ‘N’ Go buttons – home, away and sleep. Taking these final steps will be easier if you complete the grid below before programming the thermostat.
PROGRAMMING THE THERMOSTAT Complete this schedule according to daily routine and use it as you follow the instructions below. Your Period Start Time Period Number Your Touch ‘N’ Go Option for Each Period 1 2 3 4 Here’s how to connect your four time periods with the three comfort ranges – home, away and sleep. 1. Open the door. 2. Press the days button at the bottom of the thermostat. You will see all days, weekdays and weekends flashing on the display.
PROGRAMMING THE THERMOSTAT 3. Select one of these three options by pressing the up or down button located to the right of the display. You may also make your selection by pressing the days button again. Select all days if your weekday schedule is the same as your weekend schedule. 4. When you have selected one of the three options (all days, weekdays, weekends), press the period button at the bottom of the thermostat. P1 will flash on the display. 5.
PROGRAMMING THE THERMOSTAT Press home, away or sleep. Press the period button twice. P3 will flash on the display. Press home, away or sleep. Press the period button twice. P4 will flash on the display. Press home, away or sleep. If you did not select all days when you started this process, then repeat all the steps for your remaining timeframe choice – weekdays or weekends. 13.
OPERATING THE THERMOSTAT Using Touch ‘N’ Go buttons Once you have set the temperatures and time periods that correspond with your three Touch ‘N’ Go comfort buttons (see Programming the Touch ‘N’ Go feature, page 13, and Assigning time periods to temperatures, page 26), you won’t need to use your Touch ‘N’ Go buttons unless you want to make a temporary change. For example, if you go to bed earlier than usual, pressing the sleep button will lower the temperature sooner than scheduled.
OPERATING THE THERMOSTAT 3. To return to the originally programmed lifestyle period, press the appropriate home, away or sleep button. The system will return to that time period and the words temporary hold will disappear. 4. Close the door. To hold it at home, away or sleep There might be situations when you want to override the programming and hold the home’s temperature at one of the three home, away or sleep comfort levels.
OPERATING THE THERMOSTAT 4. To return to your original programming schedule, press the hold/run button. The word hold will disappear. 5. Close the door. Using the thermostat to turn the heating and cooling system off Here’s how to use the thermostat to turn the heating and cooling system off. 1. Open the door. 2. Press the mode button on the top left repeatedly until the display shows off in the upper left. 3. Close the door.
OPERATING THE THERMOSTAT Using the fan The fan function helps distribute warmth or cooling throughout your home for a more even temperature in all spaces. The thermostat is automatically set so that the fan runs only during your heating and cooling cycles (auto mode). However, you can adjust the settings so that the fan runs continuously, even between cycles or when the system is turned off. 1. Open the door. 2. Press the fan button on the left side.
OPERATING THE THERMOSTAT Using emergency heat (heat pump systems only) Emergency heat is useful when the automatic auxiliary heat system can’t keep up with demand. (Systems with heat pumps use “auxiliary heat” when it’s too cold outside for the heat pump to heat the house without help. The display indicator for this is aux heat on.) If the heat pump compressor that works with auxiliary heat fails, or if the heat pump isn’t working at all, you can turn on the emergency heat for that extra help.
OPERATING THE THERMOSTAT Changing the batteries Your thermostat is probably powered by the HVAC equipment, but if it isn’t, it’s battery powered. You can tell if it’s battery powered by checking in Advanced Programming Options. (See page 37.) If there’s no lighting until you touch a button, it’s battery powered. When the thermostat uses electricity, the batteries (if installed) take over if the electricity goes out. This allows you to monitor the indoor temperature when there’s no electricity.
OPERATING THE THERMOSTAT We recommend that you replace the batteries at the one bar level with two AA alkaline batteries. They’re in the back of the thermostat, so you’ll have to remove it from the wall. Here’s how. 1. Locate the latch at the top of the thermostat. It’s at the center of the top rim. 2. Press it down. This will disconnect the thermostat from the top of the wall plate. 3.
OPERATING THE THERMOSTAT 6. Install new batteries by matching the “plus” and “minus” ends of the batteries with the “plus” and “minus” indicators you’ll see outside the two white battery shapes in the space where the batteries sit. 7. Snap the batteries into place. 8. Put the thermostat back on the wall bracket by lining up the two slots on the bottom edge of the back of the thermostat with the two lips on the wall bracket. You will feel the slots fit over the lips. 9.
ADVANCED PROGRAMMING OPTIONS Advanced programming display codes chart You can customize several features of your thermostat. This chart shows which features you can change and the codes associated with them. The codes will be shown on the display when you follow the instructions.
ADVANCED PROGRAMMING OPTIONS Changing from Fahrenheit to Celsius Your thermostat is preset to display the temperature in degrees Fahrenheit. You can change this to Celsius. 1. Open the door. 2. Press and hold the home and sleep buttons under the display simultaneously for about three seconds. 3. Press the mode button on the left to change it from F (Fahrenheit) to C (Celsius). 4. Press the done button on the lower right. 5. Close the door.
ADVANCED PROGRAMMING OPTIONS Turning off the continuous backlighting If your thermostat is not powered by the equipment and is instead battery powered, the display will light up for a few seconds after you press any button. This is backlighting. It will go dark after a few seconds. If the thermostat is powered by electricity, there is always a low level amount of backlighting until you press any button, which increases the lighting temporarily.
ADVANCED PROGRAMMING OPTIONS 5. Press the done button on the right. 6. Close the door.
ADVANCED PROGRAMMING OPTIONS Keypad lockout The keypad lockout feature lets you “lock” the thermostat so nobody can change the temperature – or make any other changes – by pressing buttons. Keypad lockout is not activated when the thermostat is installed. Here’s how to activate it. 1. Open the door. 2. Press and hold the home and sleep buttons under the display simultaneously for about three seconds. 3. Press the up button at the top right of the display. You will see U3.
ADVANCED PROGRAMMING OPTIONS Unlocking the keypad Here’s how to temporarily unlock the keypad. 1. Open the door. 2. Press and hold the up and down buttons on the right simultaneously for about five seconds. 3. The padlock icon will disappear. This means the keypad is unlocked and can be used. The keypad will revert back to the locked state after you’ve stopped pushing buttons for two minutes. 4. Close the door.
ADVANCED PROGRAMMING OPTIONS Changing from programmable to nonprogrammable It is possible to convert your thermostat’s operation from programmable to nonprogrammable. This eliminates its advanced features. When switching to the nonprogrammable format, you lose the programming, hold, days of the week on the display, and Smart Recovery features. Switching to nonprogrammable also means you’ll give up some of the thermostat’s energy saving features.
ADVANCED PROGRAMMING OPTIONS 4. Press the mode button on the left to change it to nP (for nonprogrammable). 5. Press the done button on the right. 6. Close the door.
ADVANCED PROGRAMMING OPTIONS Changing the number of programming periods Your thermostat is preset with four time periods (P1, P2, P3, P4). You can change this to two. Here’s how to change the number of periods in the day. 1. Open the door. 2. Press and hold the home and sleep buttons under the display simultaneously for about three seconds. 3. Press the up button at the top right of the display repeatedly. You will see U5 and 4.
SPECIAL FEATURES Auto Changeover The thermostat displays one of five modes: heat, cool, Em heat (heat pump version only), heat cool, and off. When the mode selection is for both heating and cooling, the thermostat is in auto changeover mode. This allows the system to switch from heating to cooling – or from cooling to heating – to maintain the temperatures you’ve programmed. It does this automatically.
WHAT IF . . . The battery icon is displayed The battery icon appears on the display only when the battery starts to lose power. Replace it when one-- third of the icon is black. If you wait until the icon is just a silhouette with no black bars, the thermostat won’t have the power to function correctly. Replace the battery to restore thermostat functions. “Aux heat on” is displayed (heat pump systems only) Aux heat on is auxiliary heat. It applies only to the heat pump version.
WHAT IF . . . There is a power outage If you lose electricity and have batteries installed, the thermostat will continue to display the status because it has a battery backup power source. This means that even though your heating and cooling system doesn’t work, you will still be able to monitor your home’s temperature. In addition, you won’t have to reprogram the thermostat because your settings are retained even if the battery dies.
COMMON TERMS AND WHERE TO FIND THEM Auto changeover . . . . . . . . . . . . . . . . . . . . . . . . . . . . . . . . . . . . . . . . . . page 46 This feature automatically switches your system from heating to cooling – and from cooling to heating – whenever necessary when the thermostat is set in auto mode. Auxiliary heat (heat pump systems only) . . . . . . . . . . . . . . . . . . . .
COMMON TERMS AND WHERE TO FIND THEM Emergency heat (heat pump systems only) . . . . . . . . . . . . . . . . . . page 33 You can manually set the thermostat to use emergency heat but it is the most expensive option. If it’s using emergency heat, the display will show Em heat when you press the mode button. Hold . . . . . . . . . . . . . . . . . . . . . . . . . . . . . . . . . . . . . . . . . . . . . . . . . . . . . page 30 This function holds the current set temperature. Mode . . . . . . . . . . . . . . .
COMMON TERMS AND WHERE TO FIND THEM Temporary hold . . . . . . . . . . . . . . . . . . . . . . . . . . . . . . . . . . . . . . . . . . page 29 This function lets you temporarily maintain your temperature settings. The system will return to the scheduled settings during the next time period. Time period . . . . . . . . . . . . . . . . . . . . . . . . . . . . . . . . . . . . . . . . . . . . . . page 19 The thermostat features four time periods.
NOTES PAGE 52
THERMOSTAT LIMITED WARRANTY Bryant Heating & Cooling Systems Limited Warranty for Thermostats FOR WARRANTY SERVICE OR REPAIR: Contact the installer or a Bryant dealer. You may be able to find the installer’s name on the equipment or in your Owner’s Packet. You can also find a Bryant dealer online at www.bryant.com For help, contact: Bryant Heating & Cooling Systems, Consumer Relations, P.O.
THERMOSTAT LIMITED WARRANTY OWNER--OCCUPIED, RESIDENTIAL APPLICATIONS This warranty is to the original purchasing owner and is transferable only to the extent and as stated in the Warranty Conditions and below. The warranty period in years, depending on the part and the claimant, is as shown in the chart below.
THERMOSTAT LIMITED WARRANTY WARRANTY CONDITIONS: 1. To obtain the longer warranty periods as shown in the table under original owner, for the original purchaser, the product must be properly registered at www.bryant.com within ninety (90) days of original installation. In jurisdictions where warranty terms conditioned on registration are prohibited by law, registration is not required and the longer warranty period shown will be apply. 2.
THERMOSTAT LIMITED WARRANTY PROVINCES DO NOT ALLOW LIMITATIONS ON HOW LONG AN IMPLIED WARRANTY OR CONDITION LASTS, SO THE ABOVE MAY NOT APPLY TO YOU. THE EXPRESS WARRANTIES MADE IN THIS WARRANTY ARE EXCLUSIVE AND MAY NOT BE ALTERED, ENLARGED, OR CHANGED BY ANY DISTRIBUTOR, DEALER, OR OTHER PERSON, WHATSOEVER. THIS WARRANTY DOES NOT COVER: 1.
Copyright 2012 Bryant Heating & Cooling Systems, 7310 W. Morris St. Indianapolis, IN 46231 Catalog No: OM--- T2PHP--- 05BR Replaces: OM--- T2PHP--- 4BR Edition Date: 05/12 Manufacturer reserves the right to change, at any time, specifications and designs without notice and without obligations.