
Specifications


11
TROUBLESHOOTING
Controller’s Trouble LED is On
1. Check the Trouble LED on each sensor connected to the
controller. If a sensor’s Trouble LED is on, determine the
cause and make the necessary repairs.
2. Check the wiring between the sensor and the controller. If
wiring is loose or missing, repair or replace as required.
Controller’s Trouble LED is Flashing
1. One or both of the sensors is 100% dirty.
2. Determine which Dirty LED is flashing then clean that
sensor assembly as described in the detector cleaning
section.
Sensor’s Trouble LED is On
1. Check the sensor’s Dirty LED. If it is flashing, the sensor is
dirty and must be cleaned.
2. Check the sensor’s cover. If it is loose or missing, secure the
cover to the sensor housing.
3. Replace sensor assembly.
Sensor’s Power LED is Off
1. Check the controller’s Power LED. If it is off, determine
why the controller does not have power and make the
necessary repairs.
2. Check the wiring between the sensor and the controller. If
wiring is loose or missing, repair or replace as required.
Controller’s Power LED is Off
1. Make sure the circuit supplying power to the controller is
operational. If not, make sure JP2 and JP3 are set correctly
on the controller before applying power.
2. Verify that power is applied to the controller’s supply input
terminals. If power is not present, replace or repair wiring as
required.
Remote Test/Reset Station’s Trouble LED Does
Not flash When Performing a Dirty Test, But the
Controller’s Trouble LED Does
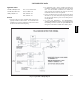
1. Verify that the remote test/station is wired as shown in Fig.
8. Repair or replace loose or missing wiring.
2. Configure the sensor dirty test to activate the controller’s
supervision relay. See “Changing sensor dirty test opera-
tion.”
Sensor’s Trouble LED is On, But the Controller’s
Trouble LED is OFF
Remove JP1 on the controller.
HKRNKA