
Installation Instructions
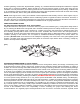

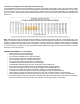
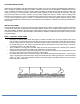
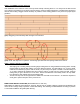
Table Of Contents
- APPLICATIONS
- HANDLE WITH CARE
- OWNER/INSTALLER RESPONSIBILITIES
- JOB SITE INSPECTION
- VENTILATED CRAWL SPACES
- (pic1)
- SUMMER/WINTER MOISTURE CONTENT MAP
- The effects of Temperatures and Humidity on wood flooring
- GENERAL INFORMATION - all installations
- HELPFUL TOOLS
- NAILDOWN OVERVIEW
- WOOD SUBFLOORS
- Note that joist spacing determines minimum subfloor thickness.
- Wood floor orientation
- Flatness
- CAUTION: Do not sand any surfaces containing lead-based paints, finishes, or asbestos.
- When using air compressors
- Use of Pneumatic Staplers and Nailers
- Recommended Fastener Lengths and Specifications
- NAILDOWN INSTRUCTIONS
- INSTALLATION PREP
- STEP 1: THE FIRST THREE ROWS
- STEP 2: FLOORING LAYOUT (Racking)
- STEP 3: INSTALLATION CONTINUED
- STEP 4: FINISHING UP
- Congratulations on your new Brazilian Pecan hardwood floor!

9
NAILDOWN INSTRUCTIONS
Nail flooring in good lighting and make adjustments as needed. Up to 25% or 100sqft of installed flooring whichever is
less is enough to determine acceptance of quality. If satisfied, continue with the installation. Installation beyond this
scope constitutes acceptance of product quality. When top nailing pre-finished flooring (the first and last rows, stair
treads, and risers) it is recommended to pre-drill and hand nail using a 3/32” drill bit and 6d finish nails. Although
pneumatic finish nailers are faster, improper use can easily damage the board or finishes. When installing wood
floorings over crawl spaces or rooms over basements and garages use moisture vapor paper (such as red rosin paper
or 15 lb. black roofing felt paper) or similar as a minimum to provide protection against moisture vapors. Install
underlayment parallel to the new flooring. When installing over wood subfloors, install the new flooring perpendicular to
the floor joist.
INSTALLATION PREP
Use a jamb saw (manual or powered) to undercut all door jambs/casing to allow enough clearance for the wood flooring
to easily slide underneath. A gap (business card thick) between the top of the wood flooring and bottom of the door
jamb is acceptable. Sand down any high spots or high subfloor seams. Correct low spots (See subfloor prep). Sweep
or vacuum the subfloor clean of dust and debris. Install moisture retardant underlayment and staple it down to prevent
movement/sliding.
STEP 1: THE FIRST THREE ROWS
•
Determine the starting wall, usually the longest or outside foundation wall. At the two opposite ends of this
wall, measure out the width of the board, plus the expansion space, and place a mark. (Do not include the
tongue of the board when measuring). An Expansion gap or space must be left around the perimeter and at
all vertical obstructions. This space is normally the same as the thickness of the new flooring, for example,
1/2” flooring requires 1 /2” expansion gaps.
•
Snap a chalk line connecting the two marks. Align the tongue side of the first row of boards on the chalk line
with the groove side towards the starting wall, maintain the expansion space.
•
Install the flooring with the tongue side facing away from the starting wall (Use long straight planks for first
two rows). Nail on the tongue side of the flooring. (See picture)
•
Pre-drill and top nail the first row of boards using a 3/32” drill bit and 6d finishing nails about 1” from the back
edge. Countersink the finish nail using a nail punch and fill with close matching wood filler. Pre-drill and blind
nail the 2
nd
and 3
rd
rows using 6d finish nails above the board tongue until nailing machines can be used (set
finish nails with a nail punch).