
Installation Instructions

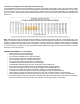
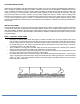
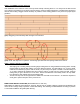
Table Of Contents
- APPLICATIONS
- HANDLE WITH CARE
- OWNER/INSTALLER RESPONSIBILITIES
- JOB SITE INSPECTION
- VENTILATED CRAWL SPACES
- (pic1)
- SUMMER/WINTER MOISTURE CONTENT MAP
- The effects of Temperatures and Humidity on wood flooring
- GENERAL INFORMATION - all installations
- HELPFUL TOOLS
- NAILDOWN OVERVIEW
- WOOD SUBFLOORS
- Note that joist spacing determines minimum subfloor thickness.
- Wood floor orientation
- Flatness
- CAUTION: Do not sand any surfaces containing lead-based paints, finishes, or asbestos.
- When using air compressors
- Use of Pneumatic Staplers and Nailers
- Recommended Fastener Lengths and Specifications
- NAILDOWN INSTRUCTIONS
- INSTALLATION PREP
- STEP 1: THE FIRST THREE ROWS
- STEP 2: FLOORING LAYOUT (Racking)
- STEP 3: INSTALLATION CONTINUED
- STEP 4: FINISHING UP
- Congratulations on your new Brazilian Pecan hardwood floor!

Flatness
All subfloors should be flat to within 3/16” in 10 feet or 1/8” in 6 feet radius. Wood subfloors must be securely nailed or
screwed to joists to minimize movement or squeaks. Install over 16” minimum center-to-center joist sub-structure.
Thoroughly inspect and replace existing floor or subfloor that shows evidence of water damage or structural weakness.
Repair any sagging or loose sections of the subfloor. Squeaky or loose boards should be re-secured. An uneven or cupped
subfloor can be an indication of excess moisture or rot, identify and correct. High spots/joist may be sanded down. Low
spots should be cut out and repaired or may be filled with old pieces of firm vinyl or build up with 30 lb. black roofing paper.
Do not fill-in low areas under nail down flooring with cement patching materials as these may break down over time.
New Construction: It is the builder’s or general contractor’s responsibility to provide the wood flooring contractor with a
subfloor that is within the tolerances listed above. Postpone the installation until corrections have been completed.
CAUTION: Do not sand any surfaces containing lead-based paints, finishes, or asbestos.
For buildings built in 1978 and earlier, contact the EPA for lead based testing prior to any sanding
(www.epa.gov).
NAILERS/STAPLERS
Nailing tips
Tongue fracture and surface dimpling is not a manufacturer defect and can be minimized by installing the flooring in proper
lighting, using the correct nail thickness or gauge, using the recommended shoe adaptor, or changing the height/angle of
nail entry.
1
To further reduce the occurrence of surface dimpling and tongue fracture the use of thinner 18-gauge cleat
nails is recommended, especially for harder exotic floors, but is no guarantee to prevent all surface dimples. In
addition, many installers will sometimes adjust the nailing angle temporarily by applying layers of duct tape to
the bottom foot plate. The use of an over-size base or foot plate to distribute the nailing force is encouraged.
If however, surface dimpling still occurs, pre-drill and hand nail the flooring using a 3/32” drill bit and 6d steel
finish nails.
2
Use caution when using staples on exotic flooring. Staples may increase the risk for tongue fracture and
surface dimples. Do not mix fasteners when nailing. Staples and cleats hold differently when mixed can result
in irregular fastening and or may allow excessive movement. When face or top nailing, pre-drilling is
recommended. Pick areas of the grain or pattern that would best hide touch-up fillers.
3
Do not use significantly bowed, crooked or twisted boards. Use a wood spline or slip tongue whenever a
change in board direction is needed. Splines should be glued with approved wood glue and nailed into place.
Forcing or pounding floorboards together with a rubber mallet during assembly can bruise or damage factory
finished board edges.
When using air compressors
Adjust the regulator to ensure proper air pressure and setting of fasteners. Set air compressor to 70-80 PSI, test the nailer.
Do not exceed the nailer or air hose limitations. Make sure that the fastening machine is recommended for the floor, is in
good working condition, is fully adjustable, is at the appropriate angle and secures fasteners properly against the tongue
of the board to prevent top edge and surface dimple damage.