
Installation Instructions
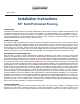
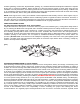

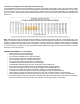
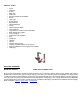
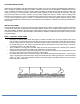
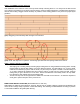
Table Of Contents
- APPLICATIONS
- HANDLE WITH CARE
- OWNER/INSTALLER RESPONSIBILITIES
- JOB SITE INSPECTION
- VENTILATED CRAWL SPACES
- (pic1)
- SUMMER/WINTER MOISTURE CONTENT MAP
- The effects of Temperatures and Humidity on wood flooring
- GENERAL INFORMATION - all installations
- HELPFUL TOOLS
- NAILDOWN OVERVIEW
- WOOD SUBFLOORS
- Note that joist spacing determines minimum subfloor thickness.
- Wood floor orientation
- Flatness
- CAUTION: Do not sand any surfaces containing lead-based paints, finishes, or asbestos.
- When using air compressors
- Use of Pneumatic Staplers and Nailers
- Recommended Fastener Lengths and Specifications
- NAILDOWN INSTRUCTIONS
- INSTALLATION PREP
- STEP 1: THE FIRST THREE ROWS
- STEP 2: FLOORING LAYOUT (Racking)
- STEP 3: INSTALLATION CONTINUED
- STEP 4: FINISHING UP
- Congratulations on your new Brazilian Pecan hardwood floor!

The effects of Temperatures and Humidity on wood flooring
It’s understood that wood products are sensitive to moisture, temperature and humidity. Refer to the chart below to better
understand the best in-home environmental relationship between relative humidity (RH) and temperature, and its effects
on wood moisture content. Refer to the current weather conditions in your area; find the combination of temperature and
RH in your area on the chart (temperature variations are listed on the left side of chart, humidity variations are listed along
the bottom.)
Note: Wood products properly acclimated and maintained to consistent temperatures of 60°-80° F and humidity 30% - 50%
will become relatively dormant, less likely to shrink or expand. Wood flooring kept outside these recommended values can
negatively impact board performance and may result in excessive movement, squeaks, board gapping, board-edge
cupping, finish splits and other related issues. Acclimation is the responsibility of the installer and or homeowner. Depending
on your local in-home conditions, the use of humidification/dehumidification equipment may be recommended to maintain
the proper in-home environment
GENERAL INFORMATION - all installations
•
Install flooring in normal proper lighting.
•
Save a box of flooring for future repairs.
•
Do not install in full bathrooms or areas with steam.
•
Inspect subfloor for flatness, squeaks, and moisture.
•
Do not install this product over radiant heat systems
•
Do not install this product below-grade or in basements.
•
Avoid board grouping board sizes should be intermingled.
•
Use breathable materials like paper when protecting a newly installed floor.
•
Inspect flooring during installation select out boards have milling and finish defects.
•
The customer is advised to be home during the installation for consultation/direction.
•
Customer and installer should discuss installation and layout to maximize satisfaction.
•
It is helpful to save the item number found on the packaging box ends for future references.
•
Jobsite subfloors can be dry today and wet tomorrow. The use of moisture barriers is recommended.
•
Floor should be installed from several cartons at the same time to ensure good color, shade and appearance.
•
An Expansion space must be left around the perimeter and at all vertical obstructions. This space is normally the
same as the thickness of the new flooring. For example; 1/2” flooring requires 1/2” expansion.