
Installation Instructions

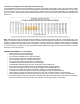
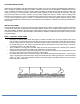
Table Of Contents
- APPLICATIONS
- HANDLE WITH CARE
- OWNER/INSTALLER RESPONSIBILITIES
- JOB SITE INSPECTION
- VENTILATED CRAWL SPACES
- (pic1)
- SUMMER/WINTER MOISTURE CONTENT MAP
- The effects of Temperatures and Humidity on wood flooring
- GENERAL INFORMATION - all installations
- HELPFUL TOOLS
- NAILDOWN OVERVIEW
- WOOD SUBFLOORS
- Note that joist spacing determines minimum subfloor thickness.
- Wood floor orientation
- Flatness
- CAUTION: Do not sand any surfaces containing lead-based paints, finishes, or asbestos.
- When using air compressors
- Use of Pneumatic Staplers and Nailers
- Recommended Fastener Lengths and Specifications
- NAILDOWN INSTRUCTIONS
- INSTALLATION PREP
- STEP 1: THE FIRST THREE ROWS
- STEP 2: FLOORING LAYOUT (Racking)
- STEP 3: INSTALLATION CONTINUED
- STEP 4: FINISHING UP
- Congratulations on your new Brazilian Pecan hardwood floor!

11
• No two planks are alike. The inner heartwood and outer sapwood will have dimensional and color variations.
To minimize gapping during installation boards of similar widths should be placed together in the same row.
Defects should be cut off placing the remainder in closets or near walls.
• Seasonal gapping or cupping is common with all wood flooring. To minimize the occurrence of board
movement maintain a constant indoor humidity of 30%-50% and temperatures to 60-80 before, during and
after installation. Humidifiers and dehumidifiers are used to maintain the proper environment and minimize
wood floor movement.
• To reduce the occurrence of cupping with wide plank flooring in room areas over 20 ft. wide, many installers
will nail and glue the boards to the subfloor. When doing so follow the recommended nailing schedule and use
an approved wood floor adhesive. Note that the greatest influence in controlling board movement is
maintaining the recommended indoor environment and providing moisture control. When installing wood
floorings over crawl spaces or rooms over basements and garages use moisture papers such as (white Silicon
Vapor Shield® or 15 lb. black roofing felt paper) or similar as a minimum to provide protection against moisture
vapors.
• Depending on your geographical area, interior climate controls and installation time of the year additional
spacing between rows may be needed to provide additional expansion during seasonal times of elevated
humidity. During the installation washers or dimes can be placed temporarily between rows to ensure the
additional space, placed at every 4’ to 5’ intervals. Remove the washers after installation.
STEP 4: FINISHING UP
•
Fill in nail holes and minor gaps with close matching wood filler.
•
Install any base board molding and shoe molding
•
Install transition moldings
•
Clean floor using the approved hardwood cleaner
•
Use felt pads under furniture legs
•
Protect against moving appliances and heavy furniture.
Congratulations on your new Brazilian Pecan hardwood floor!