
Installation Instructions

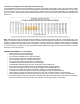
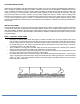
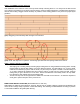
Table Of Contents
- APPLICATIONS
- HANDLE WITH CARE
- OWNER/INSTALLER RESPONSIBILITIES
- JOB SITE INSPECTION
- VENTILATED CRAWL SPACES
- (pic1)
- SUMMER/WINTER MOISTURE CONTENT MAP
- The effects of Temperatures and Humidity on wood flooring
- GENERAL INFORMATION - all installations
- HELPFUL TOOLS
- NAILDOWN OVERVIEW
- WOOD SUBFLOORS
- Note that joist spacing determines minimum subfloor thickness.
- Wood floor orientation
- Flatness
- CAUTION: Do not sand any surfaces containing lead-based paints, finishes, or asbestos.
- When using air compressors
- Use of Pneumatic Staplers and Nailers
- Recommended Fastener Lengths and Specifications
- NAILDOWN INSTRUCTIONS
- INSTALLATION PREP
- STEP 1: THE FIRST THREE ROWS
- STEP 2: FLOORING LAYOUT (Racking)
- STEP 3: INSTALLATION CONTINUED
- STEP 4: FINISHING UP
- Congratulations on your new Brazilian Pecan hardwood floor!

10
STEP 2: FLOORING LAYOUT (Racking)
After installation of the first three rows, loose lay about 100sqft of flooring about 4” or 5” away from the last secured
row. Pull from several boxes to mix board color and sizes to create a random appearance. Visually inspect flooring for
defects while racking. Stagger boards randomly as possible, avoid creating patterns. See picture for proper layout
guidance.
(pic1) Staggering board randomly adds strength to the total floor
(pic2) Avoid “stair step” and “H” patterns. Avoid lining-up board ends and spacing boards closer than 6”
STEP 3: INSTALLATION CONTINUED
•
After laying-out or racking 100sqft of flooring begin nailing the floor using a hardwood flooring nailer. Visually
inspect board for defects while nailing. Use proper fastener spacing. For Solid nailing of 3” or less in width,
minimum two fasteners per piece near the ends (1-3”) and every 8-10” apart on board. For Solid nailing of 3
¼” or wider, minimum two fasteners per piece near the ends (1-3”) and every 6-8” apart on board. Continue
nailing until you get to the last one or two rows. The first and lasts few rows usually need to be top nailed.
Pre-drill using a 3/32” drill bit and use 6d finishing nails.
•
The last row may have to be ripped down in width to fit. If the last row is less than 1” in width use carpenter’s
wood glue to join the last piece to the previous row.
WIDE PLANK INSTALLATION TIPS (Board width sizes 4” and over)
Wide planks are milled to strict tolerances, however, factors such as weather, shipping, storage and acclimation can
cause wood to change shape; expand or contract after milling. The following recommendations can help you perform
a successful installation using wide plank flooring.