
Specifications


Attaching Track,Waypoint, Event or Route Files to the Map
Attaching Tracks to the Map
You can attach tracks to any map and they will automatically be loaded when the map loads. Once
loaded they are
permanently displayed
on the map and will not disappear when the
Show Track
button is raised as will normal tracks.
The track files you attach are just normal tracks downloaded from your GPS or more usually,
manually created using the
Manually Create Track Points
button. The color and width of the track
plot is set for the track using the
Track Control
dialog, the attached track will use these same
settings when it is displayed.
How to Attach a Track to the Map
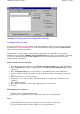
1. If the map is already loaded choose the
Check Calibration of Map
option on the File Menu.
2.
Press the
Options
button in the calibration frame -
the
Map Advanced Options
dialog will be
displayed.
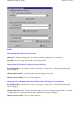
3.
Press the
Open Folder
button on the edit box (to the immediate left of the Add button).
4.
Select a .plt file which has the track you want to attach to the map
-
it will appear in the edit
box.
5.
Press the Add button to add it to the list.
6.
Repeat steps 3 to 5 until you have added all the tracks you require, up to 50 tracks can be
attached.
7.
Press the
Close
button.
8.
Press the Save button to save the map using the same or a new name.
9.
Its done.
The limitations are as follows :
There is a limit of 50 attached track files.
Attaching too many tracks with too many track points can slow performance.
Uses
The attached tracks can be used to display new roads not shown on the map
You can design tracks in geometric shapes to show special features
Page
111
of
252
OziExplorer Help Contents