
Installation guide


Aftermarket LCD Upgrade Manual
P/N 400-283-301 Rev A 11
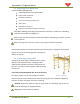
Figure 5 - Scaffolding
3.2 Preparing Your Work Area
You will need the following items:
Scaffolding with wheels (to support 400lbs)
Phillips head screwdriver
Flat blade screwdriver
7/16, 1/2 inch open end wrenches
Wire cutters
Installation instructions
Large piece of cardboard to place both CRT’s
Assemble scaffolding according to manufacturer’s directions. Position the scaffolding
under the overhead to be changed out.
Make certain that the wheels have been locked before attempting to perform any work
on the platform.
Before working on the monitors, make sure the power has been turned off.
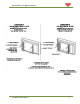
Remove both monitor rear covers and place out of working area. Unplug the overhead AC
plug at the side of the incoming power housing. Turn
off the scoring unit.
3.3 Removing Existing CRTs
Unplug all AC power cables to both monitors and the
Monitor control board AC Box. Unplug the video
cables to both monitors and store out of the way for
later use. If present, remove speaker cables and store
for later use.
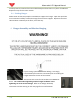
If you have not discharged the CRT, do so at this time!
For safety, position two or more people around the
monitor. Pick up at rear of monitor and remove securing nut from stud while supporting
monitor. Lift front of monitor out of slot in housing.
DO NOT support the monitor using the front bezel (if assembled). The screws can
break off resulting in a dropped monitor!
DO Support monitor from the bottom.