
Installation guide


Chapter 8: Using the Setup Wizard 61
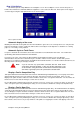
Step 6: Adjusting the Scoring Camera
The sixth step in the Setup Wizard shows the current real time image from the camera and allows you to verify
that the camera is positioned straight and level to the pins. The image has a cross hair superimposed over the pins.
Press the C button to automatically adjust the image position to the center of the screen. If you are not satisfied with
the result of the auto positioning, adjust the position of the image by pressing W to move the image up, Z to move the
image down, A to move the image left or S to move the image right. The desired images should look similar to the
image below.
When you are satisfied with the image, press the Move Cursor Left button to continue.
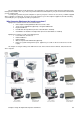
Finished !
The final screen in the Setup Wizard shows the results of the camera configuration process. Verify that there is
a Pin Position Marker dot on the head of every pin. The Duo software looks at this dot to see if the pin is present or
has been knocked over.
If the Pin Position Markers are not correctly positioned, press the Move Cursor Left button to go back to the
previous screen and try again. If you continue to have poor results from the automatic pin detection process, you set
these pin positions manually using the Adjust Camera section of the Troubleshooting screen.