
Installation guide


Chapter 7: Plug In and Setup 50
Power On !
Once you have verified that all the cables are correctly plugged in and the keypad channel numbers are set
correctly, you are ready to turn the system on.
Turn on power via your circuit breakers and make sure that your monitors are on. Then turn on the Duo CPU
module via its power switch.
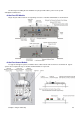
Duo CPU Module
You should be able to hear the cooling fan in the Duo CPU Module turning and see the Duo CPU unit booting
on the screens.
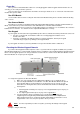
Duo Camera Module
If installed, you should see the MCU activity and LLAN activity LEDs flashing on the Duo Camera Module (If
fitted) See below for the position and function of the LED Indicators on the Duo Camera Module.
If the Ball Detectors have not yet been correctly adjusted, then you would also see a red LED on the end of the
ball detector for each lane. See below for how to adjust the Ball Detectors correctly.
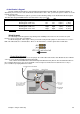
Duo Keypad
If your keypads are wired, then the keypad will beep three times to indicate that it has performed its self test ok.
If it does not beep at all, check that the cables are correctly plugged in and there are no
breaks in the cable.
If it beeps a fourth time, this indicates that a key is being held down, either by the keypad
surround being too tight, or by damage to the keypad switch.
If your keypads are wireless, then they will make no beeps when the Duo CPU is switched on.
Resetting the Wireless Keypad Channels
If you have wired keypads installed, skip this section. If you have wireless keypads installed, then your Duo
CPU Module probably does not know which keypad to listen to and which of the neighboring lane’s keypads to ignore.
Before correct keypad operation can start you must first reset the wireless channel on the Duo CPU Module. Each
Duo CPU Module can accept up to two keypads.
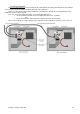
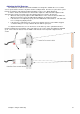
To assign the keypads to the Duo CPU Module:
1. Make sure your keypads have the right Channel Number set, as explained above.
2. Press the Keyboard Address Reset Button. The Duo CPU Module will then be placed
into keyboard address mode and listen for any keystrokes for the next 10 seconds
before timeout. During this time, both the LLAN Transmit and Receive Data lights will
flash together.
3.
i. If dual keypads are fitted, press any key on one Keypad and then press any key on
other keypad.
ii. If a single keypad is fitted, press any key on the keypad twice.
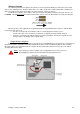
4. Test the keypads to make sure that they are correctly working. If a key on a
neighboring lane’s keypad was pressed before the procedure was completed, then
that keypad may have been assigned to the Duo CPU Module instead of the correct
keypad. If this is the case, then just repeat the above procedure.
Note: You must repeat this procedure every time you change the battery in the keypad.