
Installation guide


Chapter 4: Secure the Capping 40
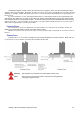
Note: Horizontal Bumpers. The only exception to the above steps is in the situation
where swing out type bumpers has been previously installed. In this case, there
is usually a gap between the existing bumper rails, at the position of the camera.
A section of capping must be removed and packing timber must be secured to
the sub timbers to allow the Duo Camera unit to be mounted at the correct height.
See Chapter 5: Accounting for Bumper Rails below for more information on
mounting to Duo Camera unit to account for bumpers.
Metal Capping
Metal capping is most often used in Brunswick centers. This method does not use any sub timbers and the
capping is screwed directly to the trusses underneath the lane. In this case:
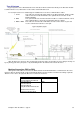
1. Drill a pilot hole in the center of the capping and then use a metal saw of 35mm diameter
(Approx 1 ½”) measured 4010mm (13’2”) from the edge of the Tailplank. Make sure you
use a hole saw designed for cutting through steel.
2. Remove any sharp edges from the hole with a half round steel file. If you wish, you
could use a rubber grommet to cover the edge for safety reasons.
3. Pull all the cables previously run in Chapter 2 through the hole.
4. Make sure that all screws that secure the capping to the trusses are tight and there is no
movement in the capping.