
Installation guide


Chapter 4: Secure the Capping 39
&KDSWHU6HFXUHWKHFDSSLQJ
Perform this step ONLY if you use Type A or B connections to your Pinsetters. Skip this step if you use a Type
C connection (Brunswick GS series)
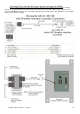
In order for the Duo system to consistently take accurate scores, the Camera Module MUST be securely
attached to the lanes with no movement. For installation simplicity, the Duo Camera Module is designed to be
screwed directly to the capping. Therefore, a section of the capping itself (Not the entire capping) must also be
securely fastened to the sub timbers to avoid mis-scoring due to movement of the capping and Camera unit. You do
not need to secure the capping along the entire lane, only a short length that will hold the Duo Unit.
Capping has, in the past, been made from three different materials: Timber, Metal and Plastic. All these types
must be securely fastened.
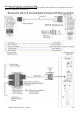
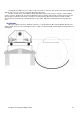
In all cases, there must be a cable access hole in the capping 4010mm (13’2”) from the rear of the pindeck.
Wooden and Plastic Capping
The procedure for all Wooden and Plastic Capping is the same.
1. Drill a hole in the center of the capping of 35mm diameter (Approx 1 ½”) measured
4010mm (13’2”) from the edge of the Tailplank.
2. Pull all the cables previously run in Chapter 2 through the hole.
3. Screw the capping securely to the sub timbers.