
Installation Guide

8/4/2016 www.floorexpert.com/knowledgeArticlePrint?KBArticleType=Installation&KBArticleName=CompleteLaminateInstallationSystem
http://www.floorexpert.com/knowledgeArticlePrint?KBArticleType=Installation&KBArticleName=CompleteLaminateInstallationSystem 22/25
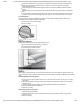
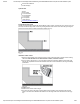
8.Placethetonguesideoftheflooringagainstthestairnosebeingsurethatthelaminatesurfaceis
flushwiththestairnosesurface.
9.Fromthispoint,continuetheinstallationofthelaminateflooringusingtheinstallationinstructions
providedwiththelaminateflooring.
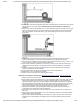
InstructionsforInstallingLaminatePerpendiculartotheStairNose
1.Measureandcutstairnosetolength.
2.Usingautilityknifeortablesaw,removethebottomlipofthestairnose.
3.Followingtheinstructionslistedbelow,settherouterbitandmanufactureagrooveonthestairnose.
Usea7mmrouterbitand7mmsplinesfor7mmproductsandan8mmrouterbitand8mmsplines
for8mmproducts.
4.Applyabeadofconstructionadhesiveina3"(7.6cm)serpentinepatterntothebackofthecutpiece
ofstairnoseandaffixtothestair.Refertoconstructionadhesivelabelforallrecommendations,
warningsandsafetyprecautions.(Onwoodsubfloors,drillappropriatesizeholesintotheinstalled
stairnoseandanchorwith6dfinishnails.Setnailsusinganailpunch.Fillholeswitharepairstick.)
5.Toavoidshiftingoverconcrete,allowenoughtimefortheconstructionadhesivetosetpriorto
continuingtheinstallation.Thistimewillvarydependingupontheadhesivebeingused.
6.Usingautilityknifeortablesaw,removethetongueorgroovefromthelaminateplanktobeinstalled
tothestairnose.
7.Followingtheinstructionslistedbelow,settherouterbitandmanufactureagrooveonthelaminate
plank.
8.ApplyabeadofArmstrongEverSealtobothsidesofoneedgeofthesplineandinsertitintothe
grooveofthestairnose.
9.Applyanotherbeadofgluetothetopoftheexposedportionofthespline.
10.Applyabeadofgluetothebottomlipofthegrooveofthepieceofflooringtobeinstalled.
11.Placethepieceofflooringintopositionandgentlytapthepiecestogetherusingthetappingblock.
12.Asmall,continuousbeadofgluemustoozetothesurfacetoensurea
waterresistantjoint.
13.Removetheexcessgluewithadampclothfollowedbywipingwithaclean,dry,cottoncloth.
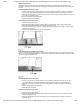
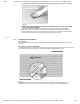
SettingtheRouterBit
1.Setthedepthoftherouterbitbyplacingtwopiecesofflooringonaflat,sturdysurfacewiththefactory
groovesfacingeachother.
2.Afterthebithasbeeninstalledintotherouter,placetherouteronthesurfaceoftheflooringand
adjustthebitheightvisuallytomatchthegrooveposition.
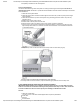
3.Tochecktheaccuracyofyourrouterbitsetting,routagrooveonthetongueedgeofapieceofscrap.
4.Ifthereisaslightscrapofthetongueleftaboveorbelowthegroove,adjustthebitdepthaccordingly
andrecheckyouradjustment.
NOTE:Ifdesired,thestairnoseandlaminatemaybegroovedandsplinedtogetherregardlessofthe
directionofthelaminateinstallation.Usea7mmrouterbitand7mmsplinesfor7mmproductsandan8
mmrouterbitand8mmsplinesfor8mmproducts.Whenusingsplinesthetongueorgrooveedgeofthe
laminateflooringandthebottomlipofthestairnosemustberemoved.
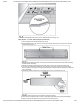
ExpansionZone
Allexpansionzonesbetweentheedgeofthelaminateflooringinstallationandallverticalsurfacesparallelto
thestairnoseshouldbeincreasedaccordingtothechartbelow:
Ifdistancebetweennosing
andverticalsurfaceis:Expansionzoneshouldbe:
5'–9'1/4"
10'–14'3/8"
15'–19'1/2"
20'–24'3/4"
25'–29'7/8"
30'+1"
CAREINSTRUCTIONS
ArmstrongLaminateFlooringisextremelyeasytoclean.
DONOTwaxorpolishyourfloor.
Foreverydaycleaning,vacuumwithawandattachmentordampmop.
ToremoveexcessivedirtbuildupuseArmstrongHardwood&LaminateFloorCleanerorBruce
Hardwood&LaminateFloorCleaner.
BeforeusingwaterorArmstrongHardwood&LaminateFloorCleanerorBruceHardwood&
LaminateFloorCleaner,thoroughlywringoutyourmoporsponge.Anexcessiveamountofmoisture
isnotnecessaryandmaydamagetheflooring.