
Installation Guide

8/4/2016 www.floorexpert.com/knowledgeArticlePrint?KBArticleType=Installation&KBArticleName=CompleteLaminateInstallationSystem
http://www.floorexpert.com/knowledgeArticlePrint?KBArticleType=Installation&KBArticleName=CompleteLaminateInstallationSystem 19/25
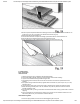
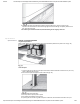
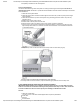
4.SnapBabyThresholdintotheTrackSystem.
OverTheTopStepNose
Usewherelaminateflooringmeetsastepdownorlanding.InstallusingtheTrackSystem.Donotuseon
individualstairtreads.SeeSectionJ(FlushStairNoseInstallationforStainTreadsandRisers)forFlushStair
NoseInstallations.
1.InstalltheTrackSystemFIRST.
2.InstalltheTrackSystemsothattheoutsideedgeoftheTrackis5/8"(15.88mm)awayfromtheedge
ofthestepdown.
3.InstallthelaminateflooruptotheTrackSystemusingArmstrongspacerstoobtain1/4"(6.35mm)
expansionzone.
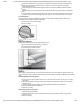
4.Measureandcutstepnosetolength.
5.Predrillholesinthestepnoseforfinishnails.
6.Adherethestepnosetothesubfloorusingahighquality,constructionadhesive.
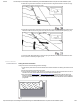
7.Applya3/16"(4.76mm)beadofadhesiveinaserpentinepatterntothebackofthestepnose(Fig.
29).Carefullyreadcautionsoncontainerandfollowthemanufacturer’srecommendedinstructions
ontheadhesivelabel.
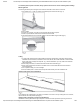
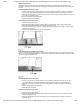
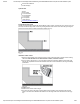
8.Snapthestepnoseintothetrackandanchorthestepnosewithfinishnails(Fig.30).
9.DONOTUSETHESTEPNOSEONINDIVIDUALSTAIRTREADS.
10.Alwaysmakesuretousemechanic(nail)andadhesive(glue)fastenerstosecurestepnose.
FLUSHSTAIRNOSEINSTALLATIONFORSTAIRTREADSandRISERS
IMPORTANTSAFETYNOTICE:Theinstallationoflaminateflooringonstairsisafullyadheredsystem.
Undernocircumstancesshouldfoamunderlaymentbeplacedonstairstepsorrisers.Thiswillresultin
anunsafecondition.Donotuseoverthetopstepnosemoldingonindividualstairtreads.
ToolList
TableSaworMiterSaw
10"(25.4cm)60or80ToothCarbidetippedATBorTripleChipSawBlade
PowerDrill
Hammer
6dFinishNails