
Installation Guide

8/4/2016 www.floorexpert.com/knowledgeArticlePrint?KBArticleType=Installation&KBArticleName=CompleteLaminateInstallationSystem
http://www.floorexpert.com/knowledgeArticlePrint?KBArticleType=Installation&KBArticleName=CompleteLaminateInstallationSystem 16/25
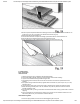
mm)largerindiameterthanthepipe.
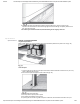
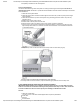
7.Cutinfromtheedgeata45°angletowardstheholesinthepiece(Fig.37).
8.Applygluetothecutedges.
9.Usethepullbartoputthepieceinplace.
10.Usespacersaswedgestoholdinplace.
CustomCutting
StartingPointModifications:
Wheninstallingacustomfloor,youmayfindstartingthefloorlayoutfromthelongestwallisnotnecessary.In
manycustomlayouts,itmayworktoyouradvantagetostartfromthemiddleandworkouttowardthewall.This
techniqueworkswellforbordersandinsets.Toassistintheinstallation,atemporarystartingblockcanbe
attachedtothesubfloor.Thisstartingblockactsmuchliketheusualstartingwallandgivesyousomethingto
tapagainstduringtheinstallation.Onceyouhavereachedtheoppositewall,thetemporarystartingblockcan
beremovedandtheinstallationcompleted.
RoutingandtheUseofSplines:
Manycustominstallationsrequirecuttingtheboardtoachieveadesiredvisualeffect.Ifthesecutpieceswillbe
installedinthefieldofthefloor,theywillhavetoberouted.Usearouterbittomodifythepiecesoitcanaccept
thetongueofthenextpieceorbefittedwithaspline.Itiscriticalduringtheroutingprocessthatthegroove
beingcutisproperlylineduptomatchthenextpiece.Thiswilleliminateanyledgingthatmightoccurifthe
routerbitistoohighortoolow.Also,ifthecutisexposedandnothiddenfromview,makesurethecutisas
trueandstraightaspossible.
HowtoInstallBordersorInsets:
Tocreateasimpleborder,startbydeterminingthe“visualcenter”oftheroom.Then,workingoutfromthat
point,measureinwholewidthorlengthunitsofthepieceyouplantoinstalla71/2"x505/8"(19.05cmx
128.59cm)board,a15"x15"(38.1cmx38.1cm)squareora15"x255/16"(38.1cmx64.29cm)block.
Measureuntilyoureachasuitableplacefortheborder.Dryfitthefieldandbordertohelparrangethelayout.
Themajorityofthecutsshouldfallattheperimeterofthefloorandbehiddenbythewallbaseorquarter
round.Toinstallthistypeoffloorlayout,youcouldeitherstartatthelongestwall,ifallthecutpieceshavebeen
calculated,orfromthestartoftheborderrow.Tostartfromtheborder,usea2″x4″asastraightedgeand
fastenittothefloortouseasastartingwall.Oncethefieldandborderhavebeeninstalled,youcangoback
andfillouttheperimeterofthefloor.
FinishingtheJob
FinishingtheInstallation(allInstallations)
1.Removespacersandinstallmoldingpieces.(SeeCoordinatedTransitionsandMoldingPieces
SectionJ.)
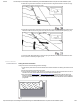
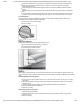
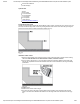
2.Alwayspredrilltransitionsormoldingspriortonailing.Toallowthefloatingfloortomovefreely,do
notfastenthetrimtothelaminateflooring(Fig.8).
3.Forroutinecleaning,vacuumordampmop.Toremoveexcessivedirtbuildup,useArmstrong
Hardwood&LaminateFloorCleaner(S302)orBruceHardwood&LaminateFloorCleaner.
4.DONOTWAXORPOLISHyourfloor.
COORDINATEDTRANSITIONSANDMOLDINGPIECES
ArmstrongoffersspeciallydesignedQuarterRoundMolding,TMolding,MultiPurposeReducer,FlushStair
Nosing,BabyThreshold,WallBaseandOvertheTopStepNosingtocompletethefloorinstallation.
Attachanyofthesepieceswithnails(6dfinishnails)orconstructionadhesive.Whenusing
constructionadhesive,weighdownthetransitionstripevenlytoensurepropercontactwiththe
subfloor.Donotuseanexcessiveamountofconstructionadhesivethatcouldoozeoutandfillthe
expansionzone.
FinishingtheJob