
Installation Guide

8/4/2016 www.floorexpert.com/knowledgeArticlePrint?KBArticleType=Installation&KBArticleName=CompleteLaminateInstallationSystem
http://www.floorexpert.com/knowledgeArticlePrint?KBArticleType=Installation&KBArticleName=CompleteLaminateInstallationSystem 11/25
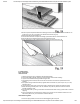
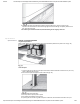
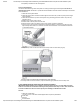
3.Besuretoplaceaspacerbetweenthemarkingpenand“scribe”pieceofboard.Thisaddsthe1/4"
(6.35mm)to1/2"(12.7mm)spaceyouneedatthefinishwall(Fig.18).
4.Markwheretheboardshouldbecut.
5.Ifthefitatthefinishwallissimpleandstraight,justmeasureforthecorrectwidthandcut.
6.Afterthelastrowisinstalled,usethepullbartotightenthejoints.
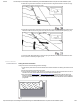
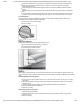
7.Whenappropriate,cuttheunderlaymentevenwiththetopofthefloor(Fig.19).
G.LOCK&FOLD
RefertoSectionE.
InstallFirstRow
1.Inspecteachpiecepriortoinstallationfordamagedboards.
2.Tominimizepatternrepeats,alwayspullfromatleast3cartonswhileinstalling.
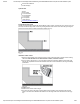
3.Layfirstrowofboardswithtonguesidefacingthewall.
4.Ifthestartingwalliscrooked,tracethecontourofthewallonthefirstrowofplanksandtrimas
needed.
5.Usespacersalongallsidesthatbuttupagainstwallstomaintain1/4"(6.35mm)to1/2"(12.7mm)
expansionzone.
6.Laypiecesfromlefttoright.Locktheendjointsbyinstallingatanangletothepreviousboard.
7.Whenmeasuringthelastpieceintherow,subtract1/4"(6.35mm)fromtheendoftheboardto
maintainexpansionzone.
8.Cutdecorativesideupifusingahandsawordecorativesidedownifusingapowersawtominimize
chipping.
9.Ifthecutoffpiecefromthefirstrowis8"(20.32mm)orlonger,useittostartthesecondrow.Ifitis
lessthan8"(20.32mm),cutafullboardinhalfandusethat.
InstallRemainingRows
1.Continuelayingboards,onerowatatimeandstaggeringtheendjoints.