8/4/2016 www.floorexpert.
8/4/2016 www.floorexpert.com/knowledgeArticlePrint?KBArticleType=Installation&KBArticleName=CompleteLaminateInstallationSystem groove ONLY. Place opened cartons of planks in the room where they are to be installed for at least 48 hours. In drier climates below 25% RH or very humid climates above 60% RH allow 96 hours of acclimation time. Example: dry environments such as Colorado and Arizona and wet environments such as Florida and Georgia.
8/4/2016 www.floorexpert.com/knowledgeArticlePrint?KBArticleType=Installation&KBArticleName=CompleteLaminateInstallationSystem that can be covered in 60 minutes (see adhesive information). If necessary, nail a sacrificial row with 1″ (2.5 cm) nails on the dry side of your chalk line to help hold the first row in place. NOTE: Avoid installing on the surface of the flooring. If necessary, distribute weight using a kneeler board.
8/4/2016 www.floorexpert.
8/4/2016 www.floorexpert.com/knowledgeArticlePrint?KBArticleType=Installation&KBArticleName=CompleteLaminateInstallationSystem Concrete Subfloors Concrete floors must be cured properly and allowed to dry for at least 60 days before installation can begin. . Concrete floors must not show any signs of moisture or alkali.
8/4/2016 www.floorexpert.com/knowledgeArticlePrint?KBArticleType=Installation&KBArticleName=CompleteLaminateInstallationSystem Tile installed over wood: Use Quiet Comfort or Quiet Comfort Premium Underlayment for Laminate with no attached backing. No additional underlayment is needed for Laminate with attached backing.
8/4/2016 www.floorexpert.com/knowledgeArticlePrint?KBArticleType=Installation&KBArticleName=CompleteLaminateInstallationSystem (12.7 mm) expansion zone around the perimeter of the floor. 6. It may be necessary to plane or cut the bottom of the door to accommodate the change in floor height. 7. Handle and unload with care. Store in a dry place, being sure to provide at least a 4″ air space under cartons which are stored upon “ongrade” concrete floors.
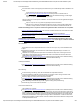
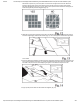
/4/2016 www.floorexpert.com/knowledgeArticlePrint?KBArticleType=Installation&KBArticleName=CompleteLaminateInstallationSystem 1. Begin on the left side of the room and work right. 2. Lay the first full piece with the small, tongue side facing the wall (Fig. 9). 3. Install second and subsequent full pieces in the first row by aligning short ends of boards and locking into place (Fig. 10). 4. Use spacers along all sides that butt up against walls to maintain 1/4" (6.35 mm) to 1/2" (12.
8/4/2016 www.floorexpert.com/knowledgeArticlePrint?KBArticleType=Installation&KBArticleName=CompleteLaminateInstallationSystem shorter than 8" (20.32 cm), cut a new plank in half and use it to begin the second row. Whenever practical, use the piece cut from the preceding row to start the next row. End joints of all boards should be staggered 8" (20.32 cm) or more. Grout lines on planks with tile visuals can be aligned, or offset as long as end joints are staggered (Fig. 12). 2.
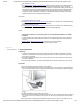
8/4/2016 www.floorexpert.com/knowledgeArticlePrint?KBArticleType=Installation&KBArticleName=CompleteLaminateInstallationSystem 5. Continue installing full boards in the second and subsequent rows until you reach the wall on your right. 6. Mark the last piece, cut and install. After all boards in the row are installed, press or walk all boards flat to the subfloor to begin the next row (Fig. 16). 7. Use a pull bar when necessary to ensure joints are tight (Fig. 17). Installing the Last Row 1.
8/4/2016 www.floorexpert.com/knowledgeArticlePrint?KBArticleType=Installation&KBArticleName=CompleteLaminateInstallationSystem 3. Be sure to place a spacer between the marking pen and “scribe” piece of board. This adds the 1/4" (6.35 mm) to 1/2" (12.7 mm) space you need at the finish wall (Fig. 18). 4. Mark where the board should be cut. 5. If the fit at the finish wall is simple and straight, just measure for the correct width and cut. 6.
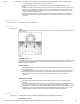
8/4/2016 www.floorexpert.com/knowledgeArticlePrint?KBArticleType=Installation&KBArticleName=CompleteLaminateInstallationSystem 2. Install the long end of the first board in the second row at an angle to the board in the first row. (Fig. 20) Press flat to subfloor to lock into place. 3. Angle the long end of the next board in the second row to lock into the first row while positioning the short end of the board over the groove from the previous board. Lock and fold into place. (Fig. 21) 4.
8/4/2016 www.floorexpert.com/knowledgeArticlePrint?KBArticleType=Installation&KBArticleName=CompleteLaminateInstallationSystem To minimize pattern repeats in the floor, always pull from at least three cartons of flooring while installing. Wall Irregularities All wall irregularities require cutting the first or last row of boards to fit the contour of the wall. 1. Use dividers or a 1" (2.54 cm) spacer turned sideways to mark the contour (Fig. 4). 2. Cut to shape. 3.
8/4/2016 www.floorexpert.com/knowledgeArticlePrint?KBArticleType=Installation&KBArticleName=CompleteLaminateInstallationSystem reduced in size. 1. Using a small plane or utility knife, plane or shave off 75% of the ledge of the groove (Fig. 7). 2. Be careful not to trim too much. Excessive reduction can weaken the joint. 3. After the groove ledge has been trimmed, place the board in position laterally and lightly pull the board into place using the pull bar. 4.
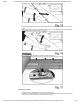
8/4/2016 www.floorexpert.com/knowledgeArticlePrint?KBArticleType=Installation&KBArticleName=CompleteLaminateInstallationSystem 8. The toilet should be removed before installing the laminate flooring. Allow a 1/4" (6.35 mm) expansion zone between the laminate flooring edge and the toilet flange. Completely seal the zone with 100% silicone caulk. 9. As with any hardsurfaced material, laminate flooring can be slippery when wet.
8/4/2016 www.floorexpert.com/knowledgeArticlePrint?KBArticleType=Installation&KBArticleName=CompleteLaminateInstallationSystem mm) larger in diameter than the pipe. 7. Cut in from the edge at a 45° angle towards the holes in the piece (Fig. 37). 8. Apply glue to the cut edges. 9. Use the pull bar to put the piece in place. 10. Use spacers as wedges to hold in place.
8/4/2016 www.floorexpert.com/knowledgeArticlePrint?KBArticleType=Installation&KBArticleName=CompleteLaminateInstallationSystem To allow the floating floor to move freely, never fasten the transition pieces to the laminate flooring. Keep the placement of the transition strip such that the 1/4″ (6.35 mm) expansion around the perimeter is maintained. When installing over a radiant heated floor, always use construction adhesive to attach transition pieces.
8/4/2016 www.floorexpert.com/knowledgeArticlePrint?KBArticleType=Installation&KBArticleName=CompleteLaminateInstallationSystem MultiPurpose Reducer Provides a smooth transition from your Laminate floor to another type of flooring of a lower height. Also finishes the space where Laminate flooring ends against a vertical surface and where quarterrounds cannot be used. If Installing Without The Track System: 1. Screw or nail a temporary spacer block 1 1/4" (3.18 cm) wide and a minimum of 1/2" (12.
8/4/2016 www.floorexpert.com/knowledgeArticlePrint?KBArticleType=Installation&KBArticleName=CompleteLaminateInstallationSystem 4. Snap Baby Threshold into the Track System. OverTheTop Step Nose Use where laminate flooring meets a step down or landing. Install using the Track System. Do not use on individual stair treads. See Section J (Flush Stair Nose Installation for Stain Treads and Risers) for Flush Stair Nose Installations. 1. Install the Track System FIRST. 2.
8/4/2016 www.floorexpert.com/knowledgeArticlePrint?KBArticleType=Installation&KBArticleName=CompleteLaminateInstallationSystem Construction Adhesive 5Minute Epoxy Optional Tools Router Router Table 7 mm Router Bit 8 mm Router Bit 7 mm Splines 8 mm Splines 12mm Splines Armstrong EverSeal Adhesive Preparation of Stair Treads Treads and risers should be structurally sound, flat, dry, clean, smooth, and free from paint, varnish, wax, oils, solvents, and other foreign matter.
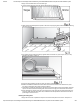
8/4/2016 www.floorexpert.com/knowledgeArticlePrint?KBArticleType=Installation&KBArticleName=CompleteLaminateInstallationSystem 6. Measure and cut to width and length another piece of laminate plank for the stair tread. Using a utility knife or table saw, remove the tongue. If the laminate has an attached fabric, it must also be removed. 7. Apply a bead of construction adhesive in a 3" (7.6 cm) serpentine pattern to the back of the cut piece of stair nose and affix to the stair.
8/4/2016 www.floorexpert.com/knowledgeArticlePrint?KBArticleType=Installation&KBArticleName=CompleteLaminateInstallationSystem 8. Place the tongue side of the flooring against the stair nose being sure that the laminate surface is flush with the stair nose surface. 9. From this point, continue the installation of the laminate flooring using the installation instructions provided with the laminate flooring. Instructions for Installing Laminate Perpendicular to the Stair Nose 1.
8/4/2016 www.floorexpert.com/knowledgeArticlePrint?KBArticleType=Installation&KBArticleName=CompleteLaminateInstallationSystem As with any hardsurfaced material, laminate flooring can be slippery when wet. Promptly wipe up spills with a moist sponge or soft cloth (Fig. 43). DO NOT CLEAN THIS FLOOR WITH ABRASIVE CLEANSERS, abrasive scrubbing pads, STEEL WOOL OR SCOURING POWDER. To avoid scratching, use floor protectors or protective pads under chairs and furniture legs.
8/4/2016 www.floorexpert.com/knowledgeArticlePrint?KBArticleType=Installation&KBArticleName=CompleteLaminateInstallationSystem 3. Replace the damaged board with a new one. Reassemble the floor (Fig. 40). Major Repairs — In Center of Room (Repair is Permanent) 1. Check replacement board for damage, size and fit. 2. Mark damaged board 11/2" (3.81 cm) from ends and sides. Drill 3/16" (4.76 mm) holes in corners and at relief cuts (Fig. 41). 3. Set saw depth to board thickness.
8/4/2016 www.floorexpert.com/knowledgeArticlePrint?KBArticleType=Installation&KBArticleName=CompleteLaminateInstallationSystem 10. Carefully place the new piece into the opening. Press firmly. 11. Remove all residual glue on the surface with a clean, damp cloth. 12. Make sure all edges are even on either side of the joints. Apply pressure for at least 24 hours using heavy weights. 13. Make sure that the weight is evenly distributed across the new piece. http://www.floorexpert.