
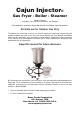
Owner`s manual
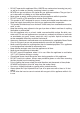
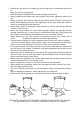
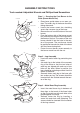
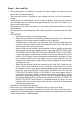

Step 4 – Hose Assembly
Return the base to the upright position allowing •
the unit to stand on its newly assembled legs.
Place the air shutter against the burner venturi •
so that it fits over it as a cap.
Place the spring over the hole of the air shut-•
ter with the wide end of the spring on the air
shutter.
Attach the hose to the end of the safety extend-•
er without the swiveling nut by connecting the
automatic shut-off timer to the projecting end of
the safety extender; rotating clockwise until fas-
tened securely. Insure that the automatic shut-
off timer is facing upwards for easy viewing and
operation.
Insert the opposite side of the safety extender •
through the center of the narrow end of the
spring and screw into the center of the air shut-
ter and burner venturi until secure.
Step 5 – Regulator to Gas Cylinder Connection
and Operation
Before each use, perform a thorough inspection •
of the hose and all connecting parts. If it shows
any indication of damage, replace all necessary
parts before continuing with operation.
WARNING: Any open flames must be extin-•
guished before the hose can be connected to
the gas cylinder.
Insure that the regulator control valve is in the •
off position before it is connected to the gas cyl-
inder. You are now ready to connect the regula-
tor to the gas cylinder which is done by rotating
the regulator clockwise onto the threaded open-
ing of the cylinder until it is securely fastened.
Slowly rotating the regulator valve clockwise •
will turn the flame on and steadily increase the
flame. Slowly rotating the regulator valve coun-
ter-clockwise will steadily decrease the flame
and turn the flame off.
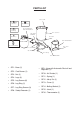
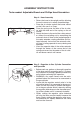
VENTURI
HOSE
AIR SHUTTER
SPRING
SAFETY EXTENDER
TIMER
ASSEMBLY INSTRUCTIONS
Tools needed: Adjustable Wrench and Phillips Head Screwdriver