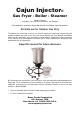
Cajun Injector® Gas Fryer - Boiler - Steamer Owner’s Manual Assembly, Care, Safety Instructions, and Recipes Tool needed for assembly: Adjustable Wrench and Phillips Head Screwdriver All Units are for Outdoor Use Only Throughout this instruction manual, you will find important information required for the proper assembly and safe use of your new Cajun Injector gas fryer.
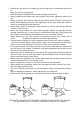
If you smell gas: • • • • • • • • • • • • Turn off gas flow to the appliance. Extinguish any open flame with a fire extinguisher. If odor continues, do not approach the appliance and immediately phone your Fire Department. DO NOT use this appliance within 25 feet (7.5 m) of flammable liquids. If a fire should occur, keep away from the appliance and immediately contact the local fire department. Do not attempt to extinguish an oil/grease fire with water.
COOKING WITH OIL OR GREASE: • • • • • • • DO NOT overfill the cooking pot with oil/grease or water. Follow instructions in the manual for establishing proper oil/grease or water levels. DO NOT allow the oil to exceed 400˚F (200˚C); if this happens; adjust the regulator control knob in order to drop temperature. If oil temperature continues to rise or begins to smoke, IMMEDIATELY turn the burner OFF.
• • • • • • • • • • • • • • • • • • • • DO NOT operate this appliance ON or UNDER any overhead roof covering (car port), as well on or under any awning, overhang, balcony, or deck. NEVER turn gas on indoors; only ignite this gas appliance outdoors. The gas fryer is not to be used in a building or any other enclosed area. Never place an empty cooking vessel on the gas appliance while in operation. DO NOT use IN or ON recreational vehicles and/or boats.
• • • • • • • • • • • • • • • • Execute the gas leak test to detect gas leaks along hose or connection points prior to every use of this gas appliance. Avoid bumping of the appliance to prevent spillage or splashing. Always separate and detach your gas cylinder from burner apparatus when not in use. Keep your hands, hair and face away from the burner flame. DO NOT lean over the cooker when lighting the burner. This appliance has an open flame. Be careful of loose hair and clothing during operation.
Gas Cylinder Storage, Placement and Filling: • • • • • • Do not store a spare LP-gas cylinder under or near appliance. Never fill the cylinder beyond 80 percent full. Over-filled cylinders can release gas. The gas cylinder safety relief valve may overheat, allowing gas to release causing an intense fire with risk of death or serious injury. If you smell, hear, or see gas escaping immediately move away from the gas cylinder and call the Fire Department for assistance.
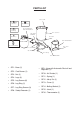
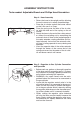
PARTS LIST GF13 - COVER GF7 - LEG RING SCREWS (3) GF11 - SPRING (1) GF5 - LEG SCREWS (6) GF9 - HOSE WITH AUTO SHUT-OFF / REGULATOR GF12 - 30 QT.
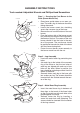
ASSEMBLY INSTRUCTIONS Tools needed: Adjustable Wrench and Phillips Head Screwdriver Step 1 – Securing the Cast Burner to the Base (Burner Mount Bar) MOUNT BAR NUT • CAST BURNER • • • • Place base upside down on an even surface. The wider ring of the base should be facing downward. Locate the burner mount bar stretching across the narrower ring of the base. Remove the nut from the bottom of the cast burner.
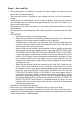
ASSEMBLY INSTRUCTIONS Tools needed: Adjustable Wrench and Phillips Head Screwdriver Step 4 – Hose Assembly • • TIMER SAFETY EXTENDER • SPRING VENTURI HOSE AIR SHUTTER • • Return the base to the upright position allowing the unit to stand on its newly assembled legs. Place the air shutter against the burner venturi so that it fits over it as a cap. Place the spring over the hole of the air shutter with the wide end of the spring on the air shutter.
Step 6 – Gas Leak Test • • • • • • • • Only propane gas is intended for use with this burner. Never use natural gas; the burner will not operate properly. Every time your burner is attached to a gas cylinder, the Gas Leak Test should be executed. Anything that can easily ignite, such as matches, lighters, sparks and lit cigarettes must be kept away from burner when performing the Gas Leak Test. Never use a flame to test for gas leaks. Never perform Gas Leak Test indoors.
Step 7 – Lighting the Burner • • • • • • • • • • • Insure that the regulator control valve is in the off position. Slowly rotate the gas cylinder valve clockwise to the on position. Using a special grill match or grill lighter for safety, insert a flame underneath the wind shield to the burner. Slowly rotate the regulator control valve to the on position until the burner ignites.
Step 8 – Quick Drain System • • • • • • Locate the two hooks on the inside of the pot not far from the upper rim; these are the Quick Drain Hooks. Two oval shaped holes can be found on the basket: One is labeled “turkey” and the other is labeled “seafood”. The basket is able to hang from the hooks by slotting the Quick Drain Hooks through either one of the two oval shaped holes in the basket. When proper cooking time has elapsed, you are ready to drain the excess liquid from any food in the basket.
Frying Non-Frozen Foods (Oil may take up to 55 minutes to reach desired temperature) Food French Fries Fried Chicken Mushrooms Fish Fillets Whole Turkey Hot Wings Maximum Quantity Temperature Time 3 lbs. (1.36 kg) 400˚F (204˚C) 5-7 minutes 8 pieces 350˚F (177˚C) 14-18 minutes 2 lbs. (0.91 kg) 325˚F (163˚C) 10-12 minutes 2 lbs. (0.91 kg) 400˚F (204˚C) 6-8 minutes 10-14 lbs. (4.5-6.4 kg) 400˚F (204˚C) 3 lbs. (1.36 kg) 400˚F (204˚C) 3 min. per lb. (0.
Techniques for Successful Preparation of Fried Foods at Homes Often when someone mentions frying foods at home, they are greeted with a chorus of negative comments ranging from messy, greasy, and dangerous to unhealthy. Utilizing the proper equipment and learning the correct methods and procedures, frying can overcome virtually all of these comments. No doubt, breading or battering foods and frying “in oil,” does add caloric content to foods.
Pan Frying This form of frying is characterized by the use of significantly less hot oil where food is semi-submerged in hot oil in an electric skillet or in a fry pan over an open flame. When pan-frying, the oil’s depth should be no more than 1/2 the thickness of the food. Pan frying differs from deep frying since the food touches the bottom of the pan and the exposed top side of the food allows some loss of moisture in the food as it cooks.
Deep Frying Foods to be deep-fried should be of a size and shape that permits individual pieces to float freely in the fat. The fat should surround the food and begin cooking it on all sides at once. The food is usually battered or breaded to protect the food’s surface moisture from coming into contact with the hot oil creating an exterior layer or crust sealing food flavors and juices inside. We suggest the following tips: 1.
Choice of Oil or Fat as a Frying Medium: 1. Your choice of Oil or Fat often depends on the frying technique to be utilized and the projected frying temperature. As an example, when sautéing, oil choice often depends on the flavor to be imparted as butter or bacon grease are often employed. Olive oil is also a good choice if temperatures not over 300˚F are to be employed in sautéing or pan-frying. 2. Health Concerns can determine your choice.
For Gulf Coast Style Seafood Boil 5 lbs. Shrimp * 8 Medium Crabs * 4 lbs. Crawfish * Vegetables 1. Wash Shrimp or seafood in cold water. Confirm crabs and crawfish are alive prior to boiling (crabs and crawfish should be alive at time of cooking). Purge Crawfish in salted water. 2. Place products to be boiled inside the basket. Be sure that water displacement does not exceed the capacity of the boiling pot.
Injectable Marinade Concepts and Utilization Techniques Injectable marinades and brines possess the same characteristics as their counterparts except that they do not require product soaking in order to impart flavor; moisturize, and tenderize. Unlike marinade soaking methodologies that only penetrate about a 1/4 inch into meat surfaces, require long soak times, and contaminate expensive marinades, flavor injection infuses blended flavors deep inside the meat.
Cajun Injector® Deep Fried Turkey Prep Time: 20 minutes Cook Time: 35-45 Minutes Yield: 8 servings Ingredients: 1 Cajun Injector® Propane Fryer 3 Gallons Cajun Injector® Cottonseed Oil 1 10 - 12 Pound Whole Turkey 2 16 oz. jars Cajun Injector® Creole Butter Recipe Marinade 1 8 oz. canister Cajun Injector® Quick Shake® Cajun Shake® Method: Place the outdoor gas burner on level dirt or grassy area. Never fry a turkey indoors, in a garage, or in any structure attached to a building.
Original Louisiana Habanero Fried Chicken Prep time: 20 minutes Marinate time: 4 hours Cook time: 30 minutes Yield: 8 servings Ingredients: 1 2 tbsps. 2 tbsps. 2 tsps. 2 4 cups 1 tbsp. 1 tbsp. 1 tbsp. 2 tsps.
Cajun Injector® Fried Catfish Prep time: 10-15 minutes Cook time: 3-5 minutes Yield: 3-4 lbs. of fish Ingredients: Cajun Injector® Cottonseed Oil 1 package Cajun Injector® Seasoned Fish Fry Mix Method: Preheat oil to 350˚F. Dip Fish into a bowl of cold water. Shake off excess water. Roll Fish in 10 ounces of the Cajun Injector Seasoned Fish Fry Mix. Deep fry at 350˚F until golden brown.
Louisiana Wildly Wicked Buffalo Catfish Wrap Prep Time: 10 minutes Cook Time: 7 minutes Yield: 5 wraps Ingredients: 1 lb. Catfish Fillets (USA raised) 1 (8 oz.) bag Cajun Injector® Chicken Fry Mix 1 Diced Tomato 1/2 cup Louisiana Brand Wildly Wicked Wing Sauce 1 Package (8 inch) Flour Tortillas 1 lb. Cole Slaw (recipe follows) 2 cups Cottonseed Oil, for Frying Method: Preheat oil to 400˚F in electric fryer, or 350˚F in propane fryer.
Louisiana Wildly Wicked Turkey Tenders Prep Time: 10 minutes Cook Time: 10 Minutes Yield: 4-6 servings Ingredients: 1 2 1/2 cup 1/4 cup 2 tbsps. 10 oz. packet of Cajun Injector® Chicken Fry Mix Turkey Breast Boneless Skinless Cut into Strips Louisiana Brand Wildly Wicked Wing Sauce Melted butter Original Louisiana Brand Hot Sauce Cajun Injector® Cottonseed Oil Method: Preheat oil to 400˚F in electric fryer, or 350˚F in propane fryer. Heat enough oil for deep frying to 350°F.
Cajun King® Country Fried Quail Prep Time: 10 minutes Cook Time: 15 Minutes Yield: 4 servings Ingredients: Cajun Injector® Cottonseed Oil 3 Large Eggs 1/4 cup Milk 1 tbsp. “Original” Louisiana Brand Hot Sauce 1 bag Cajun Injector® Chicken Fry Mix 2 tbsp. Cajun King® Blended Spice Mix 4 Quail, cleaned and cut in half Method: Preheat oil to 400˚F in electric fryer, or 350˚F in propane fryer. Heat enough cottonseed oil for deep frying to 350°F. Beat eggs and milk together, and add hot sauce.
Louisiana Wildly Wicked Buffalo Wings Prep Time: 10 minutes Cook Time: 10-15 minutes Yield: 1 lb. Ingredients: Cajun Injector® Cottonseed Oil 1 lb. Chicken Wings Separated & Tips Removed 3 tbsps. Louisiana Brand Chicken Wing Seasoning 1 bag Cajun Injector® Chicken Fry Mix 1 cup Louisiana Brand Wildly Wicked Wing Sauce 2 cups Ranch Dressing 2 cups Blue Cheese Dressing 10 Celery Sticks Method: Preheat oil to 400˚F in electric fryer, or 350˚F in propane fryer.
Incredible Corn Dogs Prep Time: 15 minutes Cook Time: 3 minutes Yield: 16 servings Ingredients: 1-1/2 cups 1 cup 1/2 cup 2 tsps. 1-1/2 tsps. 3/4 tsps. 2 1/4 cup 3/4 cup 2 16 Cajun Injector® Cottonseed Oil Cornmeal All-purpose flour Sugar Baking powder Salt Black pepper Large eggs Cajun Injector® Creole Butter Recipe Marinade Half-and-half (12 oz.) Package hot dogs (regular size) (10 oz.) wooden skewers Creole mustard for dipping Method: Preheat oil to 400˚F in electric fryer, or 350˚F in propane fryer.
Bite Size Crab Cakes Prep Time: 20 minutes Cook Time: 3-5 minutes Yield: 24 1 inch patties Ingredients: Cajun Injector® Cottonseed Oil 1 lb. Fresh lump crab meat 1/2 cup Breadcrumbs 1 tbsp. Minced parsley 1/2 tsp. Salt 1/2 tsp. Pepper 1/4 cup Mayonnaise 1 cup Egg, lightly beaten 2 tsps. Worcestershire Sauce 1 tsp. Prepared mustard Method: Preheat oil to 400˚F in electric fryer, or 350˚F in propane fryer. Remove any shell pieces from crab meat.
Stuffed Jalapeno Peppers Prep Time: 30 minutes Cook Time: 3-4 minutes Yield: 24 stuffed jalapenos Ingredients: Cajun Injector® Cottonseed Oil 24 Fresh whole jalapeño peppers or 2 (12 ounce) jars whole jalapeno pepper, drained 4 oz. Monterey Jack or cheddar cheese, cut into 24 (1-1/2 inch long) strips 1/2 cup All-purpose flour 1 tbsp.
Fried Potato Salad Prep time: 30 minutes Cook time: 5-10 minutes Yield: 12 servings Ingredients: Cajun Injector® Cottonseed Oil 6 Large eggs 1 lb. Bacon 4 lbs. Red potatoes Cajun Injector® Quick Shake® Cajun Shake® seasoning to taste 1-1/2 cups Mayonnaise 1/2 cup Dill pickle relish Method: Cover eggs with 1 inch cold water in a large pot. Place over medium-high heat. Bring to a boil. Cover and remove from heat. Let stand 15 to 17 minutes. Drain water. Run cold water over eggs until completely cool.
Chicken Fried Venison Steak Prep Time: 10 minutes Cook Time: 15 Minutes Marinade Time: 1-2 hours Yield: 4 servings Ingredients: Cajun Injector® Cottonseed Oil 1 10 oz. Packet of Cajun Injector® Chicken Fry Mix 4 4 oz. Venison Cubed Steaks Method: Preheat oil to 400˚F in electric fryer, or 350˚F in propane fryer. Heat enough oil for deep frying to 350° F. Mix 6 tablespoons of Cajun Injector Chicken Fry Mix with 3/4 cup of water and mix until smooth.
Boiled Shrimp Prep time: 15 minutes Cook time: 30 minutes Servings: 10 lbs. shrimp Ingredients: 10 lbs. Fresh Shrimp Head on 3 tbsps. Cayenne Pepper 1/4 cup Table Salt 1/4 cup “Original” Louisiana Brand Hot Sauce 2 Lemons, Quartered 1 Onion ,Halved 3/4 lb. Small Potatoes (about 2 inches in diameter) 1 Head of Garlic (not separated into cloves) 3 Ears of Corn, Shucked Method: Put 4 gallons of water in Cajun Injector® Fryer and set temperature to 400°F.
Cajun Injector® Friteuse • Chaudière • Marmite à vapeur Manuel d’utilisation Assemblage, Soin, Directives de sécurité Outils nécessaires pour l’assemblage: Clé anglaise et tournevis cruciforme Cet fritteuse est destinée seulement pour l’usage à l’extérieure. A travers la lecture de ce manuel d’utilisation, vous trouverez toutes les informations nécessaires à l’assemblage complet et à l’utilisation en toute sécurité de votre nouvelle friteuse à gaz.
Si vous sentez le gaz : •• Fermer le robinet d’arrivée du gaz. •• Eteindre toutes flammes avec un extincteur. •• Si l’odeur persiste, rester au loin de l’appareil à gaz et téléphoner immédiatement à la caserne de sapeurs-pompiers dans votre localité. •• Veiller que cet appareil à gaz reste à une distance d’au moins 25 pieds (7.5 m) de tous produits liquides inflammables.
CUIRE AVEC DE LíHUILE OU DE LA GRAISSE: •• •• •• •• •• •• •• •• NE PAS remplir la marmite d’eau, d’huile ou de graisse au-dessus du niveau maximum de remplissage. Suivre les instructions dans le manuel d’utilisation pour connaître les niveaux appropriés de remplissage d’huile, de graisse ou d’eau. Ne laisser pas la température de l’huile dépasser les 400˚F (200˚C). Si cela se produit, régler le bouton de commande du régulateur pour baisser la température.
•• •• •• •• •• •• •• •• •• •• •• •• •• •• •• •• •• •• •• •• Ne pas utiliser cet appareil SUR ou SOUS un préhaut, abris de garage, tente, porte-àfaux, surplomb, balcon, terrasse ou plateforme. Ne jamais allumer la friteuse à gaz à l’intérieur; allumer seulement cet appareil à gaz au dehors. La friteuse à gaz ne doit jamais être utilisée à l’intérieur d’un bâtiment ou dans tous autres endroits fermés. Ne jamais placer un récipient à cuire vide sur l’appareil à gaz lorsqu’il est en fonction.
•• •• •• •• •• •• •• •• •• •• •• •• •• •• •• Procéder à l’éssai d’étanchéité de gaz pour détecter toutes fuites de gaz sur toute la longueur du tuyau et aux points de raccordement avant chaque utilisation de la friteuse à gaz. Éviter de frapper ou de cogner la friteuse à gaz lors de son utilisation afin d’éviter tous débordements ou éclaboussements. Détacher toujours votre bonbonne de gaz du brûleur lorsque la friteuse n’est pas en service.
Stockage, placement et remplissage de la bonbonne de gaz : •• Ne pas stocker une bonbonne de gaz de rechange dessous ou à proximité de l’appareil. •• Ne jamais remplir la bonbonne de gaz au delà de 80 pour cent de sa capacité. Les bonbonnes trop remplies peuvent laisser du gaz s ‘échapper. •• La soupape de sûreté de la bonbonne à gaz peut surchauffer et permettre au gaz de s’échapper et entraîner un violent incendie pouvant causer des blessures graves ou même la mort.
LISTE DES PIÈCES GF13 - Couvercle GF7 - Vis d’anneau de pieds (3) GF5 - Vis de pieds (6) GF11 - Ressort (1) GF9 - Tuyau avec Interruption automatique et régulateur (1) GF12 - Marmite de 28 litres GF8 - Raccordement d’extension de sûreté GF3 - Écrou (1) GF1 - Socle (1) GF14 - Panier (1) GF10 - Obturateur d’air (1) GF15 - Crochet (1) GF2 - Brûleur en fonte GF6 - Anneau de support des pieds (1) GF4 - Pieds (3) GF16 - Thermomètre GF1 - Socle (1) GF2 - Brûleur en fonte (1) GF3 - Écrou (1) GF4 - Pied
INSTRUCTIONS POUR L’ASSEMBLAGE Outils nécessaires: Clé anglaise et tournevis cruciforme BARRE DE SUPPORT ÉCROU BRÛLEUR EN FONTE PIEDS BOUCLIER ANNEAU DE SÉCURITÉ VIS DE L’ANNEAU DU SOCLE PIEDS ANNEAU DU SOCLE Étape 1 - Fixer le brûleur en fonte au socle •• Retourner complètement le socle et mettez le sur une surface plane. La barre de support du brûleur est celle qui est attachée aux deux côtés du bouclier. •• Retirer l’écrou du fond du brûleur en fonte.
INSTRUCTION POUR L’ASSEMBLAGE Outils nécessaires : Clé anglaise et tournevis cruciforme Étape 4 – Assemblage du tuyau •• •• MINUTERIE RACCORDEMENT D’EXTENSION DE SÉCURITÉ RESSORT •• •• VENTURI TUYAU OBTURATEUR D’AIR •• Tourner le socle pour le mettre en position verticale et faites le reposer sur les pieds que vous venez d’installer. Placer l’obturateur d’air contre le venturi du brûleur de manière qu’il se positionne au dessus et serve de couvercle.
Étape 6 – Test de fuite de gaz •• Seulement du gaz propane doit être utilisé pour l’utilisation de ce brûleur. Ne jamais employer le gaz naturel. Le brûleur ne fonctionnera pas correctement si vous n’utilisez pas le type de gaz recommandé. •• A chaque fois que le brûleur est attaché à une bonbonne de gaz, vous devez procéder au test de fuite de gaz.
Étape 7 - Allumage du brûleur •• •• •• •• •• •• •• •• •• •• •• •• S’assurer que la vanne de contrôle du régulateur soit fermer. Tourner lentement la vanne de la bonbonne de gaz dans le sens des aiguilles d’une montre jusqu’à ce qu’elle soit ouverte. Pour votre sécurité, il est conseillé d’utiliser une allumette pour gril ou un briquet spécial pour gril. Allumer le brûleur en introduisant une flamme sous le bouclier à vent du brûleur.
Étape 8 – Système d’écoulement rapide •• •• •• •• •• •• Repérer les deux crochets à l’intérieur de la marmite non loin du rebord supérieur. Ces deux crochets sont les crochets du système d’écoulement rapide. Deux trous de formes ovales sont situés sur le panier : Au dessus d’un des trous il est marqué « dinde » et sur l’autre il est marqué « fruits de mer ». Le panier peut se pendre sur les crochets en insérant les crochets d’écoulement rapide à travers l’un des deux trous de forme ovale dans le panier.
Frire des nourritures décongelées (L’huile peut prendre jusqu’à 55 minutes pour atteindre la température désirée) Nourriture Pommes frites Poulet frit Champignons Filets de poissons Dinde entière Ailes de poulet frits Quantité maximum Température Durée 3 livres. (1.36 kilogramme) 400˚F (204˚C) 5-7 minutes 8 morceaux 350˚F (177˚C) 14-18 minutes 2 livres. (0.91 kilogramme) 325˚F (163˚C) 10-12 minutes 2 livres. (0.91 kilogramme) 400˚F (204˚C) 6-8 minutes 10-14 livres. (4.5-6.