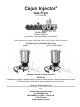
® Cajun Injector Gas Fryer 22174.01708 ® - 09060, 09061 Owner’s Manual Assembly, Care, and Safety Instructions Tool needed for assembly: Adjustable Wrench and Phillips Head Screwdriver All Units are for Outdoor Use Only 22174.01708 & 09061 091311 09060 Keep this manual for future reference WARNING: Combustion by-products produced when using this product contains chemical known to the state of California to cause birth defects, other reproductive harm, or cancer.
If you smell gas: Turn off gas flow to the appliance Extinguish any open flame with a fire extinguisher. Open lid. If odor continues, do not approach the appliance and immediately phone your Fire Department. Never operate this appliance unattended. Never operate this appliance within 10 feet (3.0 meters) of any structure, combustible material or other gas cylinder. Never use this appliance within 25 feet (7.5 m) of any flammable liquids.
COOKING WITH OIL OR GREASE: DO NOT overfill the cooking pot with oil/grease or water. Follow instructions in the manual for establishing proper oil/grease or water levels. DO NOT allow the oil to exceed 400˚F (200˚C); if this happens; adjust the regulator control knob in order to drop temperature. If oil temperature continues to rise or begins to smoke, IMMEDIATELY turn the burner OFF.
DO NOT operate this appliance ON or UNDER any overhead roof covering (car port), as well on or under any awning, overhang, apartment or condominium balcony, or deck. NEVER turn gas on indoors; only ignite this gas appliance outdoors. The gas fryer is not to be used in a building, garage or any other enclosed area. Never place an empty cooking vessel on the gas appliance while in operation. DO NOT use IN or ON recreational vehicles and/or boats.
When lighting your gas fryer, remove all unnecessary parts from cooker and its stand to prevent an explosion caused by gas build up. If burner does not ignite, turn off the regulator control valve, then close at cylinder and wait 5 minutes before trying to ignite it again. If the burner goes out during operation, first turn the regulator off, then shut off the valve at the gas cylinder.
Gas Cylinder Storage, Placement and Filling: Do not store a spare LP-gas cylinder under or near appliance. Never fill the cylinder beyond 80 percent full. Over-filled cylinders can release gas. The gas cylinder safety relief valve may overheat, allowing gas to release causing an intense fire with risk of death or serious injury. If you smell, hear, or see gas escaping immediately move away from the gas cylinder and call the Fire Department for assistance.
LP tank must have: Type 1 outlet compatible with regulator or appliance. Safety Relief Valve. UL listed Overfill Protection Device (OPD). This OPD safety feature is identified by a unique triangular hand wheel. Use only tanks equipped with this type of valve. LP tank must be arranged for vapor withdrawal and include collar to protect LP tank valve. LP (Liquefied Petroleum Gas) LP gas is non toxic, odorless and colorless when produced.
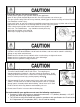
LP Tank Leak Test Only propane gas is intended for use with this burner. Never use natural gas; the burner will not operate properly. Every time your burner is attached to a gas cylinder, the Gas Leak Test must be executed. Anything that can easily ignite, such as matches, lighters, sparks and lit cigarettes must be kept away from burner when performing the Gas Leak Test. Never use a flame to test for gas leaks. Never perform Gas Leak Test indoors.
If instructions or parts are missing, contact BRUCE FOODS CORP.
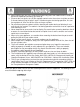
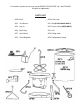
ASSEMBLY INSTRUCTIONS Tools needed: Adjustable Wrench and Phillips Head Screwdriver Step 1 – Securing the Cast Burner to the Base (Burner Mount Bar) Place base (GFK1) upside down on an even surface. The wider ring of the base should be facing downward. Locate the burner mount bar stretching across the narrower ring of the base. Remove the nut from the bottom of the cast burner (GF2). From the bottom side of the burner mount bar, place the cast burner into the groove in the center of the bar.
Step 4 – Hose / Timer Assembly Return the base to the upright position allowing the unit to stand on its newly assembled legs. Carefully insert the timer/valve (GF8) orifice through the center of the narrow end of the burner venturi (GF2) and carefully turn clockwise until tight and secure. Make sure the timer is oriented as shown in the picture below. Step 5 – Flame Safety Connection This unit is equipped with a flame safety device that will shut off the flow of gas if the burner flame goes out.
Step 7 – Checking the Temperature Gauge Heat a pot or pan of water to the boiling point. Insert the tip of the temperature gauge that came with your fryer into the boiling water. Watch the gauge until the needle stabilizes. That should be approximately 212o F (+/- 20o F) (100oC +/10o C). If it does not perform properly, contact Bruce Foods Corp @ 1-(866) 752-6497 to obtain a replacement gauge. Spiders nests or wasps’ mud inside the burner may cause fire at the air damper.
Using water or oil, whichever is required for the cooking method you choose; fill the pot to the Maximum Fill Line. NEVER fill the pot over the Maximum Fill Line to avoid any dangerous mishaps such as boilover’s. NEVER PLACE AN EMPTY POT ON A LIT BURNER. THIS WILL CAUSE SEVERE DAMAGE TO THE POT. Rotating the regulator control valve clockwise and counter-clockwise will bring the contents of your pot to the desired temperature.
Techniques for Successful Preparation of Fried Foods at Homes Often when someone mentions frying foods at home, they are greeted with a chorus of negative comments ranging from messy, greasy, and dangerous to unhealthy. Utilizing the proper equipment and learning the correct methods and procedures, frying can overcome virtually all of these comments. No doubt, breading or battering foods and frying “in oil,” does add caloric content to foods.
Oven Frying Oven frying produces a result that is healthier (usually less oil yet similar to fried foods even though it isn’t a real frying process. Generally food is baked in a hot oven and basted once with a small quantity of fat or cooking spray. As with deep-fried foods, most foods are breaded or battered prior to being baked to seal in the juices and produce a crunchy, crispy crust. Food normally does not require turning and cooks quickly using this high heat (450˚ – 500˚F) method.
Choice of Oil or Fat as a Frying Medium: 1. Your choice of Oil or Fat often depends on the frying technique to be utilized and the projected frying temperature. As an example, when sautéing, oil choice often depends on the flavor to be imparted as butter or bacon grease are often employed. Olive oil is also a good choice if temperatures not over 300˚F are to be employed in sautéing or pan-frying. 2. Health Concerns can determine your choice.
For Gulf Coast Style Seafood Boil 5 lbs. Shrimp * 8 Medium Crabs * 4 lbs. Crawfish * Vegetables 1. Wash Shrimp or seafood in cold water. Confirm crabs and crawfish are alive prior to boiling (crabs and crawfish should be alive at time of cooking). Purge Crawfish in salted water. 2. Place products to be boiled inside the basket. Be sure that water displacement does not exceed the capacity of the boiling pot.
Injectable Marinade Concepts and Utilization Techniques Injectable marinades and brines possess the same characteristics as their counterparts except that they do not require product soaking in order to impart flavor; moisturize, and tenderize. Unlike marinade soaking methodologies that only penetrate about a 1/4 inch into meat surfaces, require long soak times, and contaminate expensive marinades, flavor injection infuses blended flavors deep inside the meat.
Cajun Injector® Deep Fried Turkey Prep Time: 20 minutes Cook Time: 35-45 Minutes Yield: 8 servings Ingredients: 1 Cajun Injector® Propane Fryer 3 Gallons Cajun Injector® Cottonseed Oil 1 10 - 12 Pound Whole Turkey 2 16 oz. jars Cajun Injector® Creole Butter Recipe Marinade 1 8 oz. canister Cajun Injector® Quick Shake® Cajun Shake® Method: Place the outdoor gas burner on level dirt or grassy area. Never fry a turkey indoors, in a garage, or in any structure attached to a building.
Original Louisiana Habanero Fried Chicken Prep time: 20 minutes Marinate time: 4 hours Cook time: 30 minutes Yield: 8 servings Ingredients: Cajun Injector® Cottonseed oil, for deep-frying 1 Quart Buttermilk, Plus 2 Cups 2 tbsps. Cajun Injector® Quick Shake® Cajun Shake® seasoning 2 tbsps. Louisiana Brand Hot Sauce 2 tsps. Louisiana Brand Habanero Sauce 2 Chicken (3 to 4 pounds each), Each Cut up into 8 Pieces 4 cups All-Purpose Flour 1 tbsp. Garlic Powder 1 tbsp. Onion Powder 1 tbsp. Sweet Paprika 2 tsps.
Cajun Injector® Fried Catfish Prep time: 10-15 minutes Cook time: 3-5 minutes Yield: 3-4 lbs. of fish Ingredients: Cajun Injector® Cottonseed Oil 1 package Cajun Injector® Seasoned Fish Fry Mix Method: Preheat oil to 350˚F. Dip Fish into a bowl of cold water. Shake off excess water. Roll Fish in 10 ounces of the Cajun Injector Seasoned Fish Fry Mix. Deep fry at 350˚F until golden brown.
Louisiana Wildly Wicked Buffalo Catfish Wrap Prep Time: 10 minutes Cook Time: 7 minutes Yield: 5 wraps Ingredients: 1 lb. Catfish Fillets (USA raised) 1 (8 oz.) bag Cajun Injector® Chicken Fry Mix 1 Diced Tomato 1/2 cup Louisiana Brand Wildly Wicked Wing Sauce 1 Package (8 inch) Flour Tortillas 1 lb. Cole Slaw (recipe follows) 2 cups Cottonseed Oil, for Frying Method: Preheat oil to 400˚F in electric fryer, or 350˚F in propane fryer.
Bruce’s® Tempura Battered Smoked Soft-shell Crab Prep time: 10 minutes Cook time: 35 minutes Yield: 6 crabs Ingredients: 6 Soft-shell Crabs 2 Packages Bruce’s® Sweet Potato Pancake Mix 1 cup Seltzer Water Cajun Injector® Quick Shake® Cajun Shake® 1 qt. Cottonseed Oil for Frying Method: Smoke the soft-shell crab for 30 minutes at 165°F degrees with pecan wood pellets. In a mixing bowl, combine pancake mix and seltzer water to make a batter.
Cajun Injector® Chicken Fried Caribou Steak Prep Time: 10 minutes Cook Time: 15 Minutes Marinade Time: 1-2 hours Yield: 4 servings Ingredients: 4 1 1 1 tbsp. 2 tbsps. (4 oz.) Caribou Cubed Steaks (16 oz.) jar Cajun Injector® Creole Butter Recipe Marinade (10 oz.) packet of Cajun Injector® Chicken Fry Mix Cajun Injector® Quick Shake® Cajun Shake® “Original” Louisiana Brand Hot Sauce Cajun Injector® Cottonseed Oil Method: Preheat oil to 400˚F in electric fryer, or 350˚F in propane fryer.
Louisiana Wildly Wicked Boneless Buffalo Wings Prep Time: 10 minutes Cook Time: 7 minutes Yield: 1 lb. Ingredients: 1 lb. 1 bag 1/2 cup 1/2 cup 1/2 cup 10 Cajun Injector® Cottonseed Oil Boneless, Skinless Chicken Breast Cajun Injector® Chicken Fry Mix Louisiana Brand Wildly Wicked Wing Sauce Ranch dressing Blue Cheese dressing Celery Stalks Method: Preheat oil to 400˚F in electric fryer, or 350˚F in propane fryer.
Fried Cornish Hens Prep time: 15 minutes Cook time: 16-20 minutes Yield: 4 servings Ingredients: 2 6 oz. Cajun Injector® Cottonseed Oil Whole Cornish Hens Cajun Injector® Creole Butter Recipe Marinade Cajun Injector® Quick Shake® Cajun Shake® seasoning Method: Preheat oil to 400˚F in electric fryer, or 350˚F in propane fryer. Prepare Cornish hens while oil is heating. Remove giblets and rinse Cornish hens with warm water. Drain cavity completely.
LIMITED WARRANTY The manufacturer warrants its products to be free from defects in material and workmanship under proper assembly, normal use and care for a period of 90 days from the date of original retail purchase. This warranty does not cover loss of paint finishes due to normal wear and tear or burn off during normal use. This warranty does not cover physical or cosmetic damage due to rust on the unit. Reasonable proof of purchase is required for warranty claims. Original receipt should be retained.